Introduction
The phoenixNAP Bare Metal Cloud offers unrestricted hardware-level access to compute and storage resources. With the intuitive UI, the Bare Metal Cloud portal allows for near-instant server deployment without compromises.
This quick start guide takes you through all the BMC Portal sections where you can buy and manage BMC servers and Kubernetes Klusters, create and manage storage, networks, and IPs, view billing reports, and more.
Follow the links throughout the article to learn more about a specific Bare Metal Cloud feature within the Portal.
Prerequisites
- BMC or PNCP portal credentials. If you are a new client, create an account for Bare Metal Cloud.
How to Access the BMC Portal
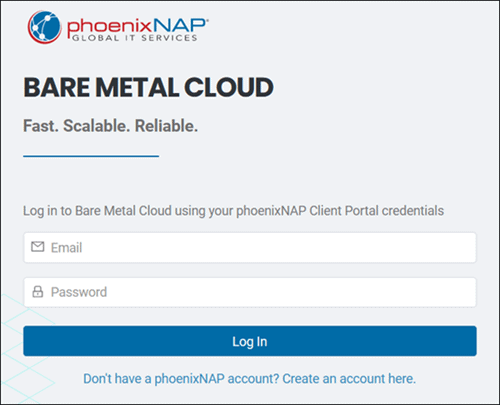
To log in to the Bare Metal Cloud portal, navigate to https://bmc.phoenixnap.com and enter your credentials.
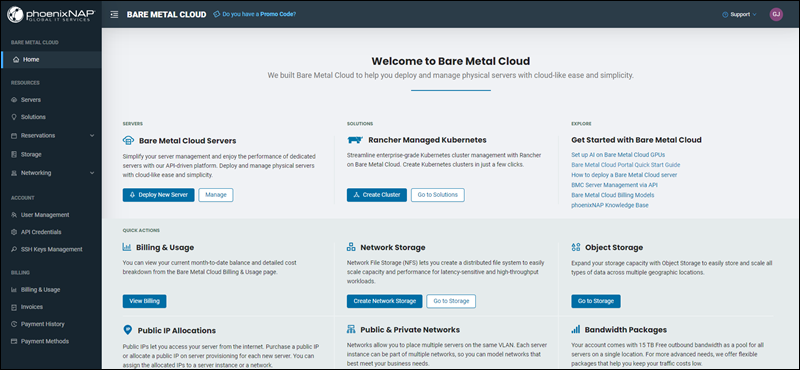
Once you log in, you are taken to the Home page with quick links to all the BMC features.
Servers
The Servers section shows a table with a list of deployed BMC servers and columns with relevant location, OS, billing, status, and configuration details. The IP address column shows a server's public IP address if available. Otherwise, a private IP is shown.
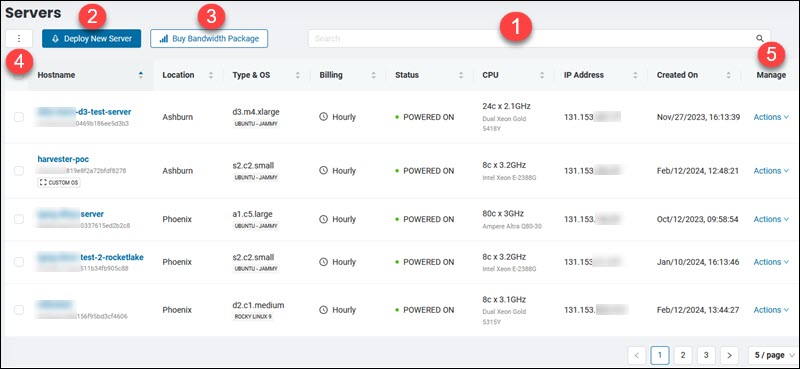
1. Use the instant search bar to refine the search if you have many server instances.
2. The Deploy New Server button takes you to the server creation page.
3. The Buy Bandwidth Package button takes you to the bandwidth order page. The button is visible only if you do not have a bandwidth package on the locations where reserved instances are deployed.
4. Use the bulk action button to perform multiple actions on the selected servers.
5. The Manage column contains the Actions menu with various server functions.
Click the column names to sort the servers.
Deploy New Server
To create a new Bare Metal Cloud server, select the Deploy New Server button from the Home or Servers page.
When the form loads, follow the steps below to create a new server.
Note: For more details, visit the How to Deploy a Bare Metal Cloud Server guide.
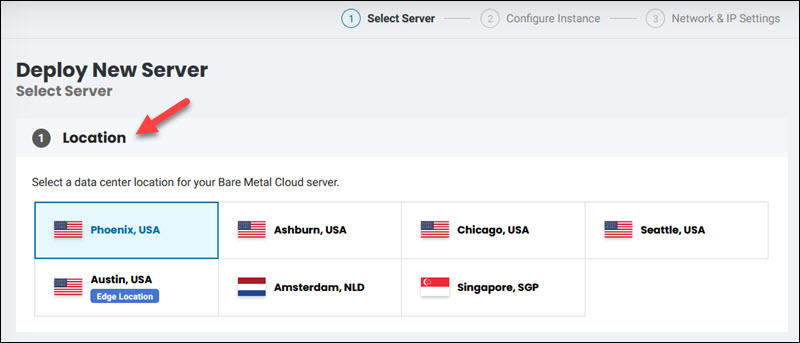
1. Select a location where to deploy your new BMC server.
2. Choose a billing model:
- Hourly. Billed by the hour. Suitable for short-term projects, instant test environments, etc.
- Reservation. Reserve a server for a longer period and ensure resource availability. Longer reservations bring larger discounts. Auto-renew is turned on by default for one-month reservations.
Note: Read our BMC billing models guide to learn more about the available billing methods.
3. Select a server from the pool of single or dual CPU instances. Use the tabs to refine the list. If a server is not available for the selected data center, click Available Locations to choose an alternative location. Use the toggle to show all immediately available instances.
4. Choose an operating system. Windows Server editions and Netris are charged extra. Click Next.
5. Enter a unique hostname and description. No spaces are allowed.
6. (Optional) The Remote Desktop and other remote access options appear if you previously selected Windows, ESXi, or Proxmox. The admin/root password appears once you click the Deploy New Server button at the end of the process. Copy the credentials and store them safely.
If you choose to deploy Netris Softgate, the section with Softgate configuration appears.
Read our How to Access BMC Windows Server and the Remote Console guides to learn more about accessing your servers.
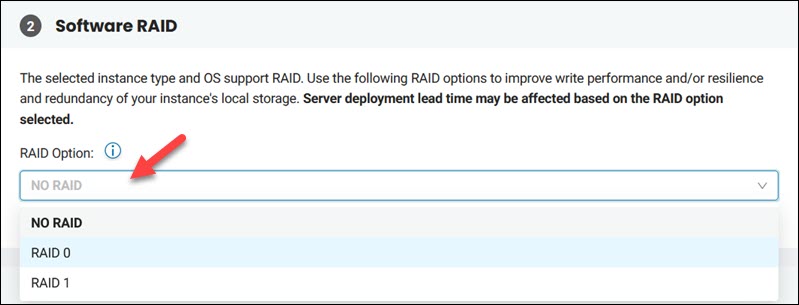
7. (Optional) Ubuntu and Virtuozo OS enable choosing the Software RAID setup because they have two drives. Choose between NO RAID, RAID 0, or RAID 1 from the dropdown menu.
8. (Optional) The Root Partition option enables changing the default root partition size on the server. Enter a value between 30 GB and the maximum disk size. Leave the field blank to use all available disk space for the root partition.
9. Select a Public SSH Key from the list in the first field if you added one previously. Otherwise, use the + Add a new Public SSH Key button to add a key in the dedicated field. You must add at least one public SSH key to enable access to your server.

Read How to Enable SSH on ESXi if you chose VMware ESXi OS for your server.
10. Assign or purchase a public IP allocation for the server if you want to access it using public networks.
11. Optionally, select a public or private network to which you want to add the server. Skip the network steps if you do not want to add a server to another network.
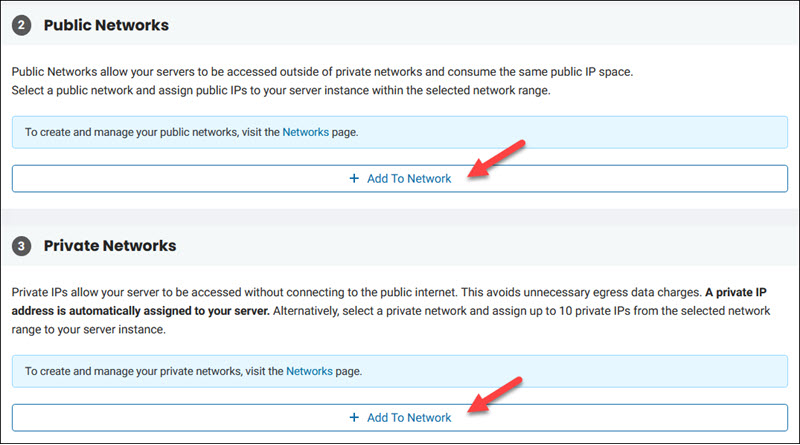
12. The gateway step appears if you assign a server to another network. Enter the gateway IP address from one of the specified IP ranges or leave the field blank for the BMC default gateway IP.
Note: When you choose a Linux-based OS, the Cloud Init feature is available on the Instance Details page. Refer to our Cloud Init article to learn how to add user-data to the cloud-init configuration.
13. Review the configuration and select Deploy New Server using either of the two buttons. If you allowed remote access to your server, a pop-up window with credentials will appear.
The server creation process takes from one to fifteen minutes, depending on the OS you selected. Follow the status on the Server page.
Note: The default maximum number of server instances in use for new BMC accounts is five. Please contact Sales if you need additional resources.
Server Manage Actions
Once you deploy your server, it appears on the server list.
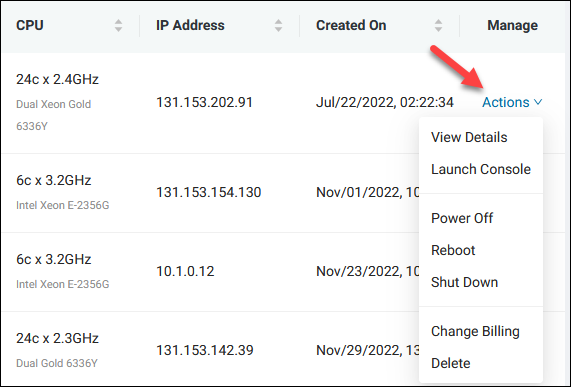
To view the available actions, locate the row for your server and click Actions in the Manage column.
View Server Details
The View Details link takes you to the Server Details page. Clicking a hostname shows the same page. The Actions button is also available here, so you do not need to navigate back to the server list.
All the information about your server is in the Instance Details and Network & IP Settings tabs.
Instance Details
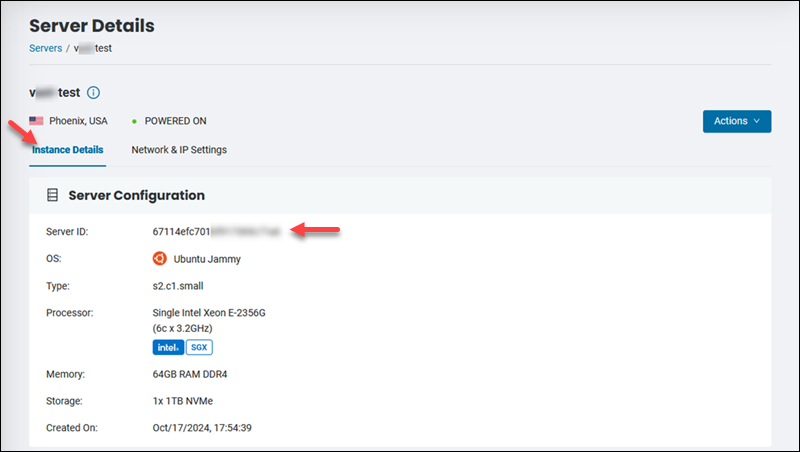
This screen contains the server configuration details. Note the server ID if you want to use the BMC API.
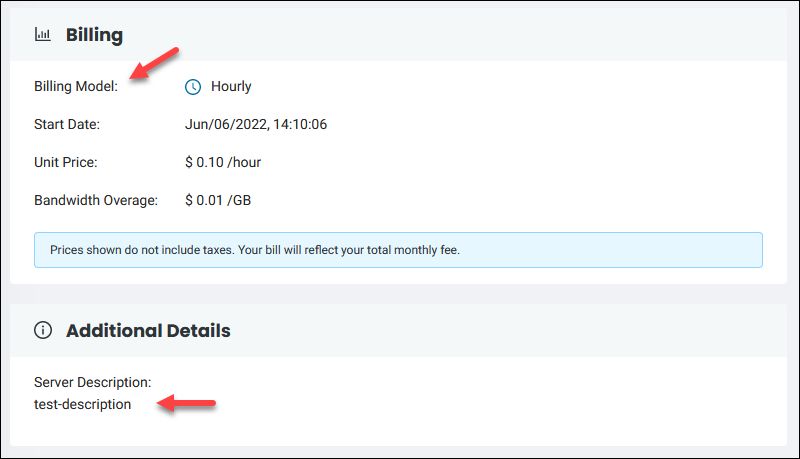
The billing part shows the pricing for your server without tax. The Additional Details section at the bottom of the page shows the description you entered during server deployment.
Network & IP Settings
This tab contains all networking-related details, such as bandwidth and public IP allocations.
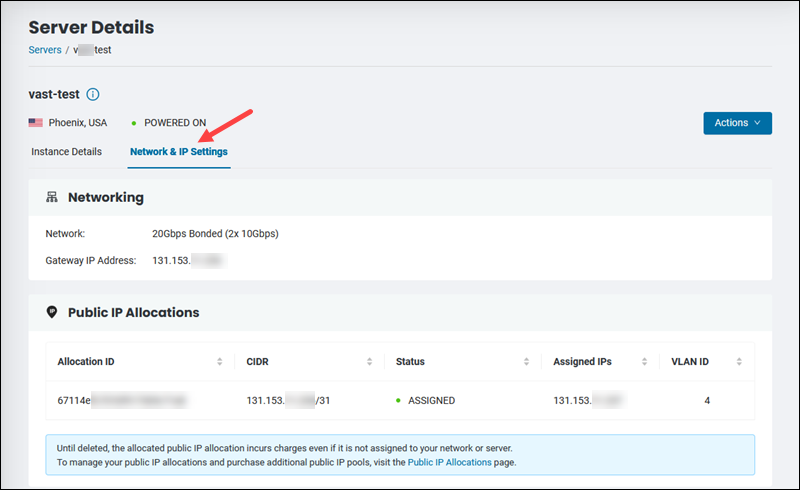
Scroll down to view the Public Networks & IPs section to view the IP addresses assigned to your server. Use one of the listed public IP addresses for remote access.
The Private Networks & IPs section is at the bottom of the page, where you can find all the relevant details.

Clicking a network name takes you to the network details page.
Launch Console
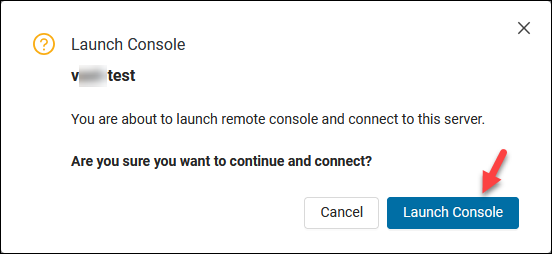
To load the web-based remote console, select the Launch Console option under the Actions menu for the server you want to connect to.
Click the Launch Console button to launch the console in a new window.
Note: Make sure to disable the pop-up blocker for https://bmc.phoenixnap.com to load the web console.
For Linux-based servers, you must create a user with a password to access the server using the remote console. To learn how to use this functionality, refer to the BMC Remote Console guide.
Power Off Server
To cut power to the server, select Power Off under the Actions menu. Save your work before you proceed.
Confirm by clicking the Power Off Server button.
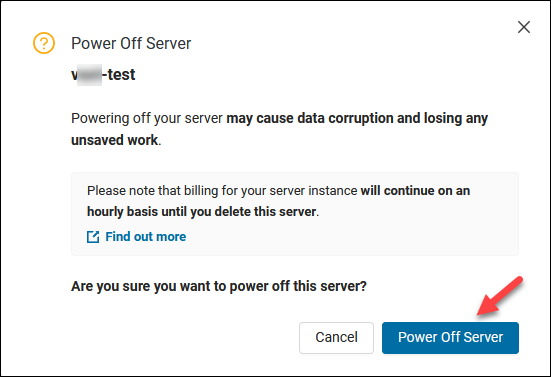
Note: Please save any unsaved work to prevent data corruption. The billing is active for powered-off servers.
Reboot Server
To close all processes and restart the server, select Reboot under the Actions menu. Save your work before you proceed.
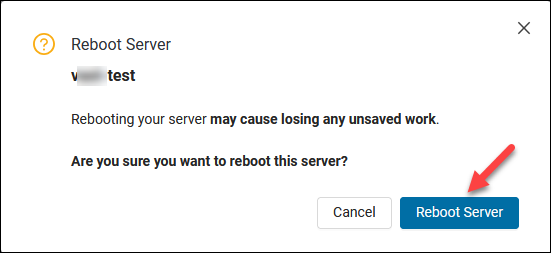
The status shows "Rebooting Server" until the server boots back up.
Shut Down Server
Select Shut Down under the Actions menu to perform an OS-level shutdown without cutting the server's power.
Confirm the selection by clicking the Shut Down Server button.
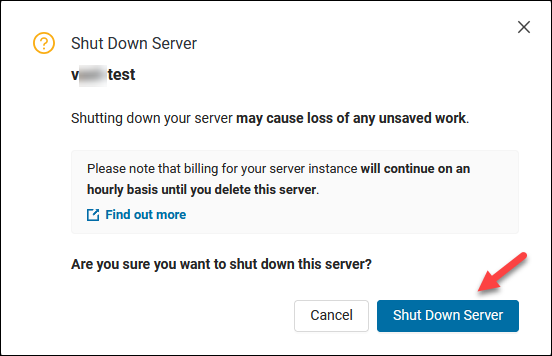
The billing continues to be active when you shut down the server.
Change Billing
To change the billing model for your server, select the Change Billing option under the Actions menu. You can only upgrade to a longer-term reservation.
For 12-month periods and longer, you must agree to the MSA.
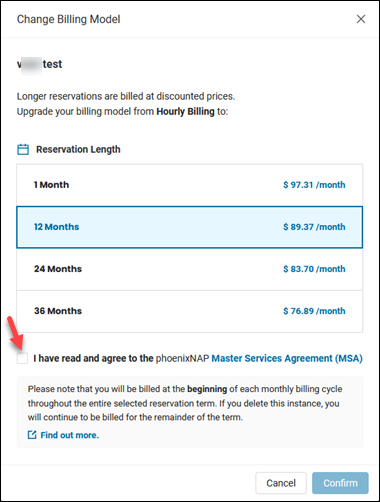
Click Confirm when you are ready to change the billing model.
Delete Server
To remove a BMC server from your account, select Delete under the Actions menu. As a safety measure, you must enter the hostname before clicking the Delete Server button.
This action cannot be undone, and you will lose all your data and settings. Select if you want to keep the public IP allocation for servers that have them.
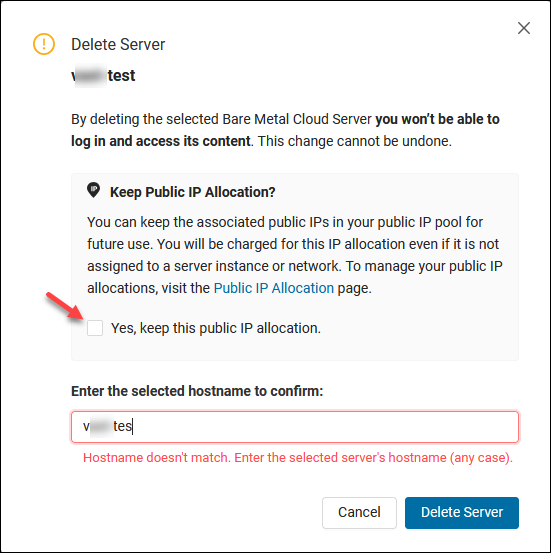
Note: Deleting a server only stops billing for hourly-based instances. If you have a reserved instance, billing remains active until the expiration date. If you keep the public IP block, you will be charged even if it is not assigned to an instance.
Solutions
The Solutions tab lets you create and manage Kubernetes clusters. The Rancher integration with Bare Metal Cloud brings all the standard Rancher options to your server.
Navigate to the Solutions section to start working on your Kubernetes environment.
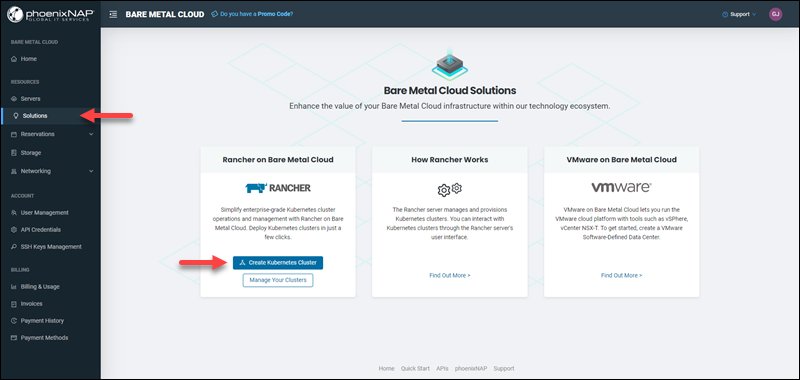
Click the Create Kubernetes Cluster button to get started. The process is seamless and intuitive. Refer to our guide to learn how to create a Rancher-controlled Kubernetes management cluster.
If you want to deploy a workload cluster directly from the portal, read how to set up a Rancher management cluster with a workload cluster.
To create, view, and manage your Kubernetes clusters, click the Manage Your Clusters link. The dashboard shows all cluster-related information:
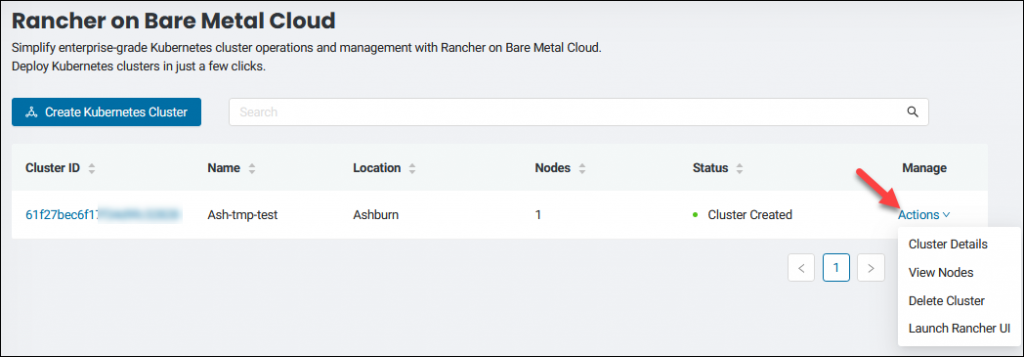
The Actions menu lets you view cluster details, view nodes, delete a cluster, and launch Rancher UI.
Reservations
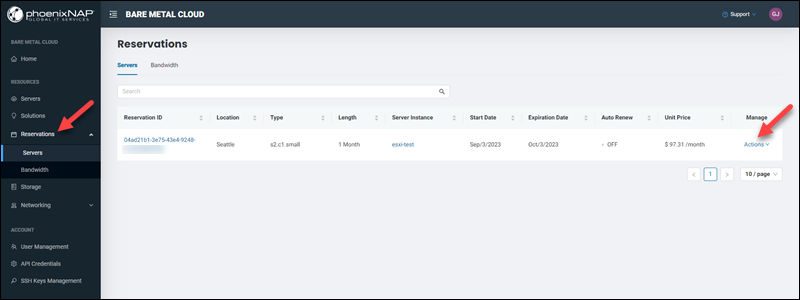
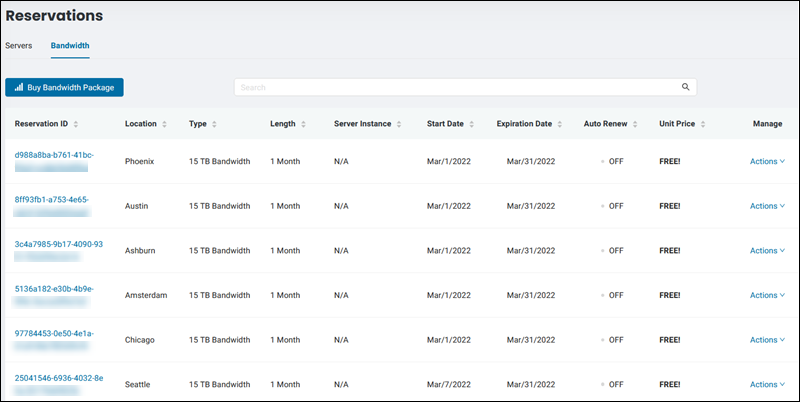
The Reservation page lets you view and manage your server and bandwidth reservations. The list provides the necessary information, such as instance configuration and location details, start and expiration date, auto-renew status, and unit price.
The server manage column has the Actions link where you can view reservation details, disable or enable auto-renew, and deploy a new server.
The bandwidth table lets you view bandwidth details, change bandwidth, and disable or enable auto-renew.
Click a column name to change the sorting in the table.
Server Reservations
To view and manage server reservations, navigate to the Reservations page and select the Servers tab.
View Server Reservation Details
To view server reservation details:
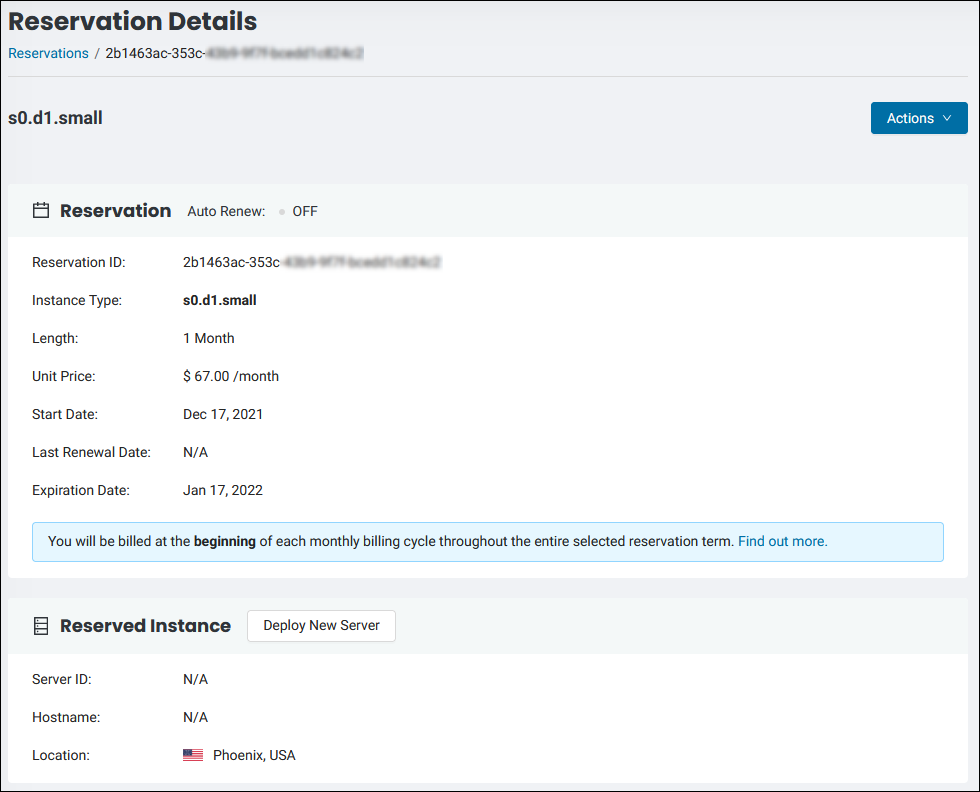
1. Locate the server reservation you want to view and click Actions under the Manage column.
2. Select View Details to view the available information. The screen shows all the pricing details for your reservation.
Disable Auto Renew
One-month server reservations have the auto-renew option enabled by default. To disable the auto-renew option:
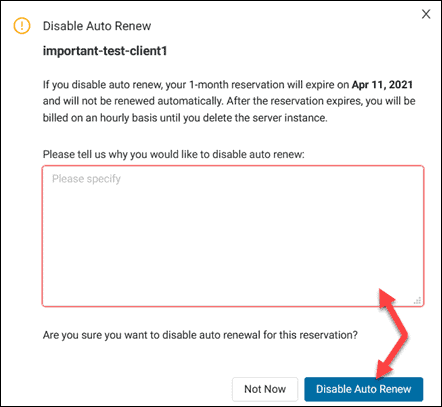
1. Click Actions and select Disable Auto Renew for the server instance you want.
2. Add the cancellation reason and click Disable Auto Renew when ready. The reservation remains active until the expiration date. Then, the reservation switches to the hourly billing model until you delete the server.
Enable Auto Renew
You can enable auto-renew until the reservation's expiration date.
To enable the auto-renew option:
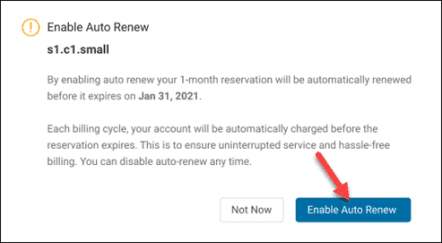
1. Click Actions and select Enable Auto Renew for your desired instance.
2. Read the information and click the Enable Auto Renew button. This option allows uninterrupted service.
Deploy a New Server Using an Existing Reservation
To reuse a reservation and create a BMC server with the same configuration:
1. Navigate to the Reservations screen.
2. Select the Servers tab.
3. Locate the reservation and select Deploy New Server under the Actions menu.
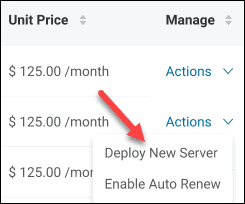
4. Complete the OS, hostname, and network steps to create a new BMC server using an existing reservation.
Bandwidth Reservations
To buy, view, and manage bandwidth reservations, navigate to the Reservations->Bandwidth page.
Buy Bandwidth Package
To benefit from cheaper rates, buy a bandwidth package instead of being charged at a regular rate. The packages you purchase are tied to one account, and bandwidth can be shared across servers in the same data center.
To buy a bandwidth package:
1. Navigate to either the Reservations -> Bandwidth or Servers page.
2. Click the Buy Bandwidth Package button.
Note: The Buy Bandwidth Package button is visible only if you do not have a bandwidth package reservation on locations where you deployed the servers.
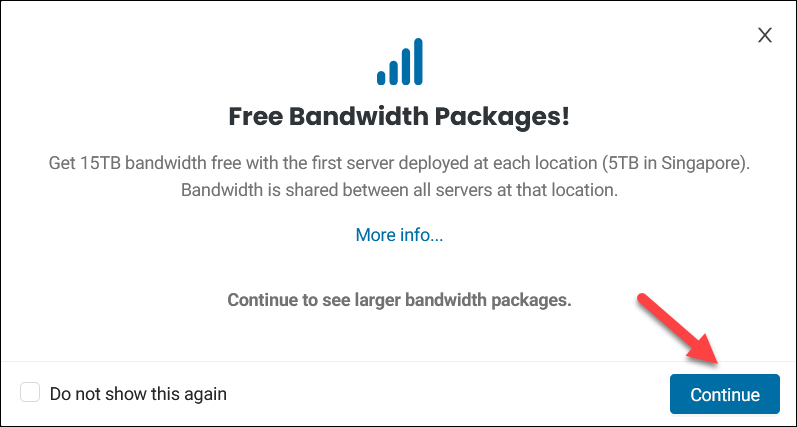
You get 15TB free of charge with the first server you deploy at each location. Click Continue to close the message box.
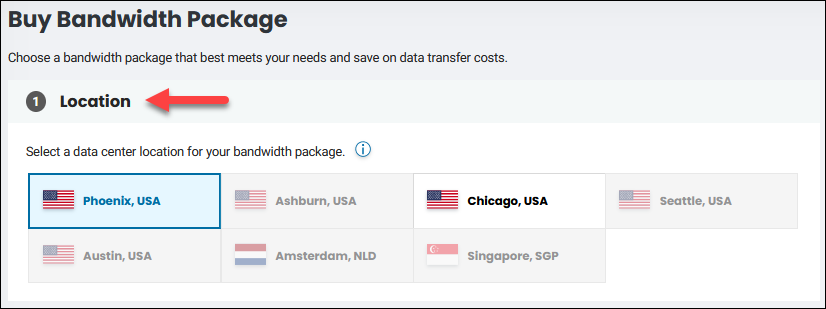
3. Select a data center location. You can only purchase one package per location. Only the locations where you have a server deployed are available.
4. Choose a preferred billing model. Savings are greater for longer terms. The auto-renew option is enabled by default for one-month bandwidth reservations. If you select 12 months or longer, you must agree to the terms and conditions.

5. Select a bandwidth package ranging from 30 TB to 3000 TB per month. When you get 15TB free for your first server, the price will be deducted from the package you select.
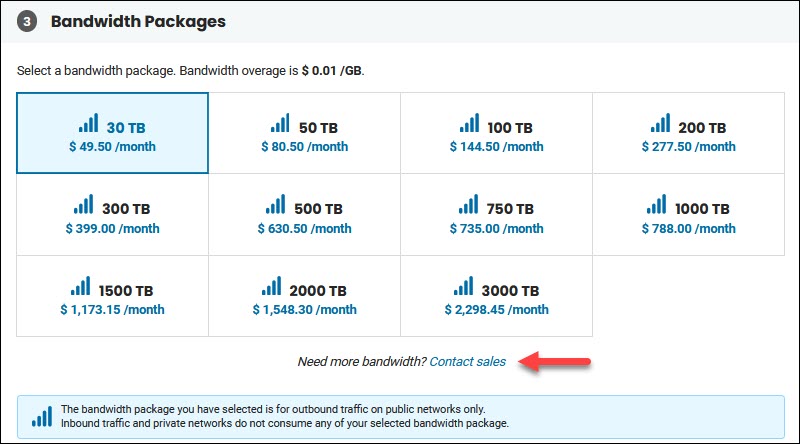
If you need a larger package, click the contact sales link to start a live chat session. Any bandwidth used over the package you purchased is charged at the price for the selected location.
6. Review the package summary, especially the notes in blue.
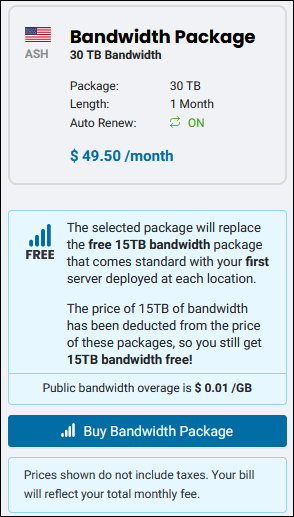
7. Click Buy Bandwidth Package to confirm the purchase.
The bandwidth packages you purchased are listed in the Bandwidth tab.
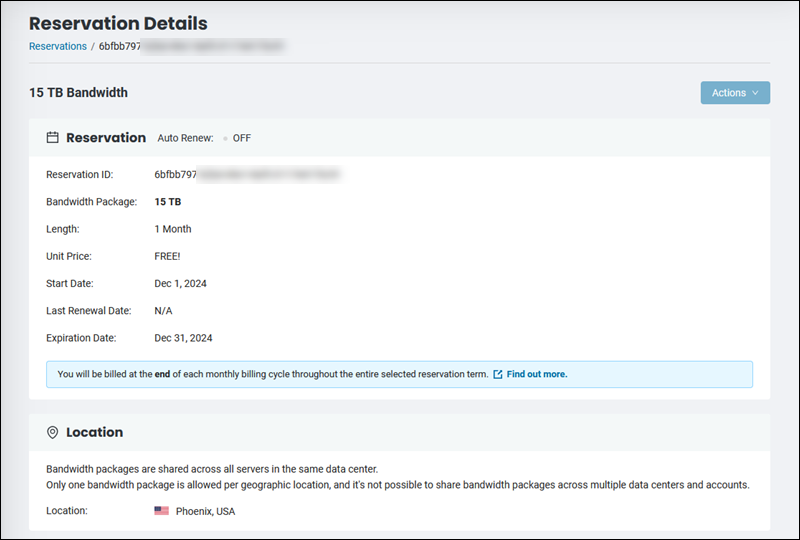
View Bandwidth Reservation Details
To view bandwidth reservation details:
1. Locate the bandwidth reservation you want to view and click Actions under the Manage column.
2. Select View Details to view the available information. The screen shows all the bandwidth pricing details for your reservation.
Change Bandwidth
1. Locate the bandwidth reservation you want to change and click Actions under the Manage column.
2. Select Change Bandwidth to upgrade the package.
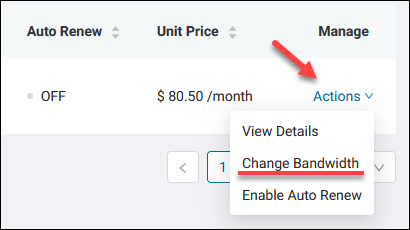
3. Select a longer reservation length and/or a larger bandwidth package.
4. Click the Change Bandwidth Package button. The button is available only when you make a change.
Note: Downgrading the bandwidth reservation length or package is not possible.
Disable Bandwidth Auto Renew
One-month bandwidth reservations have the auto-renew option enabled by default.
To disable the auto-renew option:
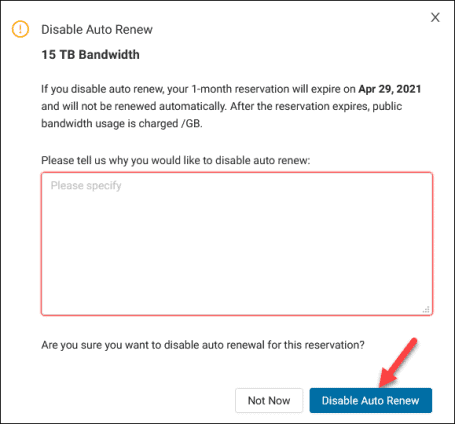
1. Click Actions and select Disable Auto Renew for the bandwidth package you want.
2. Add the cancellation reason and click Disable Auto Renew when ready. The reservation remains active until the expiration date. Then, you will be charged per GB at the standard rate for the data center location.
Enable Bandwidth Auto Renew
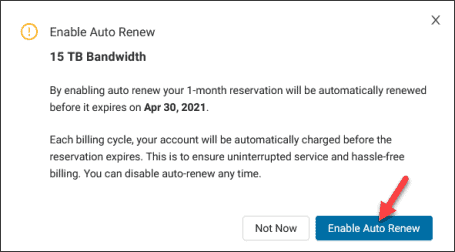
You can enable auto-renew until the reservation’s expiration date. To reenable the bandwidth auto-renew option:
1. Click Actions and select Enable Auto Renew for the bandwidth package you want.
2. Read the information and click the Enable Auto Renew button. By enabling auto-renew, you avoid higher costs if you forget to renew the package manually.
Storage
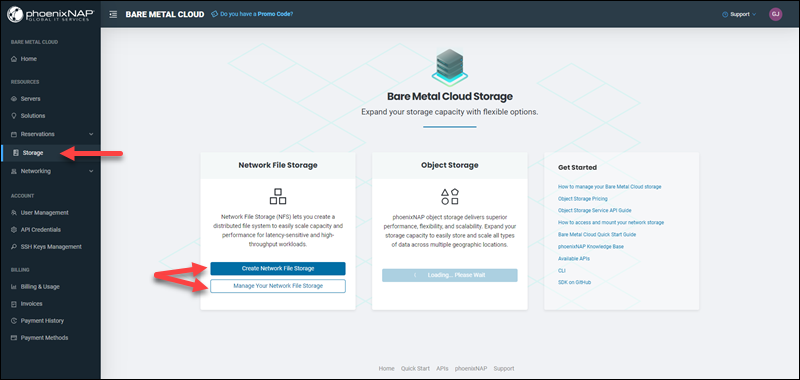
The Storage page lets you expand your BMC network storage. This feature allows you to increase storage capacity on demand.
Navigate to the Storage page to create a network file storage. If storage exists, the Manage Your Network File Storage button also shows.
Create Network File Storage
Click the Create Network File Storage button to start the creation process.
1. Choose the data center location for the network file storage.
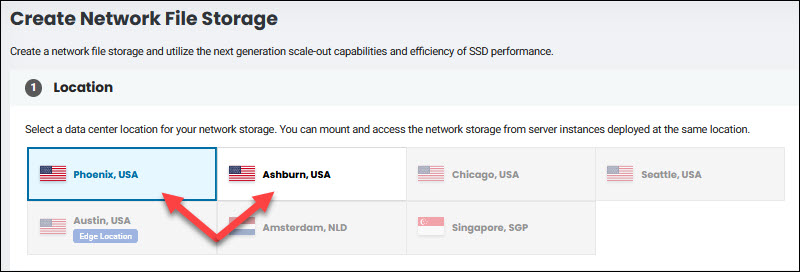
The network storage creates a private network. The storage and servers in the network must have a matching location.
Note: If you have reached the maximum number of networks, you cannot create network file storage.
2. Enter a name in the Storage Name field. Open the Add Description dropdown and add an optional description.
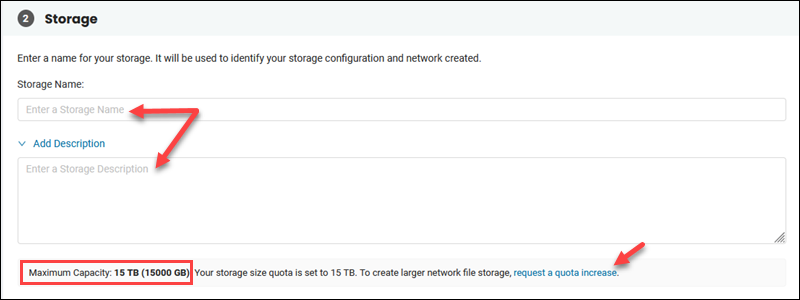
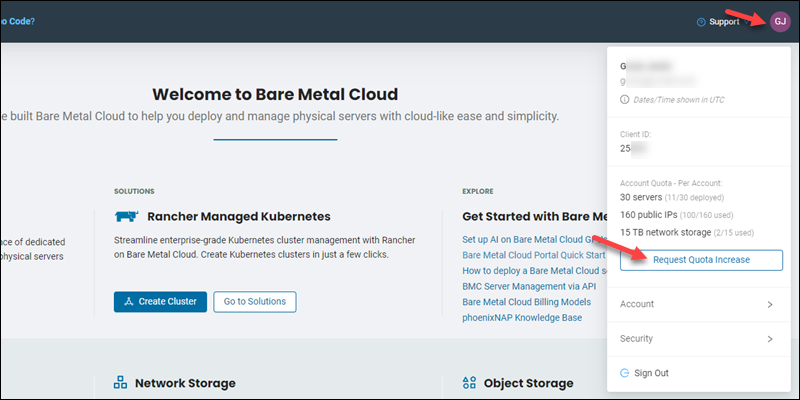
The end of the Storage section shows the maximum capacity in TB and GB. You can request an increase in quota by clicking the link, which is also available from the profile menu.
3. Enter a Volume Name to help identify the storage volume.
4. Add a Path Suffix. The suffix represents a custom part of the volume path and helps identify a volume. The path suffix is optional but recommended. The Add Description dropdown allows adding an optional description for the volume.
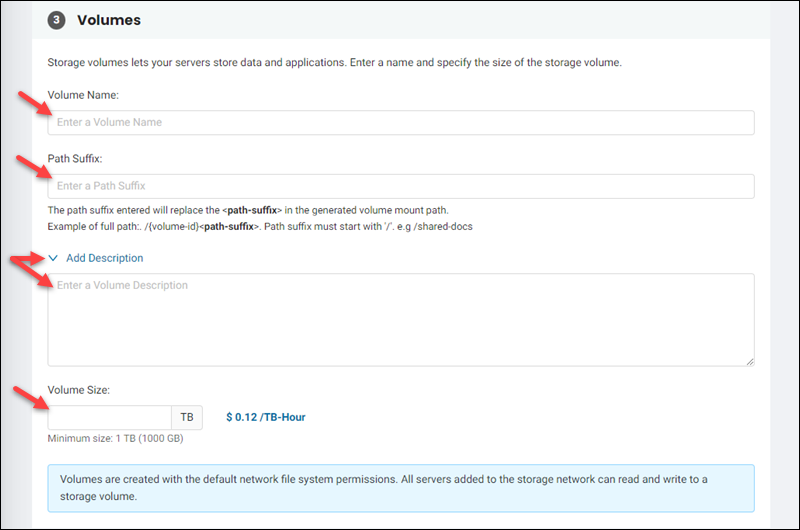
5. Set the Volume Size in TB. The size cannot exceed the maximum capacity stated in the Storage section. The price per TB-hour is next to the volume size. For more information, refer to the BMC billing models article.
6. Review the network file storage in the summary box. When ready to complete the process, click Create Network File Storage.
The network storage list loads. The Status column displays the state of the network file storage.

When done, the status changes to READY. If the status is ERROR, repeat the process or contact support for further assistance.
View Network Storage Details
To see the details of network storage:
1. Go to Storage -> Manage Your Network File Storage. The page shows brief details about your storage.
2. Locate the network file storage for which you want to view the details.
3. To view more details, click Actions -> Storage Details.
The storage details page loads with the Storage Info and Volumes tabs.

Storage Info
The Storage Info tab shows the network file storage configuration details. Note the Storage ID in the Storage Configuration section to manage the storage via API.
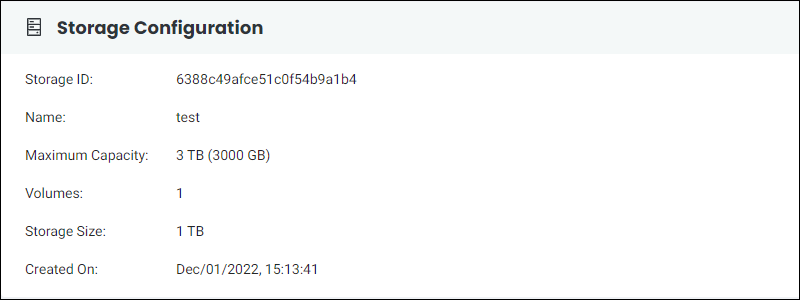
The Storage Network section shows the storage network details. Click the Private Networks link to access the Private Networks page. To use NFS, remove or add servers to the storage network.
The Billing section shows the billing model and prices without tax.

Volumes
The Volumes tab shows the volume details. Note the Volume ID to manage the volume via API.

The Manage column contains actions to edit or delete the volume, and the link to the mount command for Linux-based servers. For more details on how to mount the volume, visit the Bare Metal Cloud Storage Management page.
Note: To update the volume name, description, capacity, or path suffix, use the Network Storage API PATCH method. For more details, visit the Network Storage API VolumeUpdate documentation page.
Delete Network File Storage
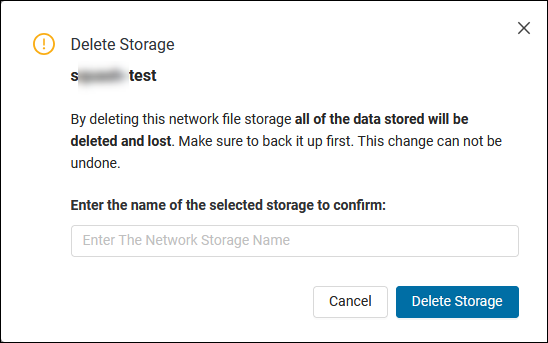
Deleting a network file storage deletes the storage network and all its data. Before deleting the storage, remove all servers residing on the network.
Warning: Before deleting the NFS, backup all critical data.
To delete a network file storage, do the following:
1. Go to Storage -> Manage Your Network File Storage.
2. Find the network file storage on the list.
3. Click Actions -> Delete Storage.
4. Enter the storage name to confirm deletion and click Delete Storage.
Networking
The Networking section allows you to have control over your BMC public and private networks, as well as public IP allocations. Use this feature to create, manage, view networks, and buy and manage public IP allocations.
Networks
The Networks section lets you create and manage public and private networks and add servers to them. Use the Private or Public tab to view the list of available networks and create new and edit existing networks.
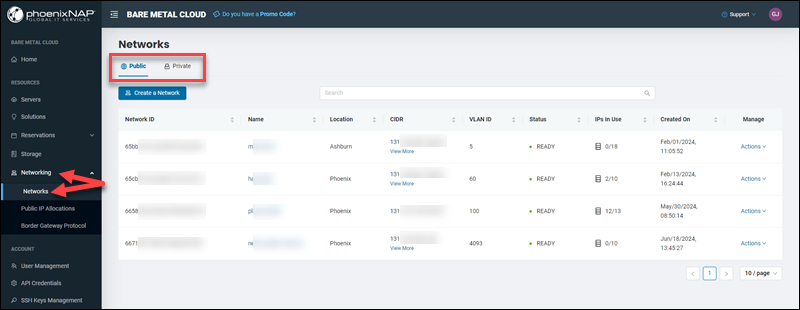
The table shows previously created networks, their network ID, name, location, CIDR, VLAN ID, IPs in use, and the creation date. The table for private networks has the column "Default" to show if a private network is the default network for the location.
Note: The maximum number of both public and private networks for a location is 15.
Create a Network
Click the Create a Network button in the Networks section to create a network. This action takes you to the network creation page, which has three steps.
1. Choose a network location.
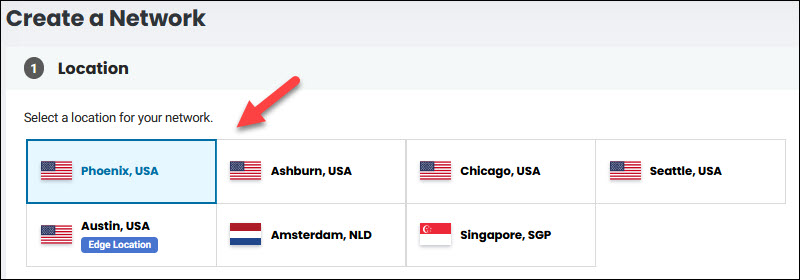
Note: When creating a public network, the location selection impacts the number of available public IP blocks in step 3. The configuration summary box on the right side of the screen shows if the location does not have available public IPs.
2. Select the network type. The wizard preselects the public or private network type depending on where you click the Create a Network button.
Specify the network name and add an optional description.
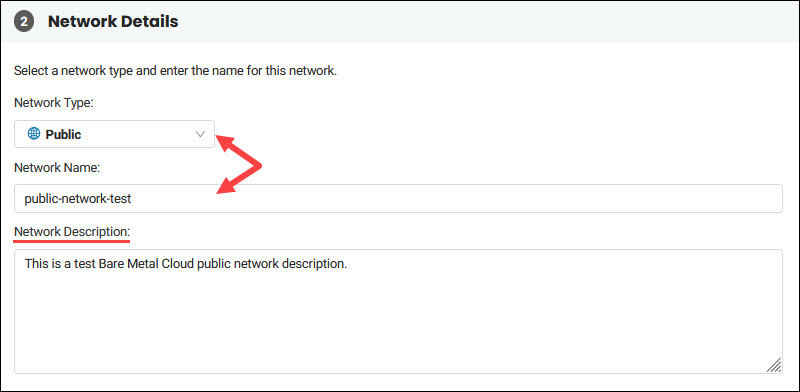
For private networks, choose if you want to set it as default by selecting Set this network as default for all servers you will deploy in the selected location.
3. Enter a VLAN ID or leave the field blank, and the system will assign it.

4. This step shows different settings depending on the selected network type.
When creating a public network:
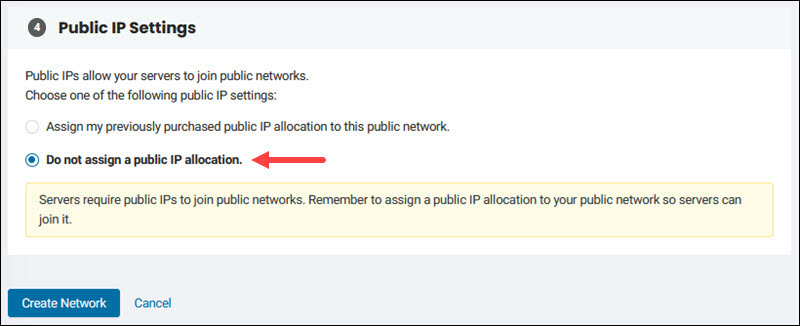
Specify public IP settings.
- Choose Assign my previously purchased public IP allocation to this public network to allow servers to join the public network. Click the field to see and select the available IP blocks. You can choose, paste, or type in up to 10 IP blocks.
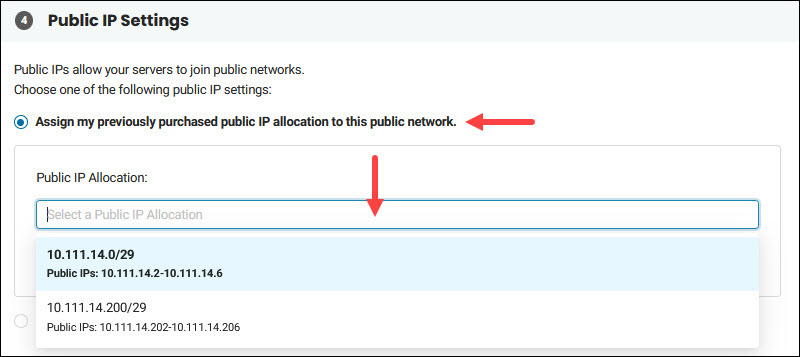
Note: The list shows the public IP blocks based on the location and status. If an IP block is not listed, it is either already assigned or purchased for another location.
- If you do not have IP blocks available for the selected location and have not purchased any public IP blocks, the Buy a public IP allocation for your network option appears. Click the Public IP Allocations link to purchase an IP block.
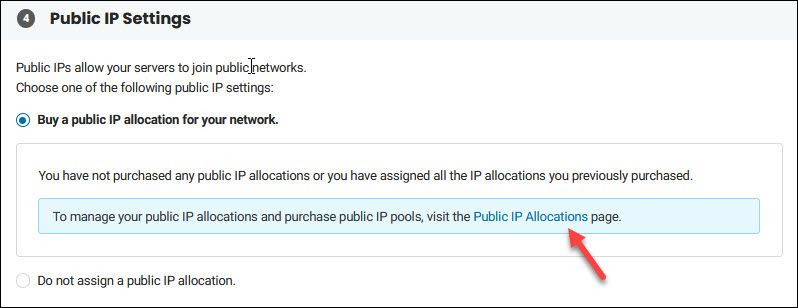
- Choose Do not assign a public IP allocation if you want to assign a public IP block later.
When creating a private network:
Specify Private Network Settings in step 3. Enter a network CIDR size between /31 and /22.
For example, 10.0.0.0/24.

Finally, review the network configuration summary on the right side and click Create Network when ready.
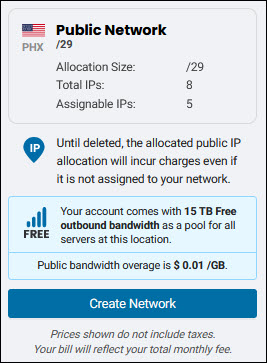
The confirmation message shows if the process is successful. The network appears on the list.
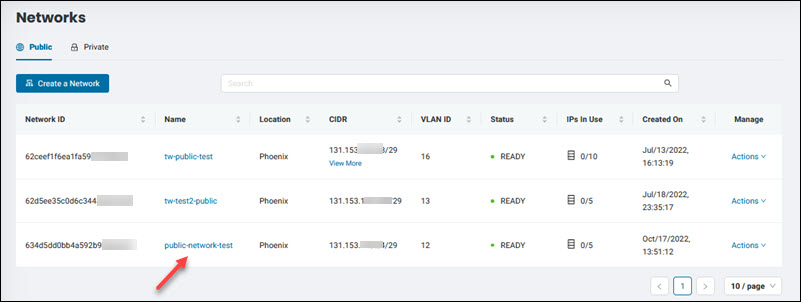
Click View More to view all IPs in use for the selected network.
View Network Details
To view details of a network:
1. Navigate to the Networking -> Networks page and choose Public or Private.
2. Locate the network for which you want to view the details.
3. Click the network name or select Actions -> View Details.
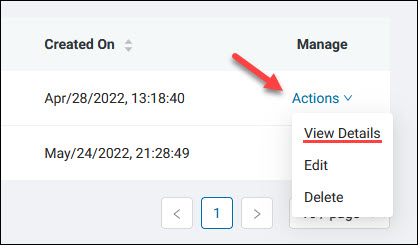
The page with network details loads. There are Network Info and Server in the Network tabs.
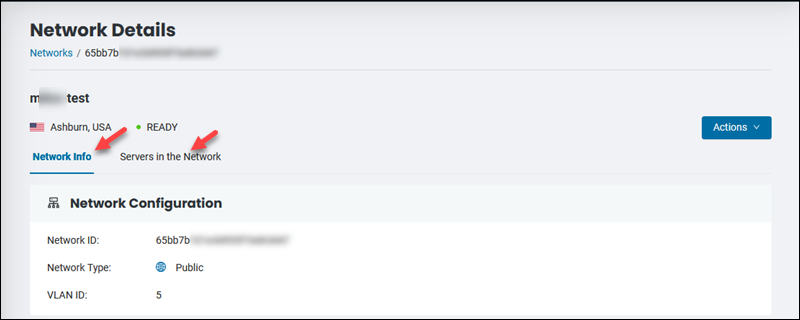
Network Info
The Network Info tab for public networks shows the following sections:
- Network configuration. Displays the network ID, type, and VLAN. Note the ID of your network if you want to use the API to manage the network.
- Public IP Allocations. View the assigned IP blocks and unassign them. Select the Assign Public IP Allocation button and choose the available IP blocks to assign them to the network.
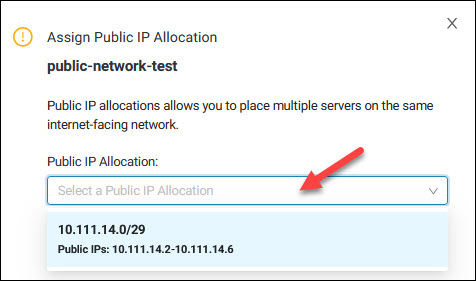
- Additional details. This section appears if you entered a description during the network creation.
The Network Info tab for private networks displays:
- Network configuration. Shows the network ID, type, VLAN, and if the network is set as default. Note the ID of your network if you want to use the API to manage the network.
- Network CIDR. Shows the set CIDR and IP range.
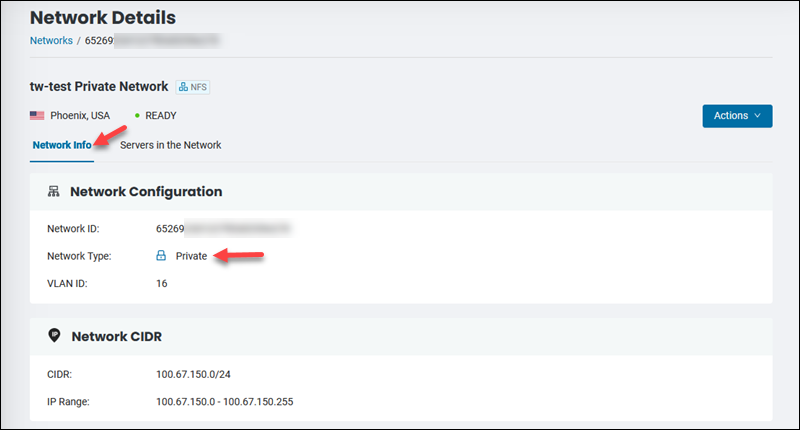
The Actions button lets you edit or delete a network.
Servers in the Network
This tab lists all the servers assigned to the network in question, along with the basic information. Use the search bar to find a server quickly.
Click a server's name to view its details. Use the Remove link to remove a server.
To add more servers to a public or private network:
1. Select the Add Server to Network button.
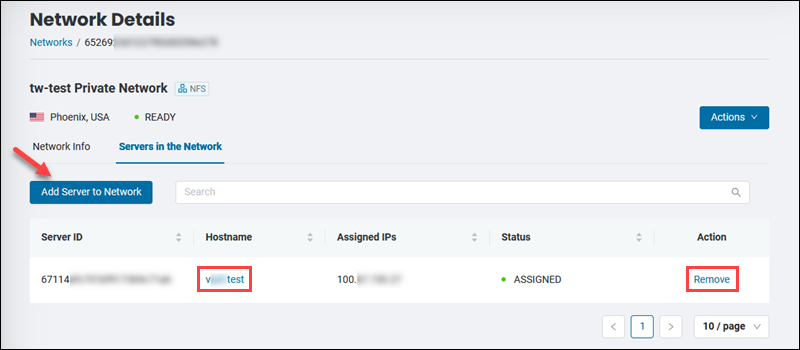
2. Select a server from the list and assign a public or private IP address depending on the network type. Manual OS-level configuration on your BMC server is necessary for changes to take effect.
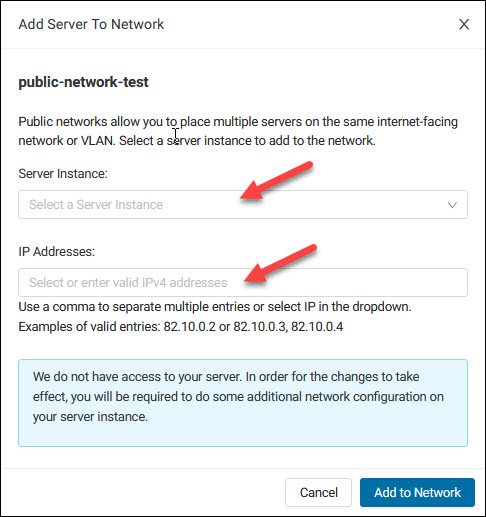
When adding a server to a private network, you can assign up to 10 private IPs. If you skip this step, the system assigns the first available IP. Additionally, one server can belong to multiple private networks.
3. Select Add to Network to complete the process.
Edit Network
The BMC portal lets you edit the network name and description.
To do so:
1. Navigate to the Networking -> Networks page and choose Public or Private.
2. Locate the network you want to edit.
3. Select Actions - > Edit.
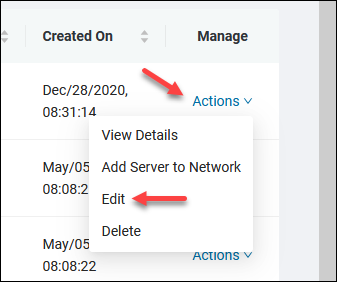
4. Enter a new name and/or description. For private networks, you can choose to set them as default.
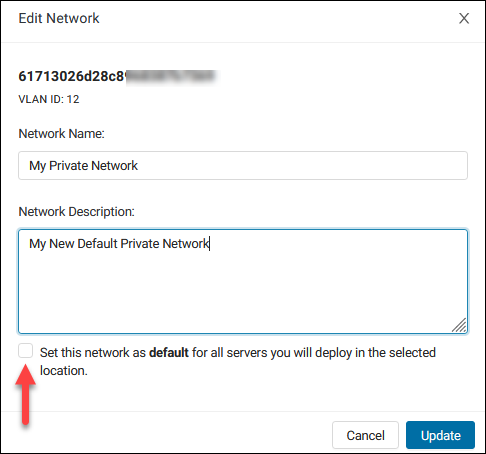
5. Click Update. The changes are instant.
Delete Network
Deleting a network is an irreversible process.
Note: The network you want to delete must not have any resources attached. Remove all assigned resources before proceeding.
To delete a network:
1. Navigate to the Networking -> Networks page and choose Public or Private.
2. Locate the network you want to delete.
3. Select Actions -> Delete.
4. Enter the network name to confirm the action and click Delete Network. For public networks, all public IP blocks will be in the unassigned state and stay in the account's ownership for future use. You will be charged for the unassigned IP allocations until you delete them, except for BYO IPs.
Note: For more info, refer to our detailed guide on how to configure a BMC server after adding it to a network via portal.
Public IP Allocations
The Public IP Allocations section lets you purchase and manage public IP blocks.
You can assign, unassign, and delete public IP allocations by using the Actions button in the Manage column.
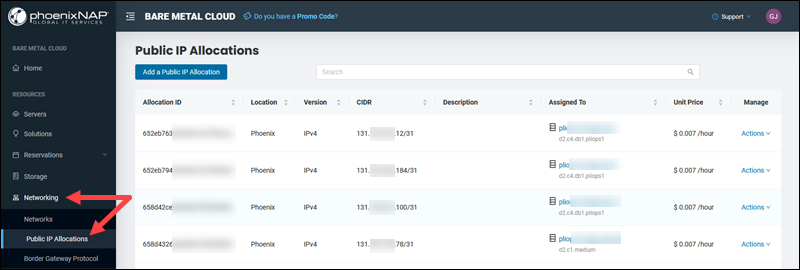
To buy a public IP allocation via the portal:
1. Navigate to the Networking->Public IP Allocations section.
2. Select Add a Public IP Allocation.
3. Choose a location for the public IP block. You can only assign IP blocks to the servers in the same data center location.
4. Choose the public IP allocation size to purchase. The prices on the card are for the whole block.
5. Click Buy a Public IP Allocation to purchase the block.
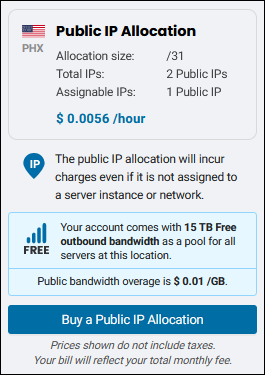
The IP address appears on the list as Unassigned.
Read the BMC Public IP Management guide to learn how to assign, unassign, and delete a public IP block.
Border Gateway Protocol
The Border Gateway Protocol section lets you create, view, edit, and delete BGP peer groups. It enables peering phoenixNAP BPG endpoints with public network or server IP blocks within the same account.
Create BGP Peer Group
To enable BGP and create a peer group in the desired region:
1. Navigate to Networking->Border Gateway Protocol.
2. Click Create BGP Peer Group.
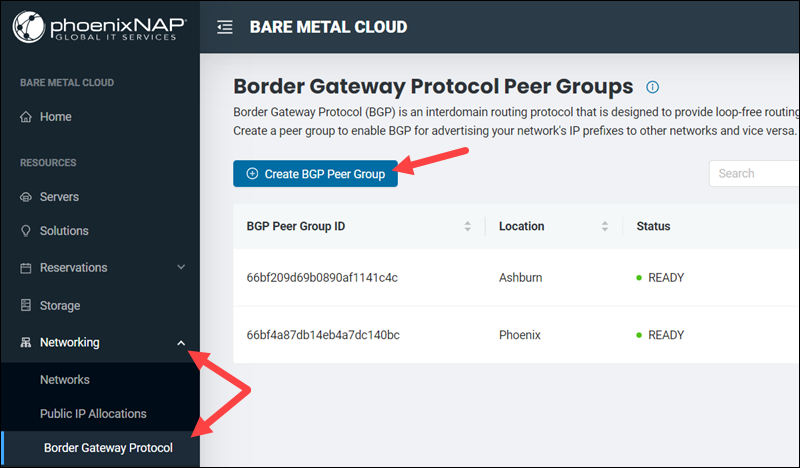
3. Select the peer group location. The field is mandatory.
4. (Optional) Enter your Autonomous System Number (ASN). If the field is blank, phoenixNAP provides a private ASN (default 65401).
5. (Optional) Select Enable Default Routing to advertise the default route. Leave the option unchecked to avoid advertising any routes to your BGP endpoints.
6. (Optional) Enter a password. The password should be between 8 and 32 characters long and use the following characters: [a-z][A-Z][0-9][!@#$%^&*()-/|\[]{}=;:<>,.]. Leave the field blank to generate a password using these rules automatically. The password can be copied or changed after creation.
7. Click Create to complete the peer group creation process.
View Available BGP Peer Groups
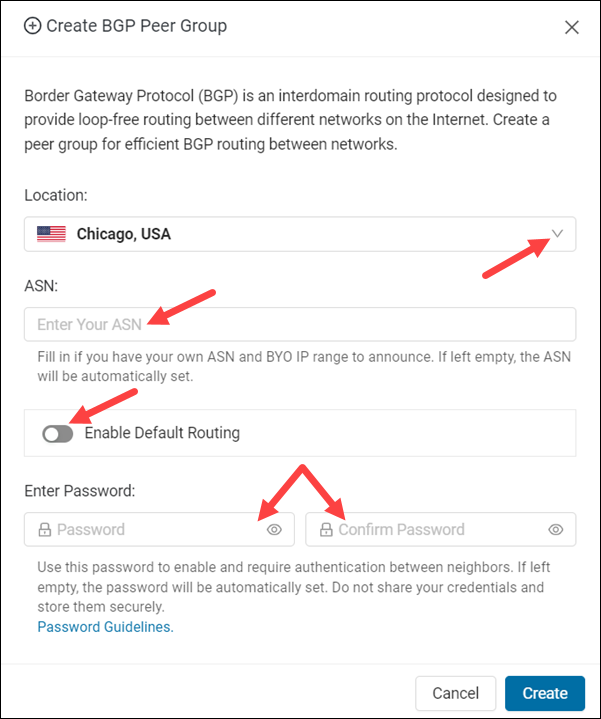
The Border Gateway Protocol Peer Groups page lists created BGP peer groups.

The list contains the following:
- BGP Peer Group ID. A unique string for identifying the BGP peer group.
- Location. The geographic location of the BGP peer group.
- Status. The current state of the BGP peer group. Possible values are
PENDING,READY,BUSY,ERROR,PENDING DELETION, orDELETING. - ASN. The Autonomous System Number.
- Default Routing. The default routing state. Possible values are
ENABLEDorDISABLED. - Created On. The date and time of creation.
- Updated On. The date of the latest update.
- Manage. Contains the Actions menu for managing the BGP group.
Edit BGP Peer Group
Edit the BGP peer group from the Border Gateway Protocol Peer Groups page:
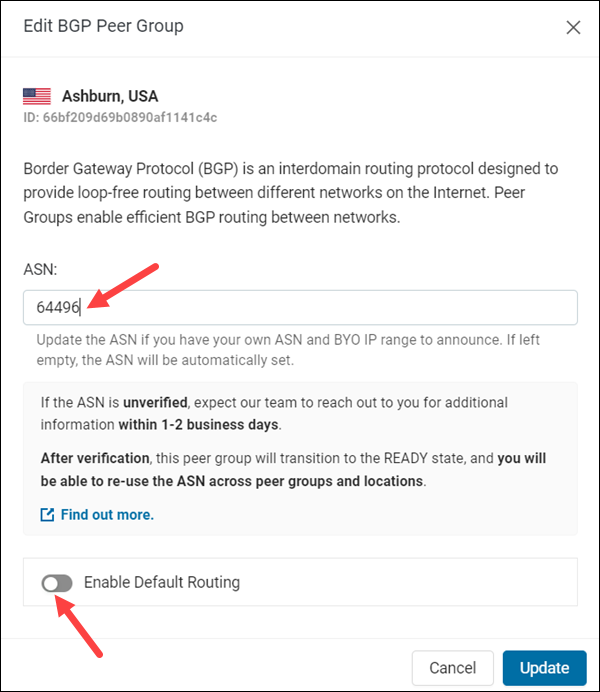
1. Open Actions->Edit BGP Peer Group for the group you want to edit.
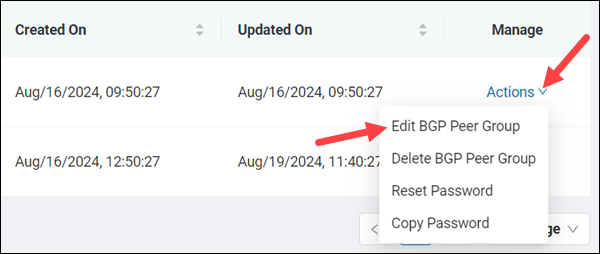
2. Adjust the ASN by typing another public ASN number in the text box.
3. Use the switch to enable or disable default routing.
4. Click Update to apply the new settings.
Delete BGP Peer Group
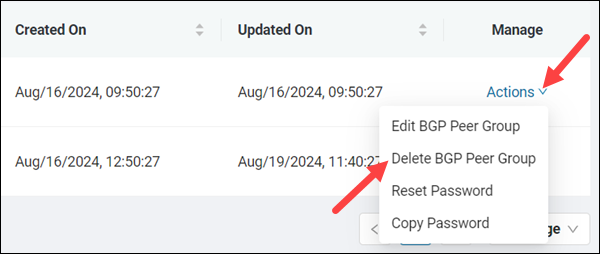
To delete a BGP peer group, navigate to the Border Gateway Protocol Peer Group page:
1. Open Actions->Delete BGP Peer Group for the group you want to delete.
2. Enter your login email to confirm the deletion.
3. Click Delete to delete the BGP peer group.
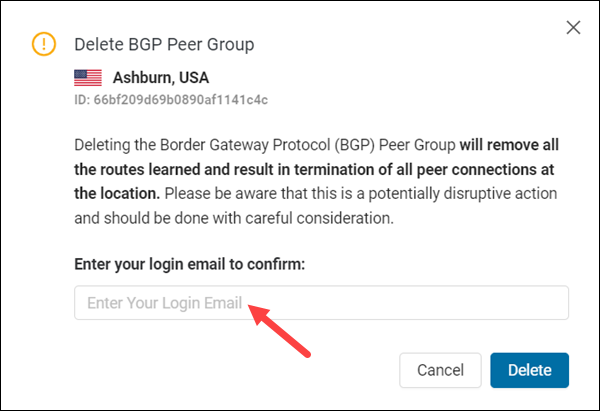
The action removes all learned routes and terminates all peer connections at the location.
Copy or Reset Password
To copy the current BGP password, go to the Border Gateway Peer Groups page and click Actions->Copy Password for the appropriate peer group.
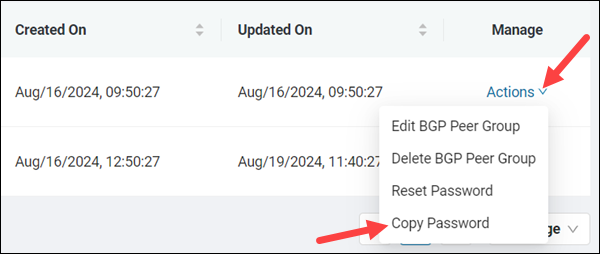
The action copies the password to your clipboard.
To change the current password, reset it and create a new one from the Border Gateway Protocol Groups page:
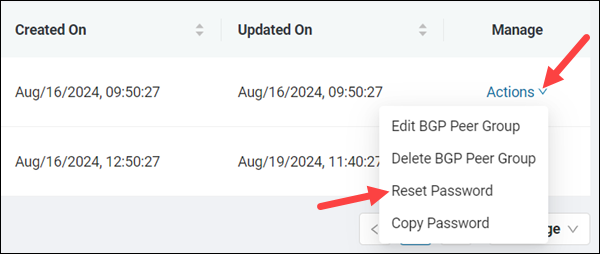
1. Select Actions->Reset password for the appropriate BGP group.
2. Enter a new password in the left field, and confirm the password by retyping it in the right field.
3. Click the Reset Password button to apply the change.
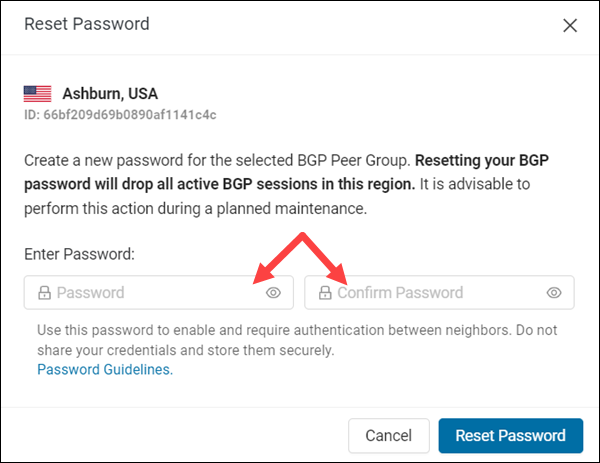
The action drops all active connections in this region.
User Management
The User Management section has basic user details and account-based actions. The page shows a listing with the following columns:

- User ID. A unique alphanumeric string for account identification.
- Login Email. The account's email address. Account owners have an additional label in this section.
- First Name. The account user's first name account.
- Last Name. The account user's last name.
- Status. The account status (set to Enabled for regular users).
- Created On. The date and time of account creation.
- Manage. Contains the Actions menu to change account information or reset the account password. Account owners have additional actions to edit or enable/disable regular user accounts.
The User Management page and available actions differ depending on whether you're the account owner or a regular user:
- Account owners have an overview of all user accounts. They have actions related to their account and additional user and invitation management actions.
- Regular users have a simplified view with just their account listing. They only have actions related to their accounts.
Shared Actions
Account owners and regular users can edit their account information or reset passwords from the Actions menu in the Manage column.
Edit Account
Both account owners and regular users can edit their account information (first and last name), while account owners can also edit other users.
To edit account information, navigate to the User Management page and do the following:
1. In the Manage column, open Actions->Edit User.

The action opens the Edit User window.
3. Adjust the user information (first or last name). The first and last names may contain spaces or hyphens, and the fields cannot be empty.
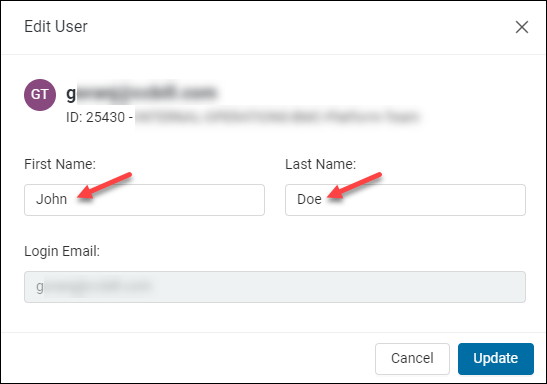
Once ready, click Update. The new information is immediately visible on the user listings page. The user whose account was edited and the account owner receive an email notification about the change.
Reset Password
Account owners and regular users can reset their passwords. To reset your password, navigate to the User Management page and do the following:
1. In the Manage column, open Actions->Reset Password.

The action opens a new window, informing you that the password reset link has been sent and to which email.
2. Check your email to find the password reset link, which leads to the password reset page. For security reasons, the link expires after some time. In case of expiry, resend the password reset link.
3. Enter a new password and re-enter to confirm.
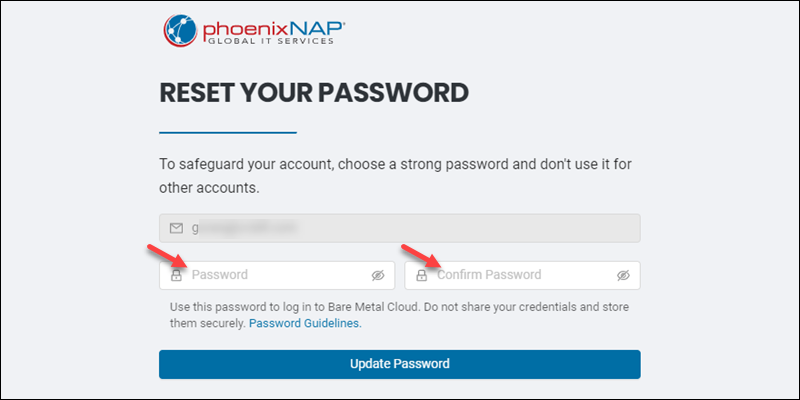
The password guidelines are available on the page.
4. Click Update Password to apply the changes. Use the new credentials to log in to the BMC platform.
Account Owner Actions
Account owners have additional user management actions and a complete overview of all regular users and user invitations.
Add User
To add a new user, you must be an account owner. Navigate to the User Management page:
1. Click the Add User button above the user table.
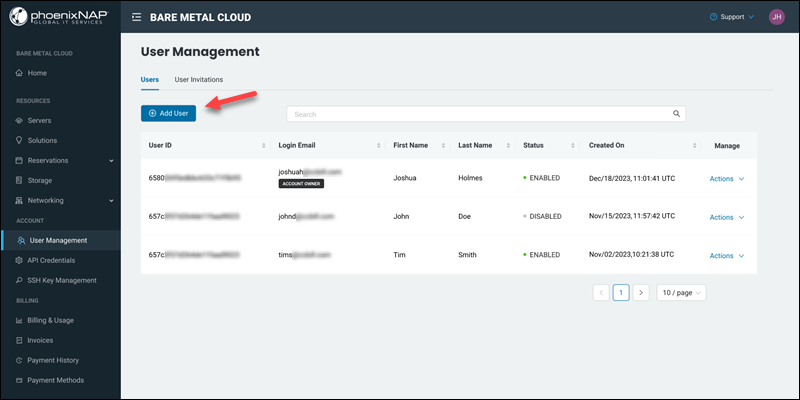
The action opens a prompt to enter user details.
2. Enter the user's login email and click Add User.
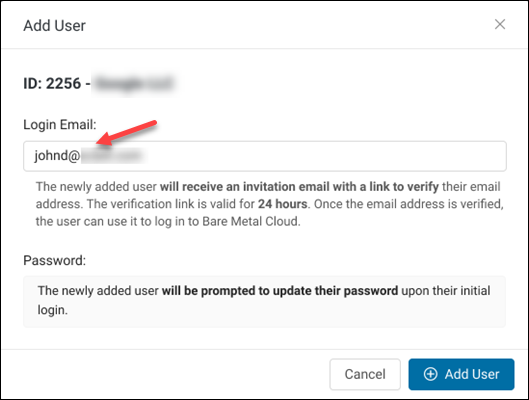
The user receives a registration link via email, which expires in 24 hours. The invitation details are on the User Invitations page.
User Invitations
Account owners have access to the User Invitations page. The page provides an overview of user invitations in a table. The columns contain the following information:
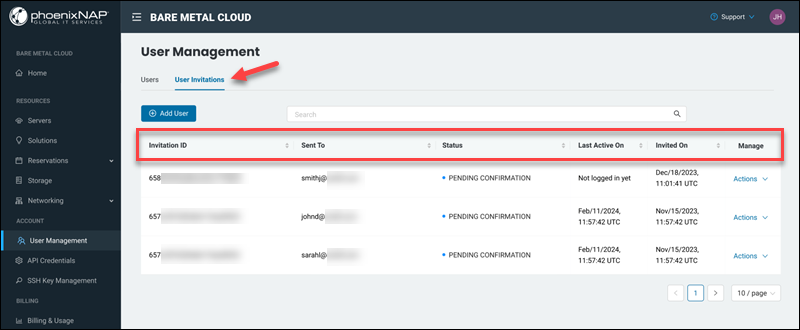
- Invitation ID. A unique alphanumeric identification, which is helpful when searching or troubleshooting.
- Sent To. The email where the invitation was sent.
- Status. The current state of the invitation. Possible states are PENDING CONFIRMATION, EXPIRED VERIFICATION LINK, or REVOKED.
- Last Active On. The time and date of the user's last activity.
- Invited On. The time and date when the invitation was sent.
- Manage. Contains the Actions menu for a particular user invitation.
The Actions menu has the following options:
- Resend Invitation. Forces a new invitation link to be emailed, regardless of the current invitation status. The status changes to PENDING CONFIRMATION.
- Revoke Invitation. Revokes a currently pending invitation. The invitation link becomes inactive, and the invitation status switches to REVOKED.
- Delete Invitation. Removes the invitation from the list. The invitation link becomes inactive, and the user is removed.
Note: If an invitaition is deleted, you can recreate the user and resend an invitation.
Enable/Disable User
Account owners have two actions for managing regular users:
- Disable User. Removes an enabled user's password, invalidates current sessions, and removes all trusted devices. Choose whether to remove the user's API credentials (keys), which gives access to the API.
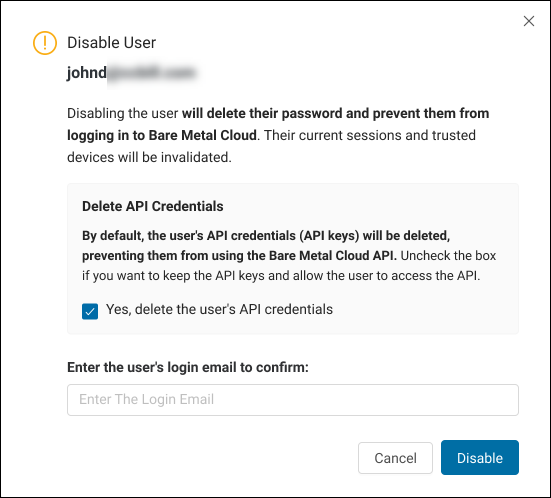
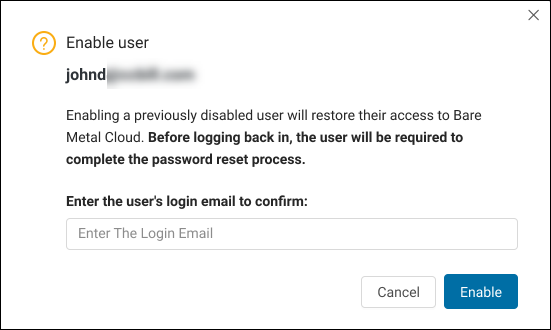
- Enable User. Restores access to a previously disabled user. The user receives a password reset link and re-gains access after completing the reset process.
API Credentials
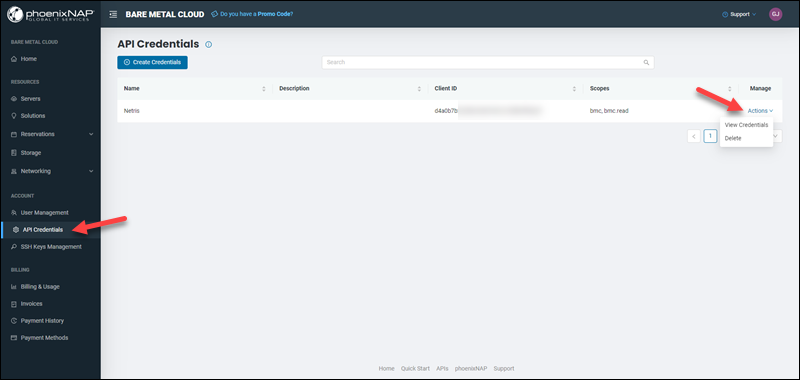
The API Credentials page holds the credentials for your APIs. The list shows the name, description, Client ID, and scopes for your credentials.
The Actions menu under the Manage column lets you view and delete credentials.
Create Credentials
To create new API credentials:
1. Navigate to the API Credentials page.
2. Click the Create Credentials button.
3. Add the credential name and optional description.
4. Assign permissions scopes. Check the box next to the permission level you want to grant to the credentials for each API set.
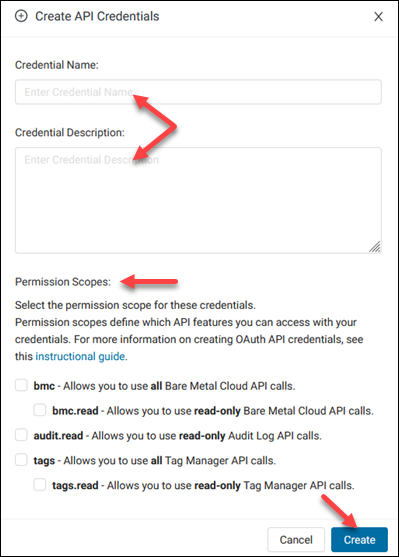
5. Click Create when ready.
6. The confirmation window shows the Client ID and Client Secret.
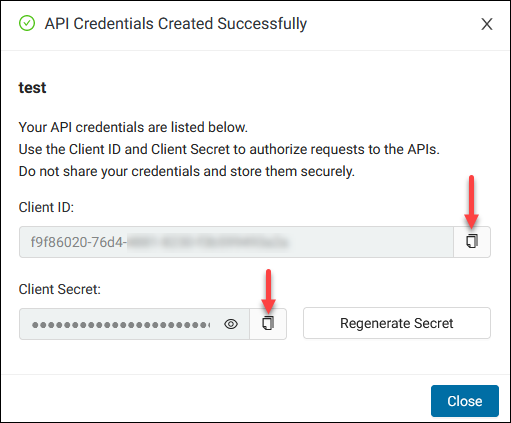
7. Copy the credentials and click Close. Your new credentials appear in the API credentials table.
You can create multiple API credentials with different scopes and permission levels. For every set of credentials, you get a unique Client ID and Client Secret to authorize API requests.
View Credentials
To view API credentials:
1. Navigate to the API Credentials page.
2. Locate the name of the entry and click Actions under the Manage column.
3. Select View Credentials to see the API credentials for the specific entry.
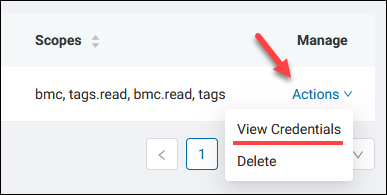
This screen lets you generate a new secret. Click the Regenerate Secret button to get a new secret. There is no confirmation message, except that your browser may ask you if you want to save your credentials.
Delete Credentials
To delete API credentials:
1. Navigate to the API Credentials page.
2. Locate the name of the entry and click Actions under the Manage column.
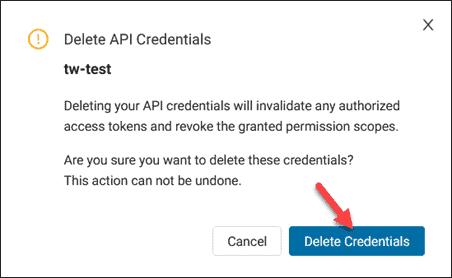
3. Select Delete to delete your API credentials. This action invalidates authorized access tokens and permissions.
4. Click Delete Credentials when ready. You cannot undo this action.
SSH Keys Management
The SSH Keys Management section is a repository for your public SSH keys. You can add, edit, and delete keys using the options on this screen.
The uploaded public SSH keys are listed in a table with sortable columns. Sort the keys by name, fingerprint, whether they are marked as default and the creation date.
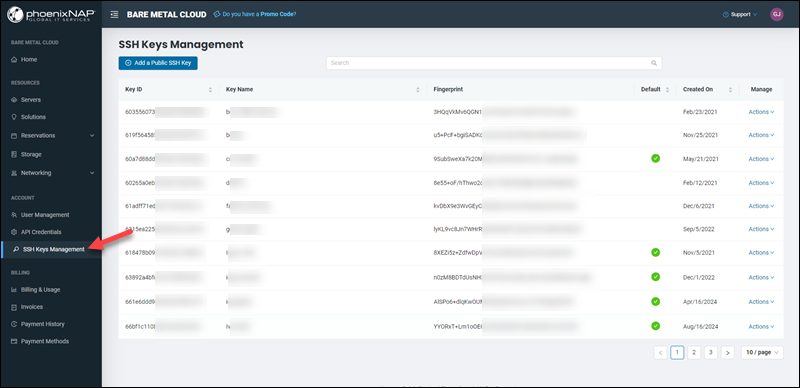
The Actions menu lets you edit and delete your keys.
Add Public SSH Key
To add a new public SSH key:
1. Navigate to the SSH Keys Management screen.
2. Click the Add a Public SSH Key button.
3. Enter the key name.
4. Paste your public SSH key content in the field.
5. Optionally, set the key as default, and the key will be preselected at the Deploy New Server screen.
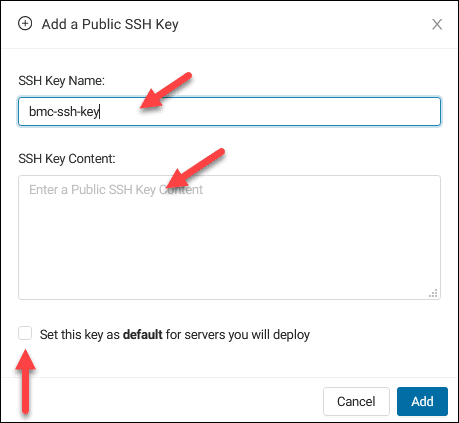
6. Click Add. The key appears in the API credentials table.
Add as many keys as you want. To grant access to multiple accounts and applications, upload different public SSH keys.
Note: It is not possible to add the same SSH key twice. If you try adding the same key, an error appears.
Edit Public SSH Key
To edit an SSH key name:
1. Navigate to the SSH Keys Management page.
2. Locate the public SSH key and click Actions under the Manage column.
3. Select Edit from the menu.
4. Change the name and click Update Key. Optionally, set the key as default.
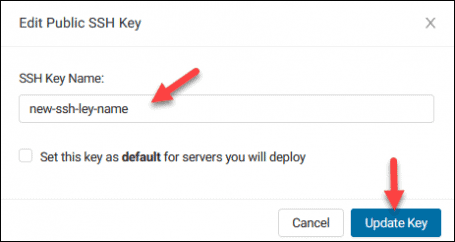
The public SSH key content cannot be edited. If you need to edit the content, delete the key and create a new one.
Delete Public SSH Key
To delete a public SSH key:
1. Navigate to the SSH Keys Management page.
2. Locate the public SSH key and click Actions under the Manage column.
3. Select Delete from the menu.
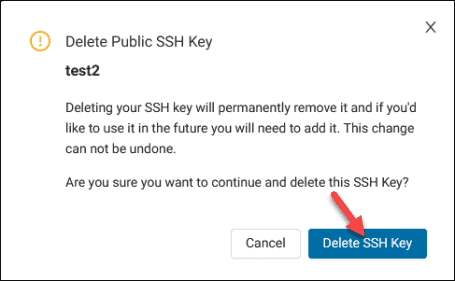
4. Select Delete SSH Key to remove the key permanently.
Note: Learn how to expand storage capacity on a network through Network File Storage (NFS) by referring to our guide Bare Metal Cloud Storage Management via Portal and API.
Billing & Usage
The Billing & Usage section lets you view statistics about the resources you used and the amount you will be charged. The donut chart provides the month-to-date breakdown of prices for all services.
There are four tabs in this section:
- All. Shows the prices on one screen for every purchase on your account: server, bandwidth, OS licenses, and IP charges.
- Hourly. Shows hourly billed servers and Windows OS licenses.
- Reserved. Shows only the reserved instances.
- Other. Shows bandwidth and OS license prices.
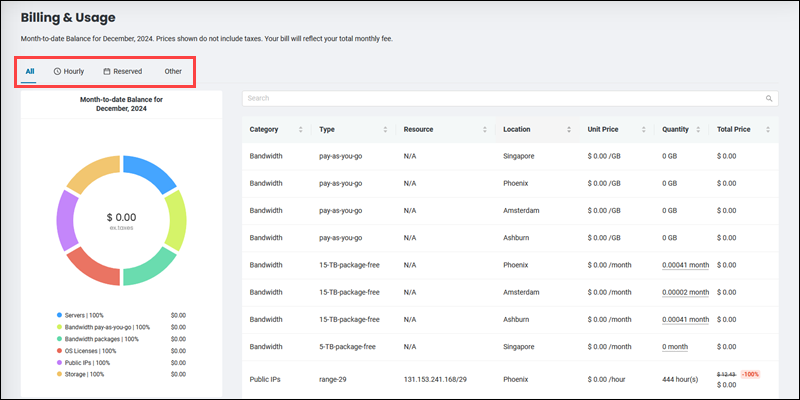
Each tab shows the filtered results on the right side. Click a column name to change the sorting by category, purchase type, hostname, etc.
Use the search bar to narrow down the list. When a server is active, click the hostname to load the server details page.
Note: When quantity shows less than one, the rest of the period will be factored in the following calendar month. This happens on the first and last billing month for reserved instances.
If you see one server name two times on the report, this means the hourly billing was upgraded at one point. Click the info icon next to the expired hourly model to view the details.
The server list shows deleted instances as well. Click the trash can to view the server ID.

Invoices
The Invoices section allows you to manage invoices for your Bare Metal Cloud services. It lists invoices alongside their issue date, due date, payment status, etc. You can sort invoices according to these parameters by clicking the corresponding column name.

Use the Invoices section to perform the following actions:
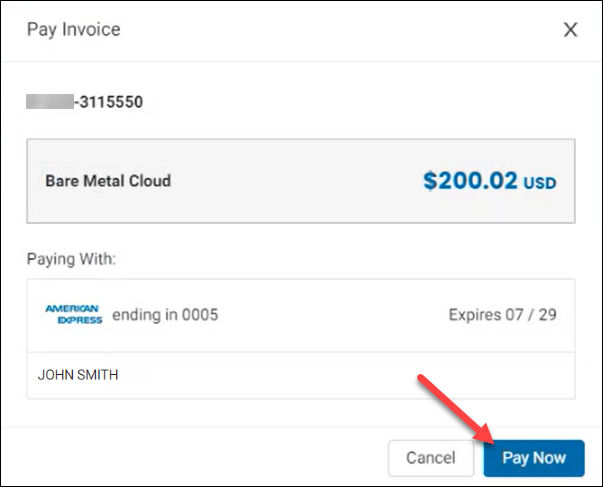
To pay an invoice manually, select Pay Invoice in the Status column. Then, click Pay Now in the Pay Invoice window that appears.
The ribbon above the invoice list allows you to filter invoices by date or payment status. Select the date box to filter invoices by date or the Payment Status box to filter by status.
You can download a PDF version of an invoice by clicking Actions and selecting Download from the menu.
Payment History
The Payment History lists all processing and completed transactions on the Bare Metal Cloud portal.
When you confirm the payment of an invoice, it shows as processing in Payment History. If the invoice is successfully processed, the transaction status changes to success.

If the payment fails, the page shows the failed status.
Payment Methods
The Payment Methods section lets you register a Visa, Mastercard, JCB, Discover, or American Express payment card to enable auto-charging for BMC invoices.
Add a new payment method by selecting the Add Payment Method button.

Provide the necessary information in the form, including your name, payment card details, and the payment method address. Once the payment method is verified, BMC services will be charged automatically each billing cycle 24 hours after you receive a new invoice.
To change a payment method, select Actions for the active payment method and click Replace. Enter new card information and click the Replace Payment Method button at the bottom of the page.
Conclusion
You should now know how to use the Bare Metal Cloud portal. The steps listed in this guide helped you create and manage Bare Metal Cloud Servers and networks, view different reports, and add and manage API Credentials and public SSH keys.
For any questions or concerns about your BMC servers, contact the Support Team.
