Introduction
The BMC portal offers server instances and public IP allocations that cater to multiple use cases. Purchase a public IP allocation or assign an existing one to allow public access to a BMC server. Depending on the project’s needs, a public IP allocation can be replaced with another one.
This guide will show you how to configure a BMC server to work with a new public IP block. We will cover both the steps for configuring an IP block during server deployment and replacing the IP block after the server is deployed.
Prerequisites
- BMC or PNCP portal credentials.
Configuring Server on Deployment
Public IP blocks can be assigned during server deployment. This is a straightforward procedure performed in the BMC portal.
To begin, start deploying a new server. For detailed instructions, read how to deploy a new server.
Assign a public IP block to the server in the Public IPs section on the Network & IP Settings page.
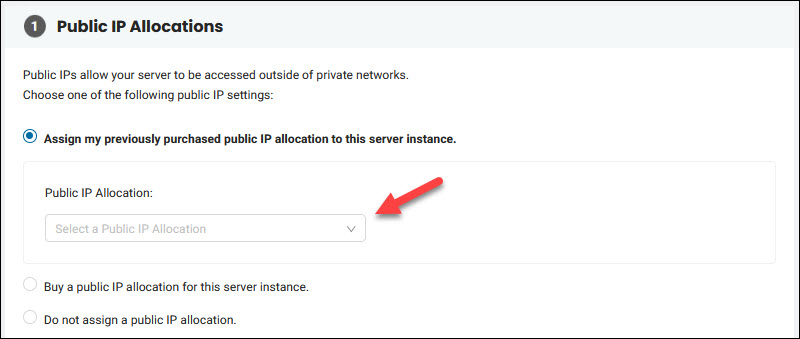
The following options are available:
- Assign my previously purchased public IP allocation to this server instance. The option is shown only if you purchased a public IP allocation using the BMC Portal Public IP Allocation feature. Select a public IP block and proceed with the deployment. The server is automatically configured to work with the chosen IP allocation.
- Buy a public IP allocation for this server instance. Allows you to buy a public IP block during the server deployment process. If you choose a Linux or Proxmox server, this section offers you to purchase a /31 allocation. For Windows and ESXi instances, the section offers a /30 allocation. The server is automatically configured to work with the IP allocation when the server deployment completes.
- Do not assign a public IP allocation. This option makes the server instance accessible only via private networks.
Configuring Server After Deployment
If you need to replace the existing public IP configuration on a BMC server, then additional configuration is necessary.
This procedure differs depending on the operating system of the instance. The sections below contain instructions for the OSes available on BMC servers.
Linux Instance Setup
Note: The steps in this section work on Ubuntu Bionic, Ubuntu Jammy, CentOS 8.4, and Debian Bullseye servers.
To change the public IP block on a Linux server, you need to set up a password for the Remote Console access, assign a new public IP block, and configure the server to work with the new block.
Set up Password for Remote Console Access
Changing the assigned IP block includes unassigning the old IP allocation. Once this step is complete, the server instance temporarily loses access to the internet and is accessible only via the Remote Console in the BMC portal. To enable access to the system via Remote Console, make sure you have a user and password to log in with.
When deploying a Linux BMC server, you must connect via SSH and perform one of the following actions:
- Create a new user. This is the recommended option.
- Add a password to the existing default user using the passwd [username] syntax.
For step-by-step instructions, read how to add a user on Linux servers.
Note Server Details
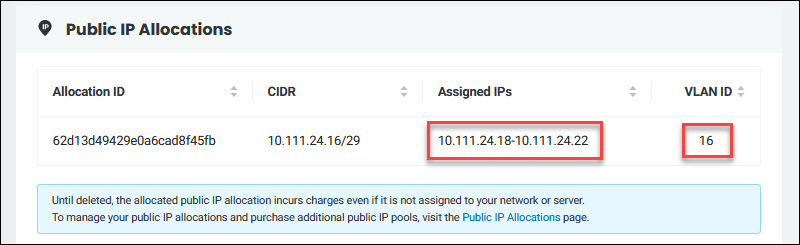
To reconfigure the server properly, note the old public IP configuration.
1. Go to the Server Details page.
2. Select the Network & IP Settings tab.
3. Note a public IP address from the Assigned IPs column and the ID from the VLAN ID column.
Assign New Public IP Block
The BMC Portal Public IP Allocations feature lets you purchase new allocations and assign and unassign new IP blocks.
Warning: After performing the next step, the server will lose internet connection. Before you proceed, it is recommended to confirm that you can log in to the Remote Console, and that your user has sudo access.
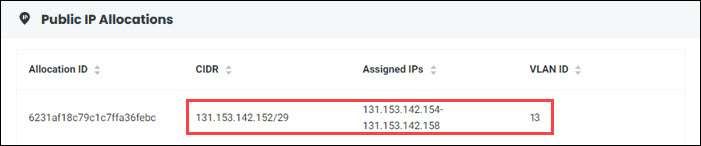
1. In the BMC Portal, unassign the public IP allocation from the server you are configuring.
2. Assign a different public IP allocation to the server. Use a previously purchased allocation or purchase a new one. For detailed instructions, read how to assign public IP allocations to the server. Wait until the assignment is complete.
3. Go back to the Server Details -> Network & IP Settings and note the new assigned IPs and the VLAN ID from the .
Configure Server for New Public IP Block
To configure the server with the new public IP block:
1. Connect to the server using the Remote Console. For detailed instructions, read how to connect to the BMC server using Remote Console.
2. Log in with the user you added for the Remote Console access.
3. At the command prompt, switch to the root user.
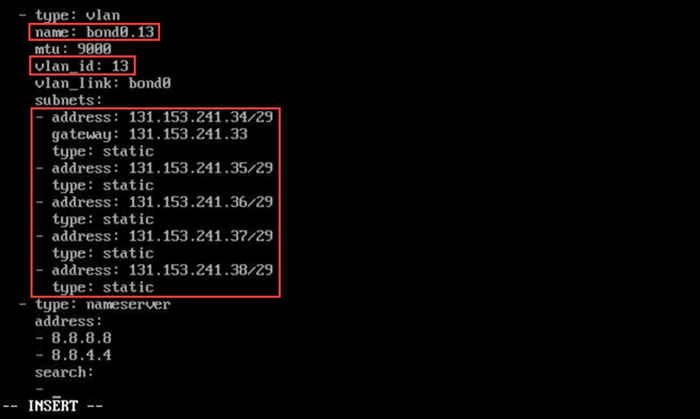
sudo su -4. Edit the network interface configuration file:
vi /etc/cloud/cloud.cfg.d/50-curtin-networking.cfgSearch for the type: vlan section named bond0.x, where x is the VLAN ID number from Step 3 of the Note Server Details tutorial section.
Edit the file using the information from the Server Details page in the BMC portal. For example, if you purchased a /29 allocation, with the assigned IPs in the 131.153.241.34-38 range and VLAN ID 13, the section would look like this:
Save the file and exit.
5. Reboot the server.
6. Test the network connectivity by pinging Google DNS.
ping 8.8.8.8The output confirms that the server communicates with the internet.

7. Use the newly assigned IPs to connect to the server via SSH.
ssh [username]@[new-IP] The server is now set up to work with the new IP allocation.
Windows Instance Setup
The BMC Portal offers two types of Windows servers - Windows Server 2019 Standard and Windows Server 2019 Datacenter. The configuration steps below apply to both Windows Server types.
(Optional) Change Password
After deploying a Windows Server, the user receives the instance’s IP address and a temporary password for the admin user. Although it is possible to use this password to connect to the instance, it is highly recommended to change it on the first login.
Follow the steps below to change the password on Windows Server:
1. Connect to the server using a remote desktop application.
2. Log in using the username Admin and the password you received when deploying the instance.
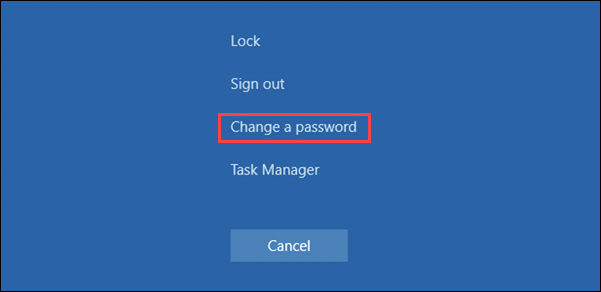
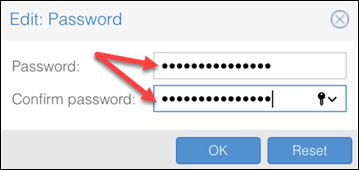
3. Change the password by pressing Control + Alt + Delete and selecting Change a Password in the menu.
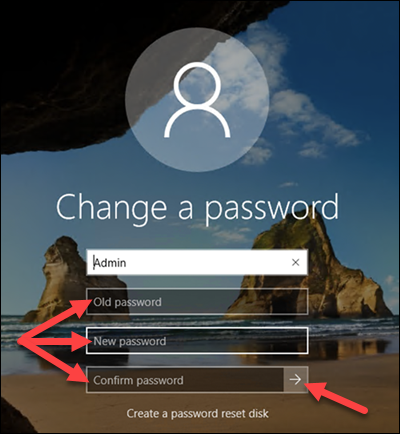
Note: Use the virtual keyboard bellow the Remote Console window to press the necessary keys.
4. Type the old password, then type the new password twice. Click the arrow to confirm the action.
Note: If you disabled the RDP access option on server deployment, learn how to change the password using SSH.
Assign New Public IP Block
1. Unassign Public IP allocation from the server you are configuring in the Public IP Allocations section in the BMC Portal.
2. Assign a different public IP allocation to the server. Use a previously purchased allocation or purchase a new one. For detailed instructions, read how to use the BMC Portal Public IP Allocations Feature. Wait for the assignment to complete.
3. Go to the Server Details page. Note the newly Assigned IPs and the VLAN ID.
Configure Server for New IP Block
1. Log in to the Windows Server instance using the Remote Console feature.
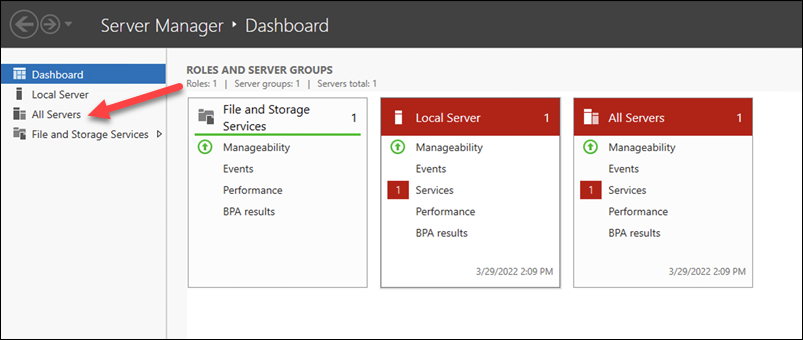
2. Search for Server Manager and open the application.

3. Select All Servers in the menu on the left side.
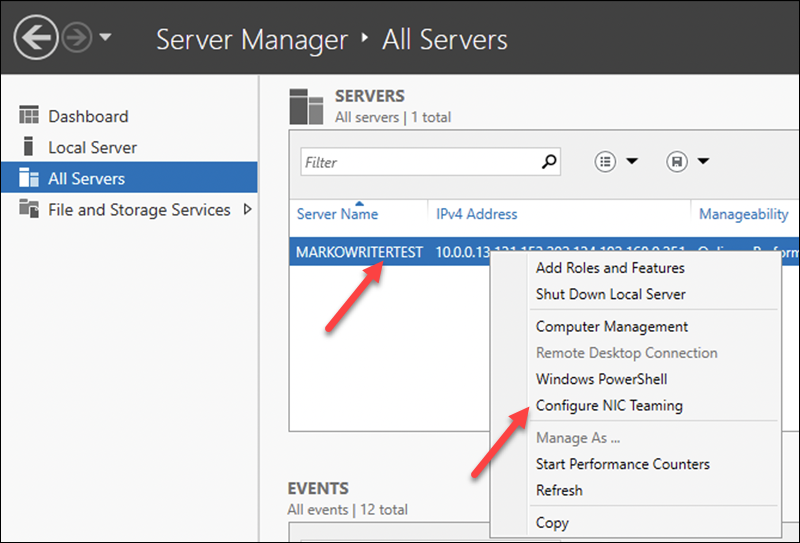
4. Right-click the server you are configuring in the Servers pane and select Configure NIC teaming.
5. Select Team Interfaces in the Adapters and Interfaces pane of the NIC Teaming window.
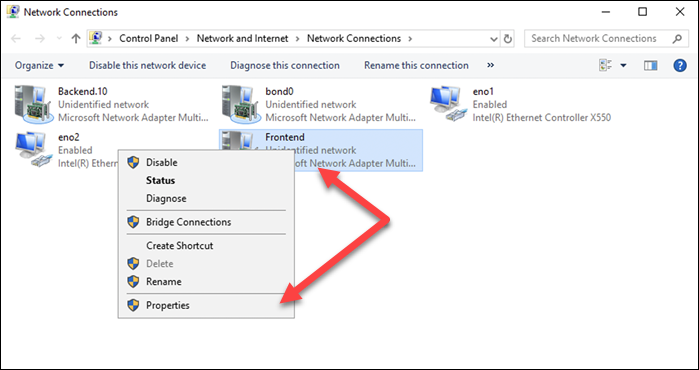
6. Right-click the Frontend item, select Properties.

7. Enter the new VLAN ID in the Specific VLAN field.

8. Go to Control Panel > Network and Internet > Network and Sharing Center > Change adapter settings.
9. Right-click the Frontend item, select Properties.
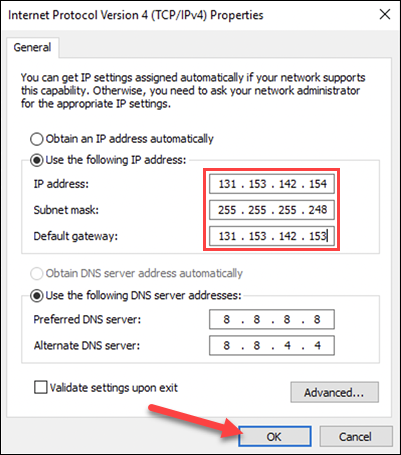
10. Select the Internet Protocol Version 4 item in the menu, then click the Properties button below the menu.

11. Edit the fields to reflect the new information from the Server Details page in the BMC portal.
12. Restart the server.
13. Test the connection by connecting to the server instance with a remote desktop app or an SSH client. Make sure to use the new IP address.
The instance is now set up to work with the new IP allocation.
Proxmox Instance Setup
Follow the steps below to configure a Proxmox instance to work with a new public IP block.
(Optional) Change Password
After a Proxmox instance is deployed, a pop-up box provides the user with the root password. It is possible to use this password to connect to the server. However, it is highly recommended to change it.
The steps below show you how to change the password on Proxmox:
1. Use a web browser to log in to the Proxmox instance. Type the following address into the address bar:
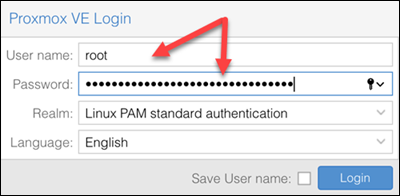
https://[public-ip-address]:80062. Log in using the username root and the password you received when deploying the instance.
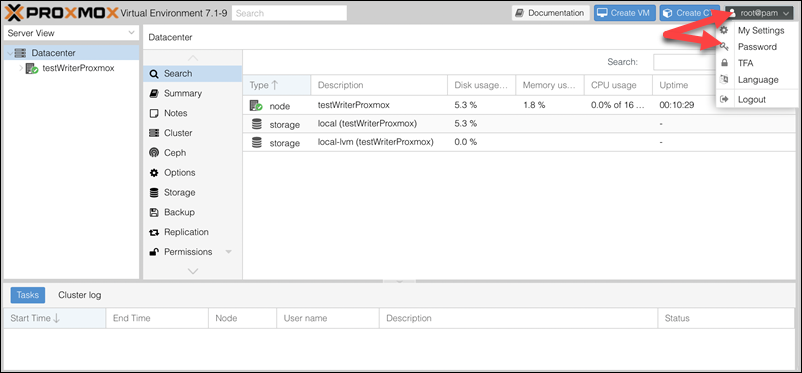
3. Click root@pam button in the upper-right side of the screen and select the Password option.
4. Type the new password twice, and confirm the change by clicking OK.
Assign New Public IP Block
1. In the BMC Portal, unassign Public IP allocation from the server you are configuring.
2. Assign a different public IP allocation to the server. Use a previously purchased allocation or purchase a new one. For detailed instructions, read how to use the BMC Portal Public IP Allocations Feature. Wait until the assignment completes.
3. Go to the Server Details page, and note the new Assigned IPs and the VLAN ID.
Configure Server for New IP Block
1. Connect to the Proxmox server using the Remote Console feature.
2. Log in with the user root, and the previously set password. The command prompt appears.
3. Open the interfaces file using a text editor:
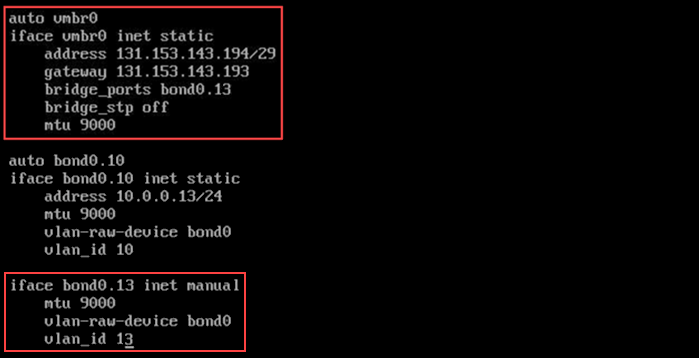
vi /etc/network/interfaces4. Search for the auto vmbr0 section. Edit the section to reflect the new information from the Server Details page in the BMC portal. Furthermore, put the new VLAN ID number in the section named iface bond0.x inet manual, where x is the VLAN ID number from your previous server configuration.
For example, if you chose a /29 allocation, with the assigned IPs in the 131.153.143.194-198 range, with the VLAN ID 13, the sections would look like this:
Note: In Proxmox, the instance can take only one public IP. Other IP addresses from the pool are added to VMs from the Proxmox interface.
Save and exit the file.
5. Reboot the server.
6. Test the new connection by attempting to connect to the Proxmox instance in your web browser.
https://[new-ip-address]:8006The server is set up to work with the new IP allocation.
ESXi Instance Setup
The following steps show how to configure an ESXi instance to work with a new public IP block.
(Optional) Change Password
After an ESXi instance is deployed, the user receives the root password in a pop-up box. While this password can be used for logging in to the server, it is highly recommended to change it on first login. Follow the steps below to change the password on ESXi:
1. Connect to the server using an internet browser:
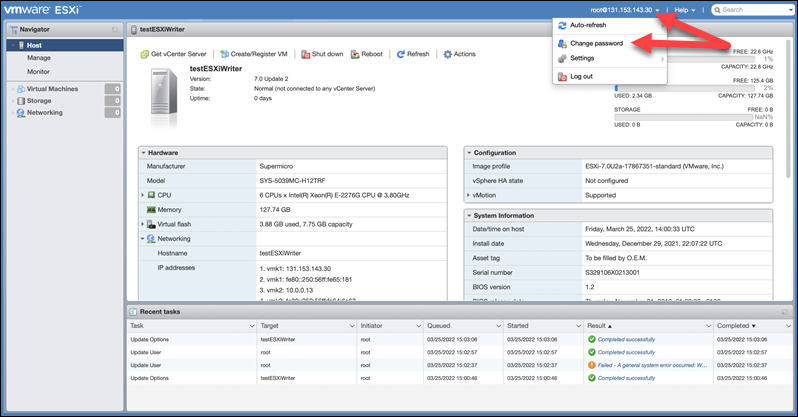
https://[assigned-ip-address]2. Log in with the username root and the password received on deployment.

3. Click the root@ip-address button in the upper-right corner of the main ESXi screen and select Change password in the menu.
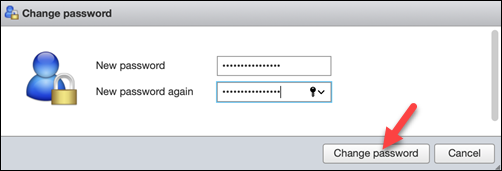
4. Type the new password twice and click the Change password button to confirm.
Assign New Public IP Block
1. Unassign Public IP allocation from the server in the Public IP Allocations section in the BMC Portal.
2. Assign a different public IP allocation to the server. Use an allocation you purchased previously or purchase a new one. For detailed instructions, read how to use the BMC Portal Public IP Allocations Feature. Wait until the server is assigned with the new IP block.
3. Go to the Server Details page, and note the new Assigned IPs and the VLAN ID.
Configure Server for New IP Block
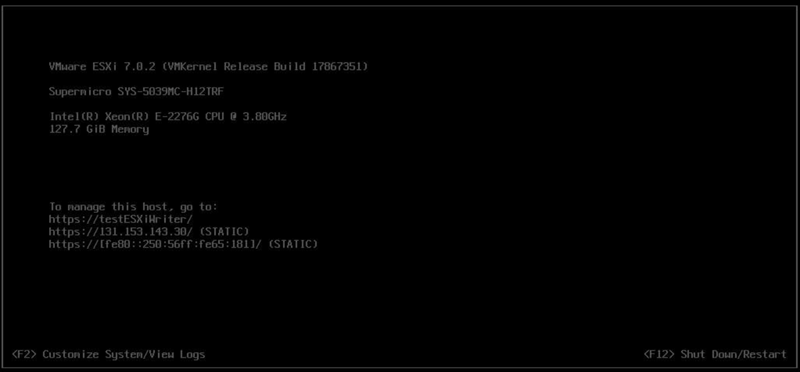
1. Log in to the ESXi instance using the Remote Console feature.
2. Press F2 while on the main screen to customize the system.
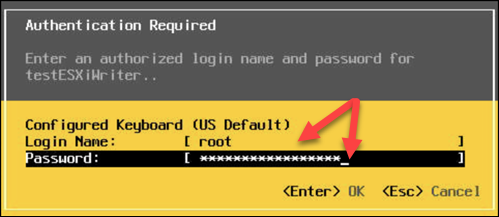
3. Log in with the root user and the password.
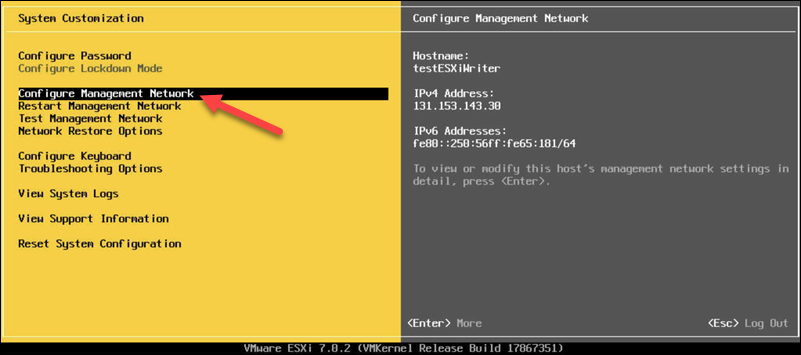
4. Select Configure Management Network in the menu on the left side.
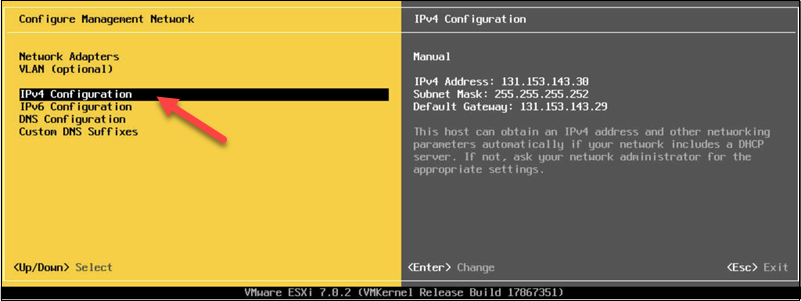
5. Select IPv4 Configuration.
6. Enter the newly assigned IP address into the IPv4 Address field, and the default gateway address in the Default Gateway field.
For example, if you choose a /29 allocation, with the assigned IPs in the 131.153.143.194-198 range, the configuration looks like this:
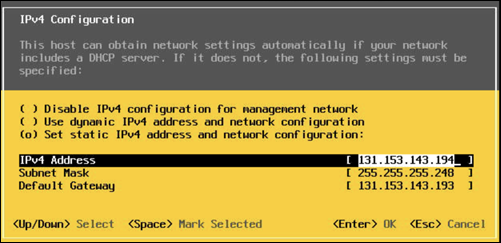
Confirm the configuration by pressing Enter.
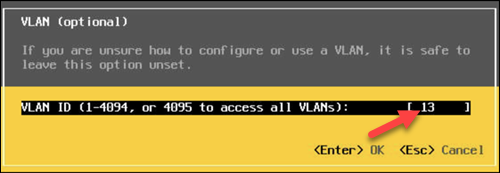
7. Select VLAN (optional) in the Configure Management Network menu.
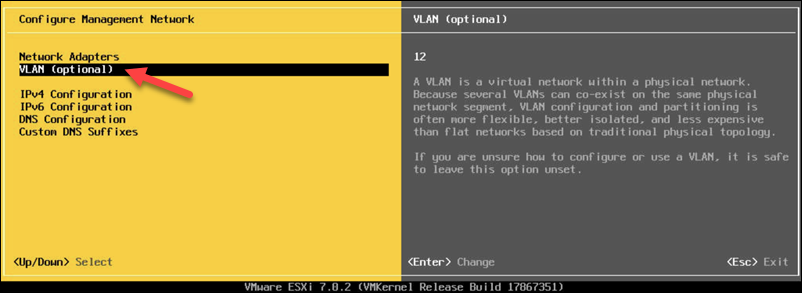
8. Enter the VLAN ID of the server in the available field. Press Enter to confirm.
9. Press Esc while in the Configure Management Network menu.
10. Press Y in a pop-up dialogue to confirm the changes and restart the network.

11. Test the new connection by attempting to connect to the ESXi instance in your web browser.
https://[new-ip-address]The ESXi server is now set up to work with the new IP allocation.
Conclusion
The article demonstrated the procedure for changing a public IP allocation on server instances running the operating systems supported in the BMC portal. The guide provided the steps for configuring public IP blocks on server deployment, and after the server has been deployed.