Introduction
A DNS cache can become corrupted for several reasons, including network attacks or viruses. A corrupted DNS cache may also affect IP address mapping for certain popular websites.
For example, instead of going to the actual website address, your browser may redirect you to an IP address of a malicious website that an attacker inserted into your computer's DNS records. Clearing the DNS cache deletes all saved DNS lookup information, providing your system with updated data from DNS servers the next time it sends a lookup request.
Follow the instructions in this guide to learn how to flush DNS in macOS, Windows, & Linux.
Prerequisites
- A machine running Windows, Linux, or macOS.
- A user account with admin/root privileges.
- Access to the terminal/command line.
What Is DNS Cache?
A DNS cache is a temporary database on your device that stores information about previously visited domain names and their corresponding IP addresses to speed up future connections. The cache speeds up project load times since it contains IP addresses for the queried domains. Instead of rerouting to DNS servers, the system answers queries from the cache.
The DNS cache contains the following information:
- Resource data
- Record type
- Record name
- TTL (time to live)
- Class
- Resource data length.
What Is a DNS Flush?
A DNS flush is a process that clears the DNS cache on your computer or device. Over time, the DNS cache can become outdated or corrupted, leading to different issues, such as the inability to reach certain websites or leading you to incorrect sites.
Flushing the DNS cache forces your device to discard this stored information and request fresh DNS data from the DNS server the next time you visit a website. Flushing is beneficial as it can resolve issues related to outdated or incorrect DNS entries and improve overall network performance.
Why Do a DNS Flush?
A DNS flush can help resolve network-related issues and improve your browsing experience. It is an easy troubleshooting step that ensures your device has the latest DNS information.
Following are some key reasons to do a DNS flush:
- Outdated or incorrect DNS entries. If a website has changed its IP address and you get a connection error, your system might still be trying to connect to the old one stored in the DNS cache. A DNS flush clears the old data and forces your system to fetch the updated information.
- Network connectivity problems. A corrupted DNS cache can cause problems accessing certain websites or slow down your browsing experience. Flush the DNS cache to resolve these issues by removing the corrupted entries.
- Privacy concerns. The DNS cache logs the websites you have visited. Flush the cache to clear your browsing history at a system level, which adds a layer of privacy.
- Troubleshooting errors. If you are getting errors like "DNS server not responding," a DNS flush is a common troubleshooting step that can potentially fix these issues by resetting the cache.
The sections below outline the steps for flushing the DNS cache on different Linux, Windows, and macOS versions.
How to Flush DNS in Linux
Linux distributions are different from Windows and macOS. Each Linux distribution might use a different DNS service, such as nscd (Name Service Caching Daemon), dnsmasq, BIND, or systemd-resolved.
Open the terminal and run the command below to check which DNS resolver is used in your system:
sudo lsof -i :53 -S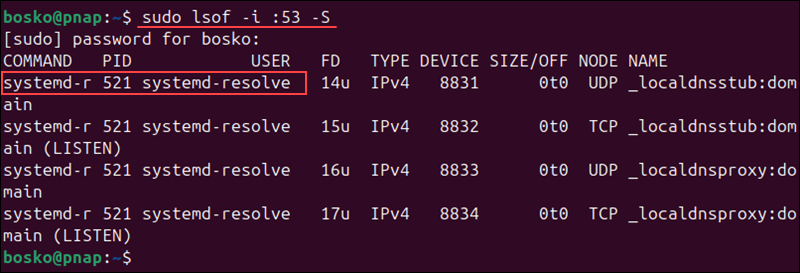
The example output above shows all the services listening on port 53, the server port reserved for DNS, including the DNS resolver service. After you find out which service your system uses, refer to the appropriate section below to flush your DNS cache.
Flush DNS Cache with systemd-resolved
The systemd-resolved service is commonly used in modern distributions, such as Ubuntu, Debian, Fedora, and Arch Linux. It has been the default resolver in Ubuntu since version 18.04. If you use an older Ubuntu release, your system will probably work with the dnsmasq DNS resolver.
Since Ubuntu 22.04, Ubuntu has used the resolvectl command to interact with systemd-resolved. Over time, the Linux ecosystem has transitioned towards using resolvectl as the unified interface for managing systemd-resolved features, replacing systemd-resolve.
To flush the cache with systemd-resolved, open the terminal, and run the following command:
sudo resolvectl flush-cachesThe command provides no output, but you can verify that the DNS cache has been cleared by checking the current cache size value, which should be 0 if the cache has been successfully cleared:
resolvectl statistics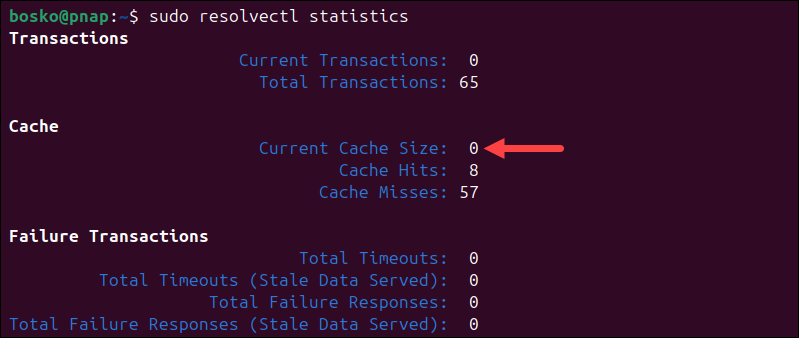
Flush DNS with nscd
The nscd service is standard in older or more traditional Linux distributions like RHEL, CentOS, and OpenSUSE. It is also sometimes used in systems where a lightweight caching solution is preferred.
Use the following command to clear the nscd DNS cache on your Linux machine if your system uses systemd as the init system:
sudo systemctl restart nscd.serviceAlternatively, if your system uses the traditional SysVinit service management, use the command below:
sudo service nscd restartEnter your password if necessary. The process stops and then starts the nscd service within seconds after clearing the cache.
Flush Local dnsmasq DNS Cache
The dnsmasq service is often found in lightweight or embedded systems and local network setups as a combined DHCP and DNS server.
Use the following command to clear the dnsmasq DNS cache on your Linux machine:
sudo killall -HUP dnsmasqAlternatively, if dnsmasq is running as a service, use the following command to clear the cache:
sudo systemctl restart dnsmasqEnter your password if Terminal asks you to. You will see the response when the service restarts.
Flush Local BIND DNS Cache
BIND is typically used on servers where a full-featured DNS server is needed. If you use BIND for DNS service, there are a few commands you can use to flush its DNS cache:
To restart the BIND DNS server using the SysVinit script:
sudo /etc/init.d/named restartTo gracefully stop and start BIND using the rndc (remote name daemon control) tool:
sudo rndc restartRun the following command to apply queued dynamic DNS updates without restarting the server:
sudo rndc execNote: BIND also allows you to target specific domains when performing a DNS flush. Just append flushname and the domain name to the sudo rndc command. For example:
sudo rndc flushname phoenixnap.com
How to Flush DNS in Windows
Clearing the DNS cache in all Windows versions involves utilizing the ipconfig command. The sections below show how to clear the cache in different Windows versions.
Flush DNS in Windows XP, Vista, Windows 7
Follow the steps below to flush the DNS cache in XP and Vista:
1. Click the Start button and navigate to All Programs > Accessories.
2. From the menu, select Command Prompt.
3. In the command prompt, run the following command:
ipconfig /flushdnsThe command outputs a message confirming that the cache has been successfully flushed. If you get a message saying Action Requires Elevation instead, contact your admin to grant you the privileges or complete the process.
Flush DNS in Windows 8, 10, and 11
To flush DNS on your Windows machine:
1. Open the Start Menu and start typing command prompt.
2. Right-click the Command Prompt result and select Run as administrator.
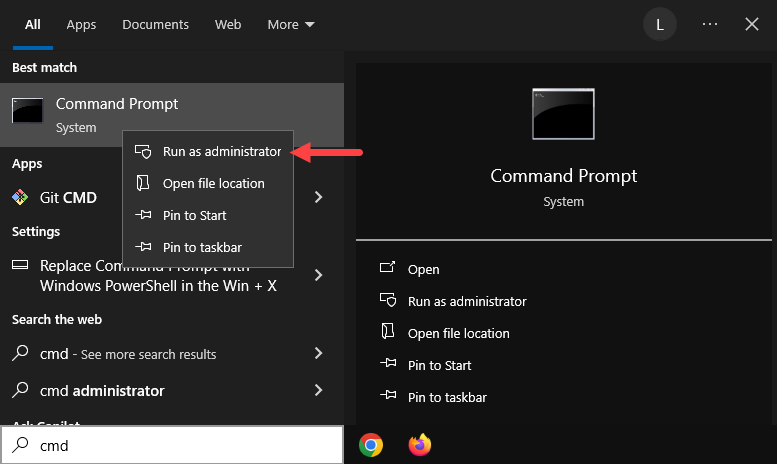
3. Run the following command:
ipconfig /flushdns4. The process should take only a few seconds. You should see the DNS Resolver Cache confirmation message when it completes:

The DNS Cache database on your computer is now empty. The next time your machine sends a DNS query, you should get the correct and updated IP mapping from DNS servers.
How To Flush DNS in macOS
Depending on your macOS version, the command to flush the DNS cache varies slightly. Below are instructions for the latest macOS version, followed by a section on older versions.
Flush DNS on macOS Sonoma (version 14)
This section outlines the steps for flushing the DNS cache on the latest macOS version, Sonoma:
1. Open the Terminal application. Launch the app by going to Applications > Utilities or press Command + Space to open Spotlight and search for Terminal.
2. Run the following command:
sudo killall -HUP mDNSResponderEnter your administrator password when prompted, and press Return.
There is no output to indicate the cache has been cleared. To get an audible notification after the DNS flush is complete, append a say command:
sudo killall -HUP mDNSResponder; say dns cleared successfully
Provide your password and you will hear a confirmation if the process is successful.
Flush DNS Commands on Older macOS and Mac OS X Versions
This section provides a list of commands for clearing the DNS cache on older versions of macOS and Mac OS X. Copy and paste the respective command for your version into the Terminal.
- macOS Mojave (version 10.14), High Sierra (version 10.13), Sierra (version 10.12), Mountain Lion (version 10.8), Lion (version 10.7):
sudo killall -HUP mDNSResponder- macOS El Capitan (version 10.11), Mavericks (version 10.9):
sudo dscacheutil -flushcachesudo killall -HUP mDNSResponder- macOS Yosemite (version 10.10):
sudo discoveryutil mdnsflushcachesudo discoveryutil udnsflushcaches- Mac OS X Snow Leopard (version 10.6), Leopard (version 10.5):
sudo dscacheutil -flushcache- Mac OS X Tiger (version 10.4):
lookupd -flushcacheConclusion
This tutorial showed how to flush the DNS cache on macOS, Windows, and Linux systems. Clearing the DNS cache is the first step in troubleshooting various network issues, so knowing how to do it is crucial.
Next, learn about different DNS record types or read how to set a DNS nameserver on Ubuntu.
