Introduction
RabbitMQ is a general-purpose message broker that uses the Advanced Message Queuing Protocol (AMQP) to facilitate the exchange of messages between a set of distributed microservices. Kubernetes is a practical solution for deploying RabbitMQ instances in a cluster, given its API-centric approach and scaling capabilities.
This tutorial will show you how to install a RabbitMQ instance on Kubernetes.
Prerequisites
- Command-line access.
- A Kubernetes cluster.
- Kubectl installed.
Deploy RabbitMQ on Kubernetes
Deploying RabbitMQ via a Helm chart eliminates much of the complexity related to the YAML configuration of the necessary Kubernetes objects. The following sections describe how to install RabbitMQ on Kubernetes using Helm.
Install Helm Package Manager
Proceed with the steps below to install the latest version of Helm on your local Kubernetes cluster:
Note: The following procedure shows how to set up Helm on Linux. For instructions relevant to other operating systems, read How to Install Helm on Ubuntu, Mac, and Windows.
1. Use the curl command to download the Helm installation script:
curl -fsSL -o get-helm.sh https://raw.githubusercontent.com/helm/helm/main/scripts/get-helm-32. Add the execute permission for the script:
chmod +x get-helm.sh3. Start the installation:
./get-helm.shThe output shows that Helm has been installed successfully.

Create Namespace for RabbitMQ Deployment
All Kubernetes resources run in the default namespace unless the user specifies a different one. To better control the deployment process, use the following command to create a separate RabbitMQ namespace:
kubectl create namespace rabbitmqYou can use any DNS-compatible name. The output confirms the namespace creation.

Install RabbitMQ on Kubernetes
Follow the steps below to deploy RabbitMQ by downloading and applying its Helm chart:
1. Add the Bitnami repository:
helm repo add bitnami https://charts.bitnami.com/bitnami
2. Update the local repository information:
helm repo updateThe Bitnami chart repository shows up in the output.

3. Apply the bitnami/rabbitmq chart:
helm install rabbitmq bitnami/rabbitmq --namespace rabbitmqThe command deploys RabbitMQ on the Kubernetes cluster in the default configuration. The deployment is executed in the previously created rabbitmq namespace.

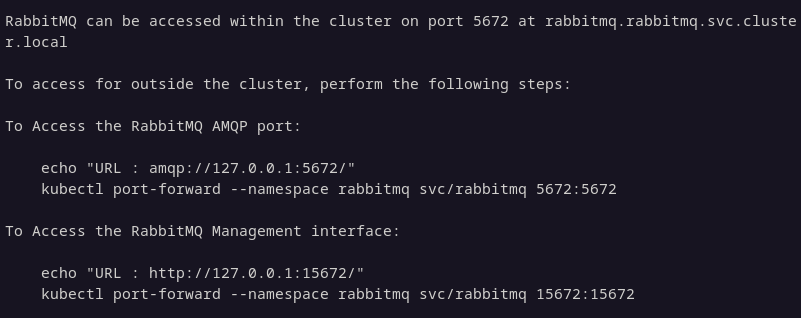
The terminal provides the information needed to access the RabbitMQ management interface, such as the credentials, port number, and URL.
Check RabbitMQ Provisioning Status
The containers might take a few moments to deploy. To review the details of the deployment, enter the following command:
kubectl get all --namespace rabbitmq
The output provides the details for the rabbitmq namespace.
Note: If this is not the first installation of the rabbitmq chart, the provided credentials may not be valid. The access credentials are stored in the persistent volume claim (PVC) and do not change upon upgrade or reinstallation unless the user manually removes the persistent volume claim. Remove the PVC by typing kubectl delete pvc [pvc-name] -n [namespace].
Forward RabbitMQ Port
Ensure the rabbitmq container port is accessible from the host system by executing the following kubectl port-forward command:
kubectl port-forward --namespace rabbitmq svc/rabbitmq 15672:15672 &The ('&') symbol tells kubectl to run the command in the detached mode.

Return to the shell prompt by pressing Ctrl+C.
Configure RabbitMQ Server
To configure RabbitMQ, users need to make changes to the rabbitmq.conf file. However, when deploying RabbitMQ on Kubernetes, the file is located within the running pods and should not be edited directly. Instead, configure RabbitMQ using Kubernetes resources, such as:
- ConfigMaps. Create a ConfigMap containing a desired RabbitMQ configuration. Mount the ConfigMap as a volume in the RabbitMQ pods. RabbitMQ reads and applies the configuration from this mounted volume.
- Environment Variables. Define environment variables within the RabbitMQ deployment or pod specifications. The environment variables override the default RabbitMQ settings.
The recommended approach to RabbitMQ server configuration is using ConfigMaps. Follow the steps below to create a ConfigMap and connect it with a deployment:
1. Create a YAML file:
nano rabbitmq-configmap.yaml2. Paste the following code into the file:
apiVersion: v1
kind: ConfigMap
metadata:
  name: rabbitmq-config
data:
  rabbitmq.conf: |
    [configuration]
Replace [configuration] with actual parameters.
3. Save and exit the file.
4. Apply the file with kubectl:
kubectl apply -f rabbitmq-configmap.yaml -n rabbitmq5. Add the following code to the deployment YAML:
spec:
  containers:
  - name: rabbitmq
    image: rabbitmq:latest
    volumeMounts:
    - name: rabbitmq-config-volume
      mountPath: /etc/rabbitmq
  volumes:
  - name: rabbitmq-config-volume
    configMap:
      name: rabbitmq-config
6. Save the file and apply the changes to the deployment.
Access RabbitMQ Dashboard on Kubernetes
Access the RabbitMQ graphical interface by following the steps below:
1. Enter the following web location in your browser:
http://[rabbitmq_ip_or_server_name]:15672Use the IP and port number for the RabbitMQ server provided during the installation. An authentication page appears.

2. Enter your username and password. On new RabbitMQ installations, the default username is user. Obtain the password by typing the following:
echo "$(kubectl get secret --namespace rabbitmq rabbitmq -o jsonpath="{.data.rabbitmq-password}" | base64 -d)"
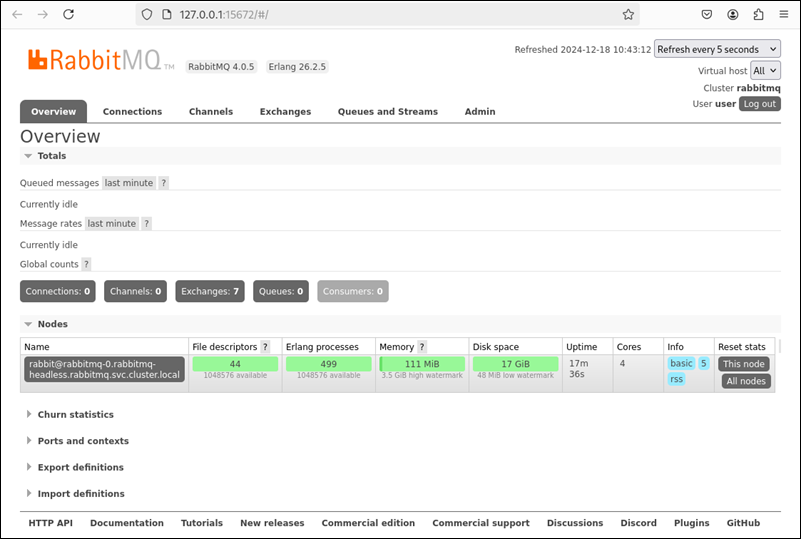
The management page appears, where users can configure virtual hosts, queues, permissions, and exchanges.
RabbitMQ Features
The following RabbitMQ features make it a versatile tool for building distributed systems that rely on asynchronous communication and message-driven architectures:
- Message Queuing. RabbitMQ acts as a central hub for storing and forwarding messages. It allows applications to send messages asynchronously and eliminates the immediate need for a response.
- Flexible Routing. RabbitMQ provides various exchange types (direct, fanout, topic, headers) that enable users to control how messages are routed to queues based on specific criteria. This flexibility helps build complex messaging topologies.
- Message Persistence. Messages can be persisted to disk, ensuring they are not lost if the RabbitMQ server restarts or encounters an error. This property is essential for critical applications where data loss cannot be tolerated.
- Multiple Protocols. RabbitMQ supports various messaging protocols, including AMQP (Advanced Message Queuing Protocol), MQTT (Message Queuing Telemetry Transport), and STOMP (Simple Text Oriented Messaging Protocol). This interoperability allows it to integrate with various applications and devices.
- Clustering and High Availability. RabbitMQ can be deployed in a cluster configuration, distributing messages across multiple nodes for improved performance and fault tolerance. This feature ensures the messaging system remains operational even if some nodes fail.
- Security. RabbitMQ offers robust security features, including authentication, authorization, and encryption, to protect messages and prevent unauthorized access.
- Management Console. A web-based management console provides a user-friendly interface for monitoring and managing the RabbitMQ server, including viewing queues, exchanges, connections, and more.
- Plugins. Plugins extend RabbitMQ's functionality, enabling features like message tracing, federation, and integration with other systems.
How Does RabbitMQ Work on Kubernetes?
Kubernetes orchestrates services and automates jobs in highly distributed clusters. A messaging broker like RabbitMQ enhances the quality of long-running tasks and stabilizes vital background processes.
RabbitMQ uses the Advanced Message Queuing Protocol (AMQP) to standardize messaging between Producers, Brokers, and Consumers. The procedure consists of the following three steps:
- A Producer publishes a message to the Exchange.
- The Exchange formats the message and forwards it to a predefined and selected Queue.
- A Consumer then retrieves the formatted message and consumes it.
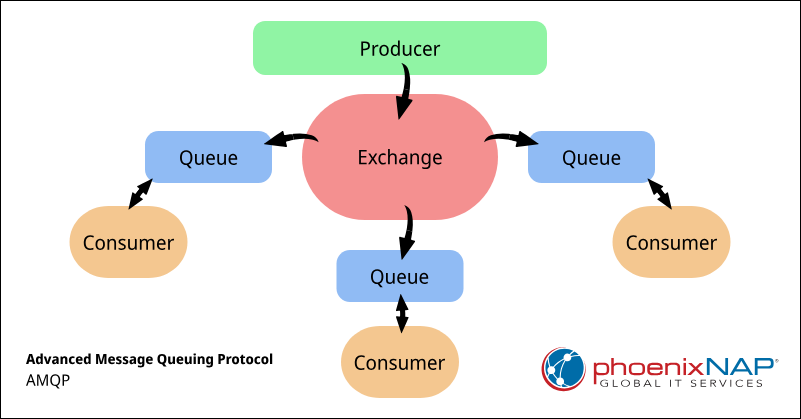
The systematic distribution of messages improves communication between loosely coupled applications and services.
How to Build RabbitMQ Cluster
The following section explains how to build a RabbitMQ cluster on Kubernetes. The process leverages the RabbitMQ Cluster Operator, which simplifies the deployment and management of RabbitMQ clusters.
Install RabbitMQ Cluster Operator
The RabbitMQ Cluster Operator contains the custom resource definition (CRD) necessary for creating RabbitMQ clusters on Kubernetes. Install the operator by applying the operator manifest available on GitHub:
kubectl apply -f "https://github.com/rabbitmq/cluster-operator/releases/latest/download/cluster-operator.yml"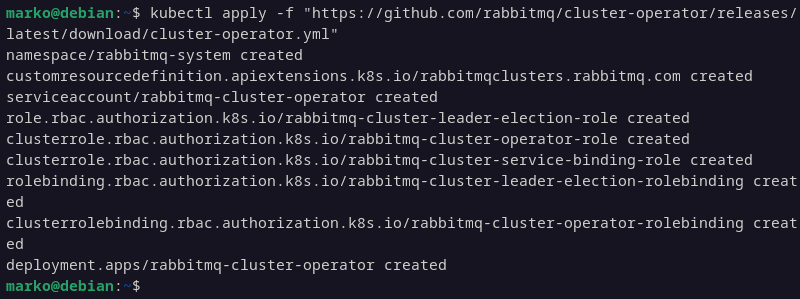
Create Cluster Manifest
Create a Kubernetes YAML manifest that defines the desired configuration for the RabbitMQ cluster:
1. Use a text editor to create a YAML file. This example uses Nano:
nano rabbitmq-cluster.yaml2. Paste the following code into the file. The manifest utilizes the RabbitmqCluster CRD provided by the operator:
apiVersion: rabbitmq.com/v1beta1
kind: RabbitmqCluster
metadata:
  name: test-rabbitmq-cluster
spec:
  replicas: 3
3. Save the file and exit.
Deploy Cluster
Deploy the RabbitMQ cluster by applying the cluster manifest to the Kubernetes environment:
kubectl apply -f rabbitmq-cluster.yaml -n rabbitmq
The Cluster Operator orchestrates the creation and management of the cluster according to the specifications defined in the manifest.
How to Add Instance to Cluster
Once a RabbitMQ cluster is deployed, it can be scaled easily by adding more instances (replicas). To edit a RabbitMQ cluster:
1. Open the cluster manifest:
nano rabbitmq-cluster.yaml2. Change the number of replicas in the spec field. For example, scale the cluster size from three to five replicas:
apiVersion: rabbitmq.com/v1beta1
kind: RabbitmqCluster
metadata:
  name: test-rabbitmq-cluster
spec:
  replicas: 5
3. Save the file and exit.
4. Apply the changes:
kubectl apply -f rabbitmq-cluster.yaml
How to Use RabbitMQ Cluster Operator Plugin
The RabbitMQ Cluster Operator Plugin simplifies the deployment and management of RabbitMQ clusters by automating many everyday tasks such as provisioning, scaling, and ensuring high availability.
The following section provides step-by-step instructions for its installation and usage.
Install RabbitMQ Cluster Operator Plugin
Follow the steps below to set up the RabbitMQ Cluster Operator Plugin on the local system:
1. Install the Krew plugin manager for kubectl by executing the following script directly in the shell:
(
  set -x; cd "$(mktemp -d)" &&
  OS="$(uname | tr '[:upper:]' '[:lower:]')" &&
  ARCH="$(uname -m | sed -e 's/x86_64/amd64/' -e 's/\(arm\)\(64\)\?.*/\1\2/' -e 's/aarch64$/arm64/')" &&
  KREW="krew-${OS}_${ARCH}" &&
  curl -fsSLO "https://github.com/kubernetes-sigs/krew/releases/latest/download/${KREW}.tar.gz" &&
  tar zxvf "${KREW}.tar.gz" &&
  ./"${KREW}" install krew
)
The output confirms that Krew is installed.

2. Open the RC file for the terminal shell. For example, in Bash, type the following:
nano .bashrc3. Add the following line to the end of the file:
export PATH="${KREW_ROOT:-$HOME/.krew}/bin:$PATH"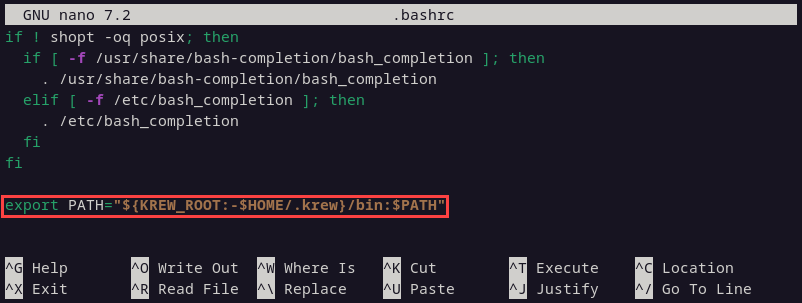
4. Save the file and exit.
5. Apply the changes made in the file:
source .bashrc6. Use the kubectl krew command to install the RabbitMQ plugin:
kubectl krew install rabbitmq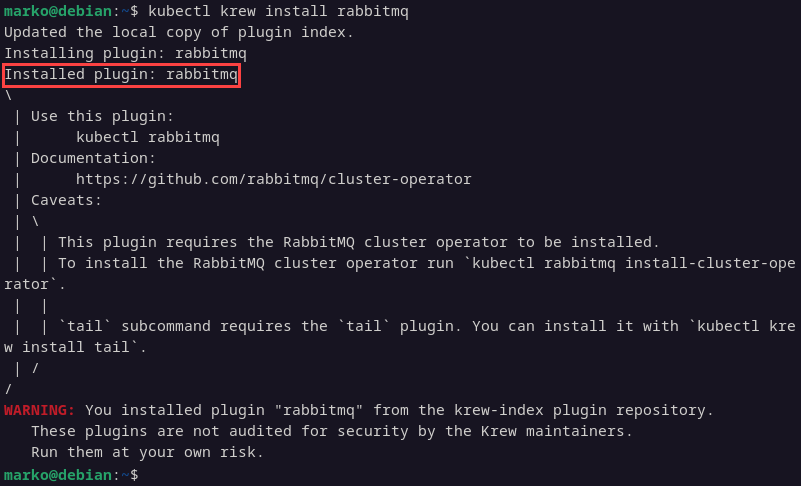
The output confirms the successful installation and provides additional information about the plugin.
Common RabbitMQ Plugin Commands
With the RabbitMQ Plugin installed, use the kubectl rabbitmq sub-command to create, manage, and delete RabbitMQ clusters. The table below contains some of the most frequently used commands:
| kubectl rabbitmq Command | Description |
|---|---|
create [instance] | Creates a new RabbitMQ cluster instance. |
get [instance] | Retrieves detailed information about a RabbitMQ cluster instance. |
list | Lists all RabbitMQ instances deployed in the current namespace. |
delete [instance] | Deletes a RabbitMQ instance and its associated resources. |
secrets [instance] | Displays the secrets associated with a RabbitMQ instance. |
manage [instance] | Manages the RabbitMQ instance by providing commands to scale, update configurations, etc. |
debug [instance] | Enables debug logging for a RabbitMQ instance. |
observe [instance] [index] | Displays the logs of a RabbitMQ node within the cluster. |
pause-reconciliation [instance] | Pauses the reconciliation process for a RabbitMQ instance. |
resume-reconciliation [instance] | Resumes the reconciliation process for a RabbitMQ instance. |
Conclusion
By following the steps of this tutorial, you installed RabbitMQ on Kubernetes using the Helm package manager. The article also showed how to install and use the RabbitMQ management plugin.
If you are still trying to decide which message queuing system to use on your cluster, read How to Deploy Kafka on Kubernetes to learn about a popular RabbitMQ alternative.
