Introduction
SSL Certificates are small data files that certify ownership of a public cryptographic key. Certificate Authorities (CA) guarantee that the key belongs to an organization, server, or other entity listed in the certificate.
When a user, via their browser, accesses a certified website, the information is encrypted with a unique public key. The data can only be decrypted by using a unique private key located on the host server. This high level of encryption prevents unauthorized attempts to access the information.
In this tutorial, learn how to install an SSL Certificate on CentOS 7.
Prerequisites
- A user with sudo privileges
- Access to a command line (Ctrl-Alt-T)
- A CentOS 7 machine
- A valid domain name with DNS pointed at the server
How to Get an SSL Certificate
There are several ways to obtain Certificates:
- Using an automated and free certificate authority such as the Let’s Encrypt project.
- Commercial certificate authorities provide certificates for a fee (Comodo, DigiCert, GoDaddy)
- Alternatively, it is possible to create a self-signed certificate. This type of certificate is useful for testing purposes or for use in a development environment.
If you are still considering what type of certificate you need, or which CA to choose, we’ve prepared a comprehensive guide to SSL certificates, private keys, and CSRs to assist you in the process.
Note: Trusted CAs do not verify self-signed certificates. Users cannot use it to validate the identity of their server automatically.
Install SSL Certificate with Let’s Encrypt
Let’s Encrypt is a free, open, and automated certificate authority. It uses the certbot software tool to administer certificates automatically.
Certbot is a highly automated tool. Make sure that that your Apache installation is valid and that you have a virtual host configured for your domain/s. You should first read our tutorial on how to install Apache on CentOS 7 if you need assistance with configuring your firewall and virtual hosts.
Certbot Installation
1. Use the command terminal to install the EPEL repository and yum-utils:
sudo yum –y install epel-release yum-utils2. Next, install a module that supports SSL for Apache:
sudo yum -y install mod_sslIn this example, the latest version of the module is already available.

3. We can now install certbot for Apache:
sudo yum –y install python-certbot-apache4. Once the installation runs its course, you can start the process to obtain a certificate by entering:
sudo certbot –apache –d yourdomain.comAlternatively, start certbot by typing:
sudo certbot5. The client asks you to provide an email address and to read and accept the Terms of Services. Certbot then lists the domains available on your server. Activate HTTPS for specific domains or all of them by leaving the field blank.

The next prompt allows you to force all requests to secure HTTPS access.
Once you have made your choices, the message on the terminal confirms that you have enabled encryption for your domain.
Automatic Certificate Renewal
The certificates issued by Let’s Encrypt are valid for 90 days. The certbot renew command checks the installed certificates and tries to renew them if they are less than 30 days away from expiration. To automate this process, create a cron job to execute the command periodically.
Use your preferred text editor to define how often to execute the renew command:
sudo crontab -eEnter this line and save the crontab:
* */12 * * * /usr/bin/certbot renew >/dev/null 2>&1How to Install SSL Certificate with Comodo
1. The first step is to submit a Certificate Signing Request to a Certification Authority. Our detailed guide on how to generate a certificate signing request (CSR) with OpenSSL is an excellent resource if you need assistance with this process.
2. Once a CA certifies your request, you receive a copy of your SSL certificate. You can now install the certificate on your CentOS 7 server.
This example shows how to install a certificate from a paid SSL provider, Comodo.
3. Once Comodo verifies your CSR the request, download the SSL files. Copy them (ComodoRSACA.crt) and the Primary Certificate (yourdomain.crt), to your Apache server directory. The private key generated during the CSR (Certificate Signing Request) process needs to be on the same server.
Configure Virtual Hosts for SSL
Aftr you have successfully certified the domain and placed the key files on the server, the next step will be to configure the virtual hosts to display the certificate.
1. Access the SSL configuration file:
sudo nano /etc/httpd/conf.d/ssl.conf2. Edit the configuration file to point to the correct files on your server.
Uncomment the following lines under section <VirtualHost_default_:443> and enter the correct file paths:
- DocumentRoot “/var/www/yourdomain.com”
- ServerName yourdomain.com: 443

- SSLEngine on
- SSLCertificateFile – The path of your certificate file.
- SSLCertificateKeyFile – The path of your key file.
- SSLCertificateChainFile– The intermediate COMODO certificate file.
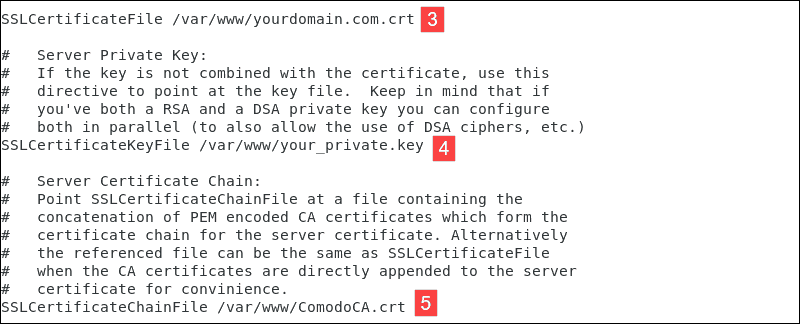
3. After making the necessary changes, exit the file (Ctrl+X), and press y to save the changes.
4. Test your Apache configuration before restarting. Make sure that the syntax is correct by typing:
sudo apachectl configtest5. Once the system confirms that the syntax is correct, restart Apache:
sudo systemctl restart httpdYou have now set up your Apache server to use the SSL certificate.
How to Create a Self-signed SSL Certificate
A self-signed certificate is useful for testing, in development environments, and on an intranet.
1. As with Let’s Encrypt, the mod_ssl Apache module provides support for the SSL encryption:
sudo yum –y install mod_ssl2. Create a new directory to store the private key:
sudo mkdir /etc/ssl/privatekey3. Restrict access to that directory only to the root user:
sudo chmod 700 /etc/ssl/privatekey4. Generate a self-signed certificate using this OpenSSL command:
sudo openssl req -x509 -new -newkey rsa:2048 -nodes -days 365 -keyout /etc/ssl/privatekey/ yourdomain.key -out /etc/ssl/certs/yourdomain.csrThis is a detailed overview of the elements:
- openssl – activates the OpenSSL software
- req – indicates that we require a CSR
- -x509 – specifies to use the X.509 signing request
- -new -newkey – generate a new key
- rsa:2048 – generate a 2048-bit RSA mathematical key
- -nodes – no DES, meaning do not encrypt the private key in a PKCS#12 file
- –days 365– number of days that the certificate is valid for
- -keyout – indicates the domain you’re generating a key for
- -out – specifies the name of the file that contains the CSR
Note: Make sure to replace yourdomain with your actual domain.
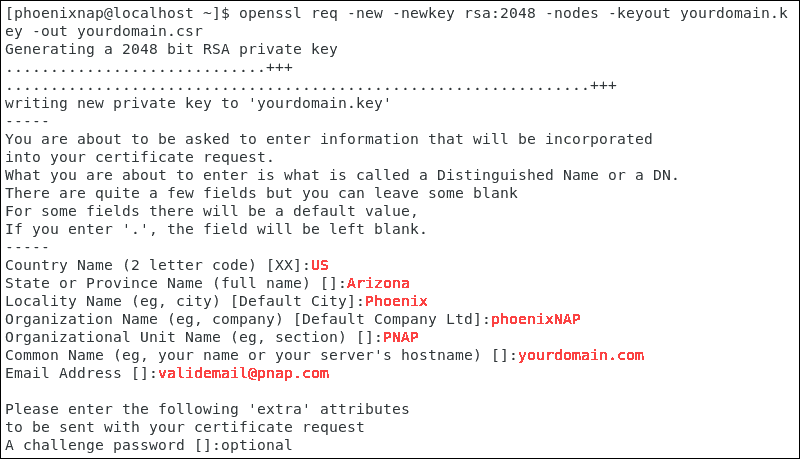
5. The system launches a questionnaire for you to fill out.
Enter your information in the available fields:
- Country Name – use a 2-letter country code
- State – the state where the domain owner is incorporated in
- Locality – the city where the domain owner is incorporated in
- Organization name – an entity that owns the domain
- Organizational unit name –the department or group in your organization that works with certificates
- Common name – most often, the fully qualified domain name (FQDN)
- Email address – contact email address
- Challenge password – define an optional password for your key pair
The image represents an example questionnaire in CentOS 7.
6. Proceed to configure the virtual host to display the new certificate. The process is identical to the steps outlined in Chapter 2, Configure Virtual Hosts for SSL.
7. Test your Apache configuration before restarting. To make sure that the syntax is correct, type:
sudo apachectl configtest8. Once the system confirms that the syntax is correct, restart Apache:
sudo systemctl restart httpdYou have now set up your Apache server to use your self-signed SSL certificate and should be able to visit your site with SSL enabled.
How to Check if a SSL Certificate is Valid?
To check if a SSL Certificate is valid you can publically available services, such as the SSL Server Test. Confirm the status of your certificate, and to check if all the details are correct.
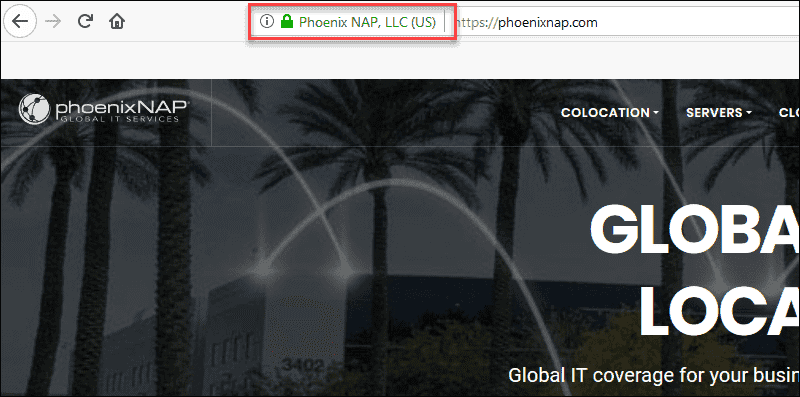
Alternatively, access your website using https:// to see if the SSL certificate is visible. The green padlock indicates that the additional layer of encryption is present.
Conclusion
By following these instructions, you have secured traffic on your CentOS Linux distribution website by implementing an SSL Certificate.
Your new SSL certificate ensures that all data passing between the web server and browsers remain private and secure.
