Introduction
Due to the limitations of virtualization technology, a guest operating system installed on a virtual machine has limited functionalities compared to the host system.
VMware Tools is a VMware Workstation package designed to address these limitations and improve display, clipboard, and peripheral management.
This tutorial explains how to install VMware Tools on an Ubuntu guest system.
Prerequisites
- VMware workstation installed.
- Ubuntu installed as a guest system.
- Command-line access on the Ubuntu guest.
- Administrative privileges on the Ubuntu guest.
Method 1: Install Open VM Tools Package
The recommended method for installing VMware Tools on an Ubuntu guest is to use the open-vm-tools package from the official Ubuntu repositories. Install the package by entering the command below in a terminal window:
sudo apt install open-vm-tools open-vm-tools-desktopThe command installs an open-source implementation of VMware Tools. The installation is quick, uses fewer resources than other methods, and is distribution-specific.
Method 2: Use GUI to Install VMware Tools in Ubuntu
The other option for installing VMware Tools is retrieving the software package from the VMware Workstation host. The installation can be completed via the Ubuntu desktop GUI or the command line.
Follow the steps below to install VMware Tools using Ubuntu GUI:
1. Open VMware Workstation and start the Ubuntu VM.
2. When Ubuntu is fully booted, select the VM item from the VMware Workstation menu bar at the top of the screen.
3. Choose Install VMware Tools from the drop-down menu.
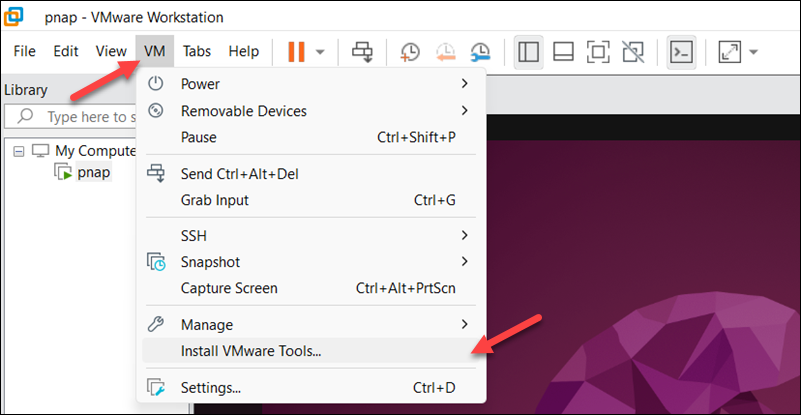
A virtual disk containing the VMware Tools installation appears in the Ubuntu dock.
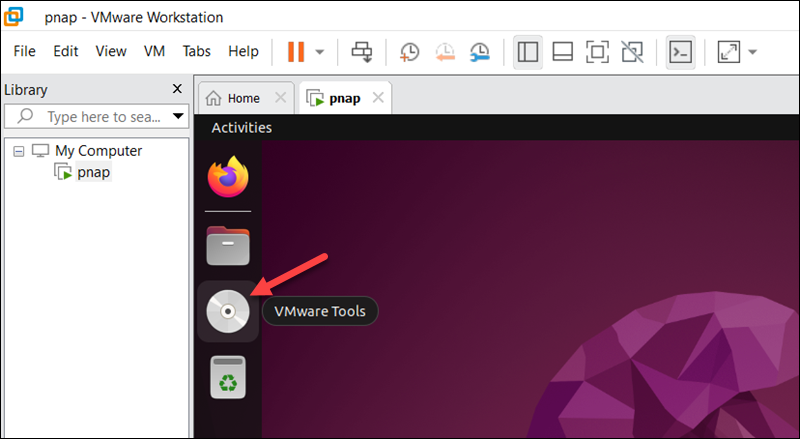
4. Click the disk icon to open the file manager.
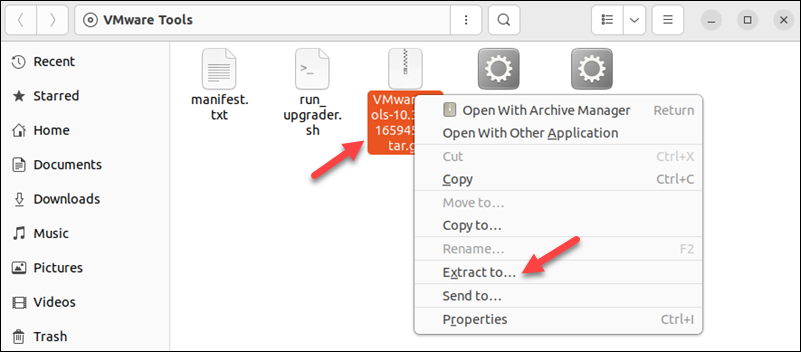
5. Right-click the compressed TAR.GZ file and select where to extract the files.
6. Open a terminal window. Type the following command to access the vmware-tools-distrib directory:
cd [path-of-extraction]/vmware-tools-distribFor example, if the directory was extracted into the Documents directory, type:
cd Documents/vmware-tools-distrib7. Start the installation by entering:
sudo ./vmware-install.pl –f
Before the installation starts, the system prompts several questions. Press Enter after each question to apply the default settings, then wait for the installation to finish.

8. Type the command below to verify the version and successful installation of VMware Tools:
vmware-toolbox-cmd --versionThe output shows the version number.

Method 3: Use Terminal to Install VMware Tools
If your Ubuntu system does not have a graphical interface, proceed with the following steps to install VMware Tools from the command line:
1. Use the steps described in Method 2 to mount the VMware Tools installation CD.
2. Enter the following cd command to go to the mounted directory:
cd /media/[username]/'VMware Tools'3. Use the ls command to list the contents of the directory and locate the TAR.GZ archive:
ls
4. Extract the content from the archive to a temporary directory:
tar xvzf VmwareTools-10.3.10-12406962.tar.gz -C /tmp/5. Navigate to the VMware tools distribution folder:
cd /tmp/vmware-tools-distrib/6. Start VMware Tools installation:
sudo ./vmware-install.pl –f7. Press Enter for each question to apply the default configuration and complete the installation.
Conclusion
This tutorial showed you how to install VMware Tools on your Ubuntu system. The tutorial included three installation methods: the distribution package, graphical interface, and command line.
Next, read our VirtualBox vs. VMware comparison article to learn more about these popular type 2 hypervisors.