Introduction
SCP (Secure Copy Protocol) is a network protocol that securely copies files/folders between Linux (Unix) systems on a network. To transmit, use the scp command line utility, a safer variant of the cp (copy) command.
SCP protects your data while copying across an SSH (Secure Shell) connection by encrypting the files and the passwords. Therefore, the information is still encrypted even if the traffic is intercepted.
This guide shows you how to copy files using the SCP command and includes 13 practical.
Prerequisites
- A secure shell login on the server.
- (optional) Root access on both the client and server.
- A secure shell login on the server system.
SCP Command Syntax
The syntax for using the scp command is:
scp [option] [user_name@source_host:path/to/source/file] [user_name@target_host:target/path] If you omit:
- The user_name of the host (or target), the command defaults to the current user.
- The path/to/source (or the target/path) from the command, the program looks for (or copies) the file locally.
When working with remote files, always specify the user and host specifications.
Use an account with read access to the file(s) you want to copy on the source system. Additionally, you need to use an account with write access to the directory where the file(s) will be saved on the destination system.
Note: The scp command does not check the destination location before writing. Any files in the destination with the same name will be overwritten without notification.
SCP Command Options
You can add many scp command options to the command to customize and speed up the process. Options are added as attributes right after the scp command.
Each option has a short, single-character form and a longer, descriptive equivalent.
| Option | Description |
|---|---|
-1 | Use protocol 1. |
-2 | Use protocol 2. |
-4 | Only use Ipv4 addresses. |
-6 | Only use IPv6 addresses. |
-B | Run in batch mode and disable all queries for user input. |
-b [buffer_size] | Specify the buffer size used for data transfer. If not specified, uses the default 32768 bytes. |
-C | Enable compression. |
-c [cipher] | Select the cipher for data encryption. If not specified, SCP uses the default - 'AnyStdCipher'. |
-D [debug_level] | Set the debug level (1, 2, 3, or 99). |
-d | Copy the file only if the destination directory already exists. |
-F [file] | Specify an alternative configuration file for SSH. |
-h | Show a list of command options. |
-i [file] | Specify the file from which to read the identity for public key authentication. |
-l [limit] | Limit the bandwidth (specify the limit in Kbit/s). |
-o ssh_option | Set options to SSH in ssh_config format. |
-P [port] | Specify the port to which to connect. If not specified, SCP uses port 22. |
-q | Run SCP in quiet mode. |
-Q | Disable file transfer statistics. |
-r | Copy recursively. |
-S [program] | Use a specified program for encryption connection. |
-u | Delete the source file once the copy is complete. |
-v | Enable verbose mode, which sets the debug level to 2. |
SCP Command Examples
Use the SCP command in the following cases:
- Copying files from a local host to a remote host.
- Copying files from a remote host to a local host.
- Copying files between two remote servers.
To understand this useful utility better, take a look at the following scp command examples.
Copy a File from Local to Remote Server
In the example below, we copy a sample file from a local host to a remote server:
scp Desktop/sample_example.txt [email protected]:/home/remote_dir The command includes the following information:
Desktop/sample_example.txt- The name of the file being copied and its location.[email protected]- The username and IP address of the remote server./home/remote_dir- The location where to store the copied file.

Copy File from Remote Server to Local Host
To copy a sample file from a remote host to a local host, run this command:
scp 147.182.143.27:/home/remote_dir/sample_example.txt home/DesktopThe information provided is
[email protected]- The username and IP address of the remote server from where the file is currently located./home/remote_dir/sample_example.txt- The name of the file being copied and its location.home/Desktop- The location where to store the copied file.

Copy File from One Remote Server to Another
Next, copy a file from one remote server to another remote server using the scp command in the following format:
scp [email protected]:/home/remote_dir/sample_example.txt [email protected]:home/DesktopThe command above specifies:
[email protected]- The username and IP address of the remote server from where the file is currently located./home/remote_dir/sample_example.txt- The name of the file being copied and its location.[email protected]- The username and IP address of the remote server where we want to copy the file.home/Desktop- The location where to store the copied file on the remote server.
Copy Multiple Files with SCP
SCP allows you to copy multiple files in a single command. For example, the command below copies two files from a local host to a remote server:
scp example/sample1.txt example/sample2.txt [email protected]:/home/remote_dirIt includes the following information:
example/sample1.txt- The name and location of the first file being copied.example/sample2.txt- The name and location of the second file being copied.[email protected]- The username and IP address of the remote server receiving the files./home/remote_dir- The location where to store the copied files on the remote server.

Copy Directory from Local Host to Remote Server Recursively
Apart from files, scp can also securely copy directories to or from remote servers. The following command shows how to copy a sample directory to a remote server recursively:
scp -r example [email protected]:/home/remote_dirThe command includes:
-r- The option for copying the directory recursively.example- The name of the directory copied from the local server.[email protected]- The username and IP address of the remote server receiving the folder./home/remote_dir- The location where to store the copied directory on the remote server.
Copy File with SCP Using Specific Port
By default, SCP uses port 22. However, if a remote system is configured to listen to SSH requests on a different port, use the –P switch to specify the port.
For example, the following command copies a file from a local to a remote server using port 2222:
scp -P 2222 Desktop/sample_example.txt [email protected]:/home/remote_dirThe components of the command above are:
-P 2222- Instruct the command to use the port 2222.Desktop/sample_example.txt- The file name you want to copy and its location.[email protected]- The username and IP address of the remote server receiving the file./home/remote_dir- The location where to store the copied file on the remote server.
Copy File with SCP in Quiet Mode
Running a scp command in quiet mode means disabling the progress meter and non-error messages from showing in the output. To do so, you need to add the -q option:
scp -q Desktop/sample_example.txt [email protected]:/home/remote_dir
Copy File with SCP in Verbose Mode
You can run scp in verbose mode by adding the -v option, which sets the debug level to 2. This flag prints debugging information in the output to help you when troubleshooting.
Add the -v option after scp to enable verbose mode, as in the example below:
scp -v Desktop/sample_example.txt [email protected]:/home/remote_dir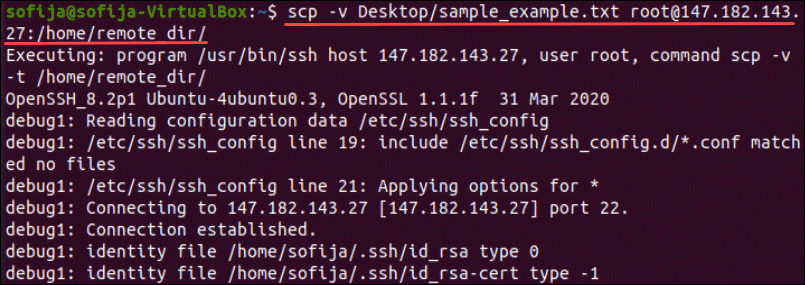
Copy File with SCP and Limit Bandwidth
Another helpful option is limiting the bandwidth used by the scp command by adding the -l parameter. This is especially useful when copying large files to prevent SCP from draining the bandwidth.
When limiting bandwidth, specify the number in Kilobits/s. Bear in mind that 1 byte = 8 bits. Therefore, if you want to limit the bandwidth for SCP to 100 KB/s, the value in -l kbps would be 800 (100 x 8), as in the command below:
scp -l 800 Desktop/sample_example.txt [email protected]:/home/remote_dirCopy File with SCP Faster
To speed up the file transfer from one server to another, add the -C option to compress the file while it's being transferred. Once the file reaches its destination, it returns to its regular size.
scp -C Desktop/sample_example.txt [email protected]:/home/remote_dirCopy File with SCP Using Specific Cipher
By default, SCP uses AES-128 to encrypt files. However, the -c option allows you to change the cipher SCP will use to encrypt the file.
For instance, to increase security, you can switch to 3DES encryption, as in the following example:
scp -c 3des Desktop/sample_example.txt [email protected]:/home/remote_dirCopy File with SCP Using IPv4 or IPv6
You can force SCP to only use IPv4 or IPv6 by adding the -4 or -6 attribute.
To copy a sample file from a local server to a remote host only using IPv6, enter:
scp -6 Desktop/sample_example.txt [email protected]:/home/remote_dirCopy File with SCP and Preserve File Attributes
To copy a file using SCP and preserve file attributes such as modification and access times, modes, and permissions, use the -p option:
scp -p Desktop/sample_example.txt [email protected]:/home/remote_dirConclusion
In this guide, you have learned what the scp command is and how to use it to secure the transmission of files. This tool is especially useful as a replacement for FTP, which is inherently insecure by default.
The secure copy protocol also follows regular command-line and SSH functionality, creating a seamless command set for managing files between Linux machines.