Introduction
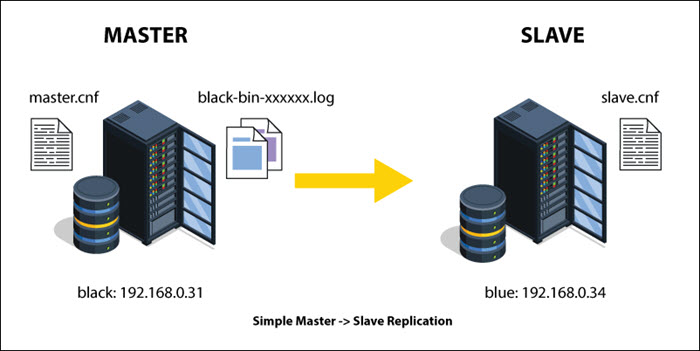
In cloud computing, master-slave data replication refers to storing the same information on multiple servers. One server controls the group, and the other devices handle the work within the same node.
Replication allows businesses to create regular daily backups that can restore the master MySQL database in case of a storage malfunction. It also facilitates simultaneous data processing without overloading the master server.
This guide will walk you through setting up master-slave replication in MySQL.
Prerequisites
- A Linux system.
- A user account with root privileges.
- MySQL installed on the master and slave servers.
- The cloud server's private IP address (to avoid charges for bandwidth on the public IP during configuring).
Note: The term master-slave serves to distinguish this model from master-master replication in which any member of the group can update the information. Also, there has been a tendency to reduce the usage of the terms and replace them with other terms, such as primary/subordinate.
What Is Master-Slave Replication in MySQL
Master-slave replication in MySQL is a process that enables the replication or copying of data from one MySQL database server (the master) to one or more MySQL database servers (the slaves). The logic behind the replication is to boost scalability, ensure data availability, and provide a reliable backup solution in case of a catastrophe or hardware failure.
Why Is Master-Slave Replication Important
MySQL master-slave replication plays a crucial role in modern database deployments. It continuously copies and replicates data from a master server to one or more slave servers, thus facilitating data availability and disaster recovery.
The key benefits of master-slave replication are:
- Resiliency. Slaves act as hot backups, ready to become the new master in case of a primary server failure. This setup minimizes downtime and data loss.
- Scalability. Read queries can be distributed across slaves, offloading the master and facilitating the handling of increased loads.
- Disaster recovery. Slaves safeguard data against hardware failures or catastrophic events, ensuring quick recovery.
Note: While master-slave replication offers substantial benefits, there are some limitations. Slaves don't accept direct write operations, and delays in data propagation are possible depending on the chosen configuration.
Steps for Setting Up Master-Slave Database Replication in MySQL
This section shows how to set up the master-slave database replication in Ubuntu. The default package manager for Ubuntu is apt, so if you are using a different Linux distribution, check the syntax for that system.
For example, Yum (Yellowdog Updater, Modified) is the package management tool for Red Hat Enterprise Linux systems. Therefore, the apt part of the command can be safely replaced with yum while the rest stays the same.
The syntax for the install command is either yum install [package_name] or apt install [package_name].
Follow the steps outlined in the sections below to set up the replication of your MySQL server.
Step 1: Adjust Firewall Settings
The first step is to adjust the firewall settings on the machine hosting the master database. The default firewall on Ubuntu is UFW, which we will adjust to allow connections from the server hosting the slave database.
On the source server, use the following syntax to allow connections through the firewall:
sudo ufw allow from [slave_server_ip] to any port 3306Replace [slave_server_ip] with the IP address of your machine hosting the slave.
For example:

The command allows connections from the specified server's IP address to MySQL's default port number 3306.
Note: New to UFW? Check out our guide on how to configure UFW on Ubuntu.
Step 2: Configure the Source Database
To set up the replication, you must adjust some settings in the source database configuration file. In Ubuntu, the default location of the MySQL configuration file is /etc/mysql/mysql.conf.d/. Follow the steps below:
1. Run the following command to open the config file with nano, or use a text editor of your choice:
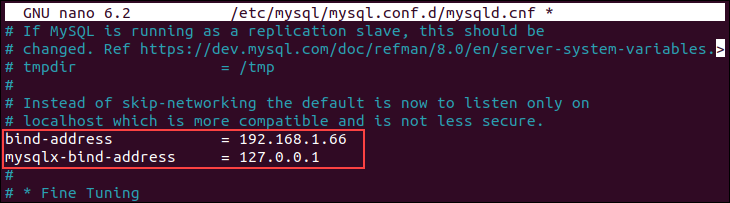
sudo nano /etc/mysql/mysql.conf.d/mysqld.cnf2. Find the following line in the file:
bind-address = 127.0.0.1Replace 127.0.0.1 with the public IP address of the source server. Since 127.0.0.1 represents localhost, not changing this setting would cause the connection to fail.
Use the source server IP address to configure your source MySQL instance to listen for connections on an IP address that the slave can reach.
For example:
3. Find the server-id line:
# server-id = 1The server-id setting allows MySQL to distinguish between multiple servers in a replication setup, as each server has its own server-id value. Uncomment the line (remove the #) and, since this is the master server, keep the value 1.
4. Scroll down until you find the following line:
# log_bin = /var/log/mysql/mysql-bin.logUncomment the line to allow the program to read the binary log file. By default, binary logging is disabled. The slave server must be able to read the source server's binary log file to know when and how to replicate the data.
5. Scroll down to the end of the file and find the binlog_do_db line:
# binlog_do_db = include_database_nameUncomment the line and replace include_database_name with the name of the database you want to replicate. To replicate multiple databases, add multiple instances of the line one after the other, each specifying the database name.
6. After you finish editing the file, press Ctrl+O to save and exit the file.
7. Restart the MySQL server to apply the changes:
sudo systemctl restart mysqlStep 3: Create Replication User
In this step, create a MySQL user, which the slave server will use to connect to the source database. This dedicated user will perform any actions related to the replication process.
If you want to use an existing user with appropriate privileges to connect to the MySQL server, skip the creation and only grant the privileges.
To create a dedicated user, follow the steps below:
1. Open the MySQL shell:
sudo mysql2. Create a new MySQL user using the following syntax:
CREATE USER '[user_name]'@'[ip_address]' IDENTIFIED WITH mysql_native_password BY '[password]';- Replace
[user_name]with the username you want to use for the account. - Replace
[ip_address]with the slave server's IP address. - Replace
[password]with a strong password.
For example:

The example above creates a user slave_copy, with the slave server's public IP address and a strong password. The authentication is done through the mysql_native_password authentication plugin. While it is possible to use MySQL's default authentication mechanism caching_sha2_password, it requires an encrypted connection between the two servers.
Note: See how to secure your MySQL installation with the mysql_secure_installation script.
3. Grant the new user the appropriate privileges. Use the following syntax to provide the user with the REPLICATION SLAVE permissions:
GRANT REPLICATION SLAVE ON *.* TO '[user_name]'@'[ip_address]';Replace all the placeholders with your own information, same as in the previous step.
For example:

4. Run the FLUSH PRIVILEGES command to free up any cached memory from running the previous commands:
FLUSH PRIVILEGES;Step 4: Retrieve Log File Position
The slave server needs the coordinates of the master server's binary log file and the file's position to function properly. The coordinates allow the server to determine from which point it should start copying the database events and help it track the events it has already processed.
Follow the steps below to retrieve the log file's position:
1. Lock the database to prevent users from making changes to data while you are retrieving the file's position. Note that locking the database causes some downtime, so plan accordingly.
Open the MySQL prompt and run the following command to lock the database:
FLUSH TABLES WITH READ LOCK;2. Execute the statement below to obtain the current status information for the binary log file:
SHOW MASTER STATUS;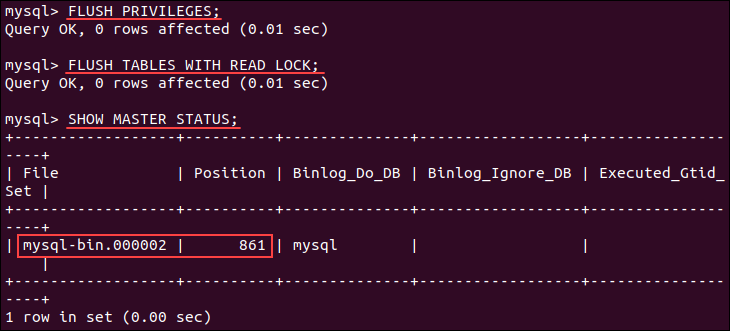
Take note of the file name and position value, as you will need them in the next step.
Step 5: Copy Data or Create New Database
Depending on whether you have existing data that you want to migrate over to the slave server, there are two options to choose from:
If You Don't Have Existing Data for Replication
If your master server MySQL instance is a fresh installation and does not have existing data, you can unlock the database. Open the MySQL prompt and run the following command:
UNLOCK TABLES;Then, close the MySQL shell and move on to step 6.
If You Want to Replicate Existing Data
If your master MySQL instance has existing data that you want to migrate to the slave server, you can create a database snapshot via the mysqldump utility. Follow the steps below:
1. With the database still locked, open a new terminal window and use the syntax below to export your database using mysqldump:
sudo mysqldump -u root [database_name] > [database_name.sql]For example, to create a snapshot of the mysql database, run the following command:
sudo mysqldump -u root mysql > mysql.sqlThe command creates a database snapshot and writes it to the mysql.sql file.
2. Unlock the databases to make them writable again by running the following in the MySQL prompt:
UNLOCK TABLES;3. Send the snapshot to the slave server. The safest way to do that is to use an SSH connection and the scp command:
scp [file_path] [username]@[ip_address]:/tmp/- Replace
[file_path]with the path to the snapshot file. - The
[username]is the administrative Ubuntu user profile on the slave server. - The
[ip_address]is the public IP of the slave server.
For example:
scp mysql.sql [email protected]:/tmp/The command sends the snapshot file to the specified server, placing it in the server's /tmp/ directory.
4. SSH into the slave server.
5. Once connected, open a MySQL prompt and create the database that you want to replicate from the master server:
CREATE DATABASE [database_name];Replace [database_name] with the name of the database, such as mysql.
6. Exit the MySQL prompt and use the syntax below to import the database snapshot:
sudo mysql [database_name] < [snapshot_file_path]For example:
sudo mysql mysql < /tmp/mysql.sqlThe command imports the data from the mysql.sql snapshot to the mysql database we have created.
Step 6: Configure Slave Server
The last step in setting up the replication is to configure the settings on the slave server. Follow the steps below:
1. Open the MySQL configuration file on the slave server using a text editor:
sudo nano /etc/mysql/mysql.conf.d/mysqld.cnf2. Find the server-id line and uncomment it. Change the value to a number different from the one you have set on the master server (for example, 2):
server-id = 23. Find the lines below and set the same values as in the source machine's configuration file:
log_bin = /var/log/mysql/mysql-bin.logbinlog_do_db = mysql4. The last step is to add the following line to the end of the file, defining the slave server's log file location:
relay-log = /var/log/mysql/mysql-relay-bin.log5. Save the changes and exit the file.
6. Restart the MySQL server for the changes to take effect:
sudo systemctl restart mysqlStep 7: Start Replication
After configuring both MySQL instances, you can start the replication process. Open the MySQL shell on the slave server and use the syntax below to instruct the server where to find the binary log file and from which position to start reading it:
CHANGE REPLICATION SOURCE TO
SOURCE_HOST='master_server_ip',
SOURCE_USER='replica_user',
SOURCE_PASSWORD='password',
SOURCE_LOG_FILE='mysql-bin.000002',
SOURCE_LOG_POS=861;- Replace the
master_server_ipwith the public IP address of the master server. - The
replica_useris the user account you have created for the replication. - The
passwordis the password you have set up for the user. - For
SOURCE_LOG_FILEandSOURCE_LOG_POS, specify the file name and position you obtained in Step 4.
Start the replication by running:
START REPLICA;The command instructs the server to start replicating any changes made to the specified database on the master server.
To see the details about the current server state, run the following command:
SHOW REPLICA STATUS\G;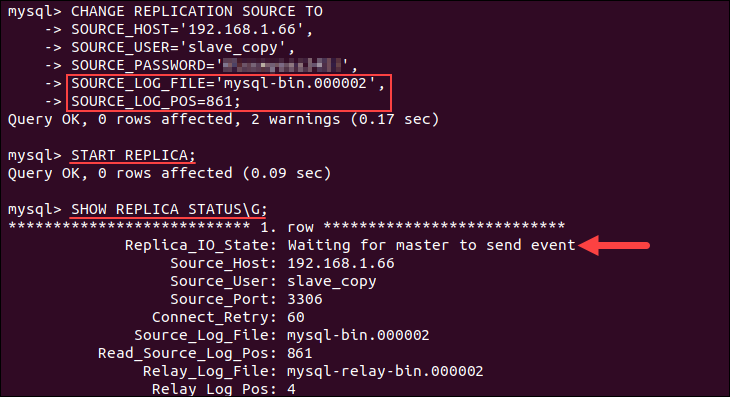
The output shows the current server status.
Conclusion
After reading this article, you should be able to set up master-slave replication in MySQL and begin slave threads. You can now easily do regular backups, as well as store and modify data on multiple computers.
Next, see how to reset or change your MySQL root password or learn the key differences between MySQL and PostgreSQL.