Introduction
The phoenixNAP Bare Metal Cloud preconfigured single CPU instance is an ideal solution for load balancing. A software load balancer does not require demanding hardware and the cheapest BMC instance is more than enough to get you started.
This tutorial explains an example setup for a load balancer on phoenixNAP's s0.d1.small BMC server instance.

Prerequisites
- Access to the command line/terminal with sudo privileges.
- Access to the browser with a stable internet connection.
- A Bare Metal Cloud (BMC) account.
What is Load Balancing?
Load balancing distributes high traffic volumes across multiple servers, ensuring no single instance is overworked. The end goal of load balancing is overall processing efficiency and a better user experience.
The load balancer monitors the backend server health and ensures optimal requests and server resource handling. For example, load balancers help reroute traffic when a server can't receive a request.
S.0 BMC Instance as a Load Balancer
Software-based load balancers are easy to set up on a BMC server as a Linux process. For example, the HAproxy server utility is simple to install and configure as a load balancer on a BMC instance.
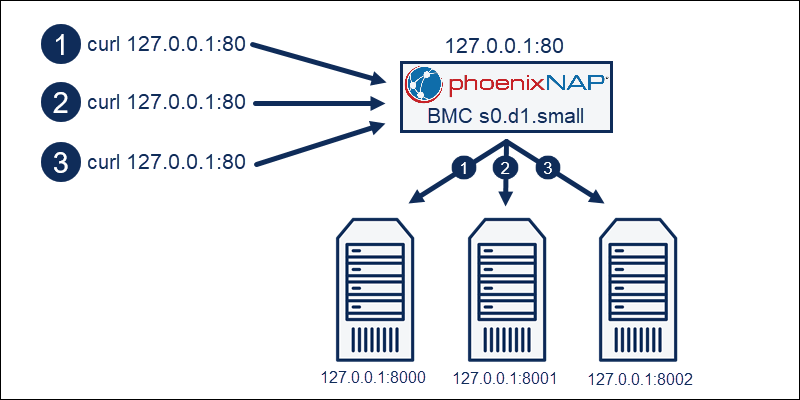
The setup has the following structure:
- The small BMC instance acts as a load balancer.
- The three testing servers act as a server farm.
Follow the instructions to set up an example local web application with a load balancer.
Step 1: Generate SSH Keys
Generate a key pair on the machine you will use to connect to BMC via SSH. Skip this step if there is a saved key on the BMC portal you'd like to use.
1. Open the terminal (CTRL+ALT+T).
2. Generate a new SSH key:
ssh-keygenThe command starts the keygen process.
3. Follow the steps to create the key pair. If there are existing keys you want to keep saved under id_rsa, change the key name. Otherwise, press Enter to choose the default location and overwrite the existing keys.

Add a passphrase for additional security.
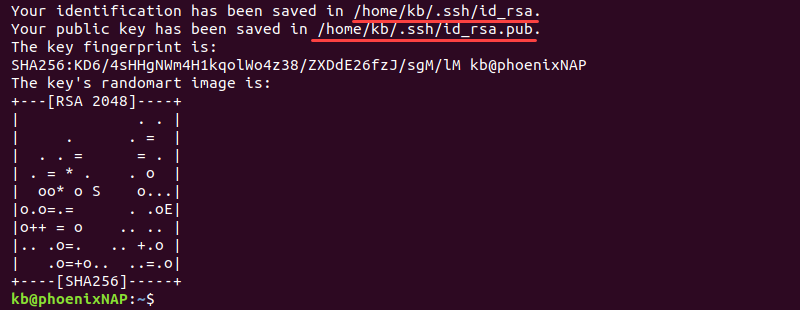
When the process completes, the output prints the key pair location and the randomart image.
4. Open the id_rsa.pub file using Vi:
sudo vi ~/.ssh/id_rsa.pub5. Copy the file contents and exit the editor:
:qThe following step uses the id_rsa.pub contents.
Step 2: Deploy s0.d1.small BMC Instance and Connect via SSH
1. Log in to the BMC portal using your phoenixNAP Client Portal credentials.
2. Click Deploy New Server on the Servers page.
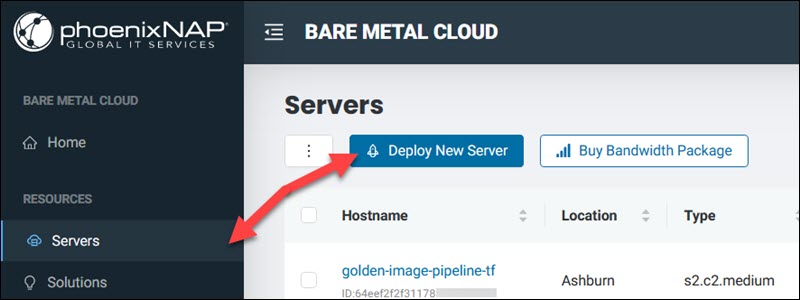
3. Select the Location for the server in the first section. Choose a billing model right after.
4. Select the s0.d1.small BMC instance from the Server section.

5. Chose an operating system in the following section. We're using Ubuntu Bionic. Press Next to proceed to the Instance Details page.
Note: Typically, an Ubuntu server is available in under two minutes.
6. Enter the hostname and an optional description for the server.
7. If you generated a new key in the previous section, click Add a new Public SSH Key and paste the id_rsa.pub contents. If you have a key saved in the BMC portal, type in the saved key name and select it from the list.
8. Buy an IP allocation or assign an existing allocation. To test this guide, at least one public IP is necessary. /31 IP allocation is the minimum requirement for Linux.
9. Skip the Public Networks and Default Gateway options for now.
10. Review the details once more and click the Deploy New Server button to complete the process when you're ready.
11. Locate your BMC instance on the server list and click the name to see instance details. The server is ready when the status displays as Powered On.

View the assigned IPs column in the Network & IP Settings tab on the Server Details page.
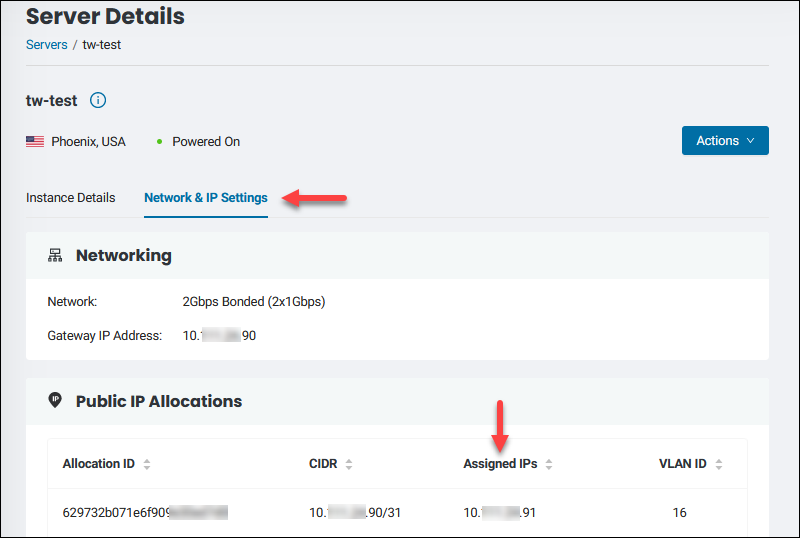
Use a public IP address for the next step.
12. SSH into the machine by running the following command in the terminal:
ssh ubuntu@<your public IP>
If the output asks to confirm the authenticity, type in yes to add the location to known hosts and connect to the BMC server.
Step 3: Install HAProxy
1. Add the HAProxy repository:
sudo add-apt-repository ppa:vbernat/haproxy-1.8
2. Press Enter when asked to add the repository.
3. After the process completes, update the packages:
sudo apt-get update4. Lastly, install HAProxy with:
sudo apt-get install haproxyStep 4: Create Test Web Servers
1. Create three directories that will act as servers:
mkdir server{1..3}
2. Create a landing page for each server:
touch server{1..3}/index.html3. Edit each index.html file:
sudo vi server1/index.html4. Add the following contents:
<!DOCTYPE html>
<html>
        <title>Server 1</title>
        <body>Connected!</body>
</html>
5. Add the same contents to server2/index.html and server3/index.html. Change the title tags contents to Server 2 and Server 3 respectively.
Step 5: Configure HAProxy Load Balancer
1. Edit the default configuration for HAProxy:
sudo vi /etc/haproxy/haproxy.cfg2. Delete everything from the file and add the following contents:
defaults
  mode http
  timeout client 10s
  timeout connect 5s
  timeout server 10s
  timeout http-request 10s

frontend myfrontend
  bind 127.0.0.1:80
  default_backend myservers

backend myservers
  balance roundrobin
  server server1 127.0.0.1:8000
  server server2 127.0.0.1:8001
  server server3 127.0.0.1:8002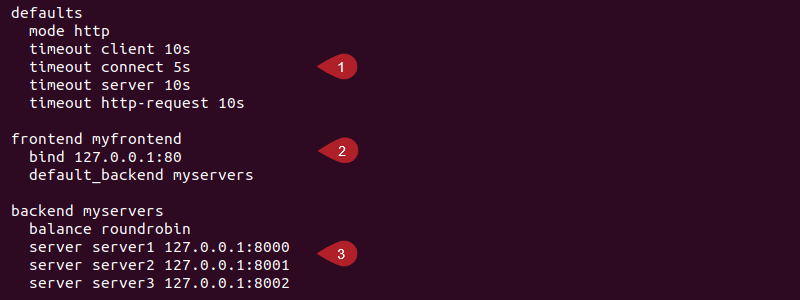
The configuration file has three sections:
defaultsare the shared settings defined in all the following sections. The section sets the wait times to help avoid common connection problems.frontenddefines the address and port where HAProxy receives requests. Thedefault_backendline points to where the load balancer should relay the connections.backendstores the server addresses and ports for multiple servers, defined in the following step. The load balancing algorithm is set to round robin.
3. Save the file and close:
:wq4. Restart HAProxy to apply the configuration:
sudo systemctl restart haproxyThe output does not print anything to the console.
Note: Learn more about how to configure HAProxy for Load Balancing
Step 6: Run Servers and Test Load Balancer
1. Open three more terminal tabs and log into the server:
ssh ubuntu@<your public IP>There are now four terminal tabs open.
2. In each tab, navigate to the server folders:
cd server1cd server2cd server33. Run the test server in each terminal tab on a different port:
python3 -m http.server 8000 --bind 127.0.0.1python3 -m http.server 8001 --bind 127.0.0.1
python3 -m http.server 8002 --bind 127.0.0.1
4. In the fourth tab, test the connection using curl:
curl 127.0.0.1:80Run the command two more times to confirm the load balancer works correctly.
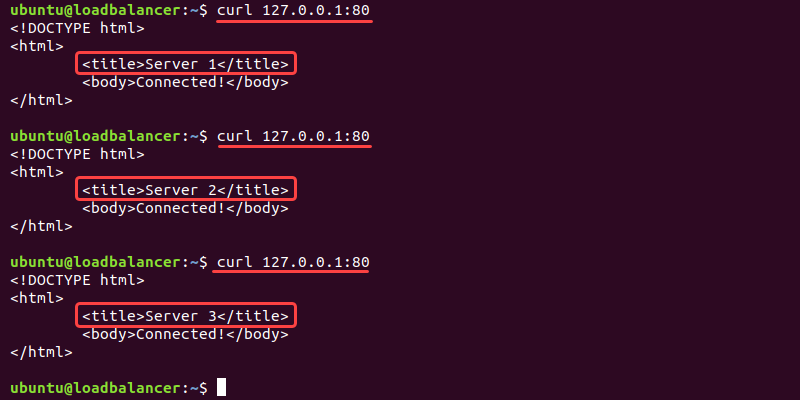
The round robin load-balancing algorithm ensures the requests route to each server once to balance the load.
Why Use S.0 as a Load Balancer?
Configuring an S.0 BMC server as a load balancer is an inexpensive way of maximizing the speed and resource capacity of a cluster of servers.
Some benefits of using the s0.d1.small BMC server as a load balancer include:
- Low cost. The instance is the smallest and cheapest offer, and the configuration easily handles the load balancer workload. Pay on an hourly basis, per month, or make an extended reservation depending on your use case.
- Effective network overload handling. The general-purpose instance is commonly used for high-traffic websites and utilizes all the resources in a balanced way.
- Increased security and high availability. The network is robust, fast, low-latency, and reliable. Additionally, each server comes with 20 Gbps DDoS protection to ensure maximum availability and security when under attack.
Conclusion
After reading this article, you know how to set up the s0.d1.small BMC instance as a load balancer on the frontline of your server farm.
This inexpensive general-purpose instance has many other use cases and can be configured to serve as a powerful firewall or sandbox environment for Dev teams.

