Introduction
Vim is a widely used, open-source Unix text editor. Learning to use Vim commands is a matter of practice and experience. That is why it is handy to have a helpful reference sheet while mastering them.
In this tutorial, you will find the most important Vim commands as well as a downloadable cheat sheet.

Moving Inside a File
You can move the cursor within a file by single characters, words, tokens, or lines.
According to Vim, a word can be a group of letters, numbers, and underscores. On the other hand, a token is anything separated by whitespace and can include punctuation.
Additionally, you can move to different parts of a text by screen view.
Moving by Characters, Words and Tokens
The basic keys for moving the cursor by one character are:
h– move the cursor leftj– move the cursor downk– move the cursor upl– move the cursor right
You can also use these keys with a number as a prefix to move in a specified direction multiple times. For example, if you run 5j the cursor moves down 5 lines.
b– move to the start of a wordB– move to the start of a tokenw– move to the start of the next wordW– move to the start of the next tokene– move to the end of a wordE– move to the end of a token
For instance, you have the noun phrase “step-by-step” as part of a text and the cursor is placed at the end of it. The first time you press b, the cursor moves back to “step-by-step”. However, if you use B, the cursor moves all the way back to: “step-by-step” since there is no whitespace between these characters.
Moving by Lines
0(zero) – jump to the beginning of the line$– jump to the end of the line^– jump to the first (non-blank) character of the line#G/#gg/:#– move to a specified line number (replace # with the line number)
To illustrate the difference between 0 and ^, take a look at the following example. In the first bullet, the command moves the cursor to the blank space before the bullet. On the other hand, in the third bullet, the ^ key moves the cursor to the hyphen (the first character in the line).

Note: To use the #G / #gg to jump to the wanted line, line numbering needs to be enabled. Check out how to show or hide line numbers in Vim/Vi.
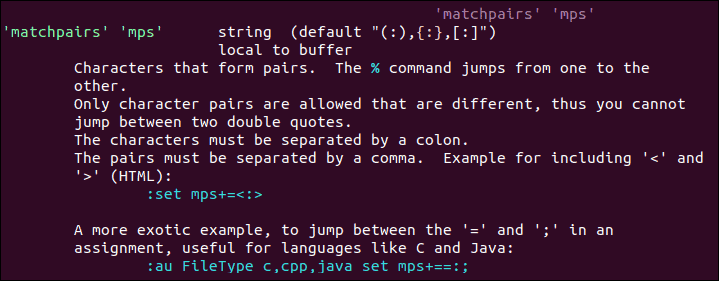
To learn more about matchpairs and how to use more than the default supported pairs, run the following commands in the text editor: :h matchpairs.
Moving by Screens
The following commands are used as a quick way to move within the text without scrolling.
Ctrl + b– move back one full screenCtrl + f– move forward one full screenCtrl + d– move forward 1/2 a screenCtrl + u– move back 1/2 a screenCtrl + e– move screen down one line (without moving the cursor)Ctrl + y– move screen up one line (without moving the cursor)Ctrl + o– move backward through the jump historyCtrl + i– move forward through the jump history
H– move to the top of the screen (H=high)M– move to the middle of the screen (M=middle)L– move to the bottom of the screen (L=low)
Inserting Text
i– switch to insert mode before the cursorI– insert text at the beginning of the linea– switch to insert mode after the cursorA– insert text at the end of the lineo– open a new line below the current oneO– open a new line above the current oneea– insert text at the end of the wordEsc– exit insert mode; switch to command mode
Some of these commands switch between command and insert mode. By default, Vim launches in command mode, allowing you to move around and edit the file. To switch to command mode, use the Esc key.
On the other hand, the insert mode enables you to type and add text into the file. To move to insert mode, press i.

Editing Text
r– replace a single character (and return to command mode)cc– replace an entire line (deletes the line and moves into insert mode)C/c$– replace from the cursor to the end of a linecw– replace from the cursor to the end of a words– delete a character (and move into insert mode)J– merge the line below to the current one with a space in between themgJ– merge the line below to the current one with no space in between themu– undoCtrl+r– redo.– repeat last command
Note: Bear in mind that Vim undoes and redoes changes by entries (changes made within one insert mode session). For more details, refer to the article How to Undo and Redo Changes in Vim.
Cutting, Copying And Pasting
yy– copy (yank) entire line#yy– copy the specified number of linesdd– cut (delete) entire line#dd– cut the specified number of linesp– paste after the cursorP– paste before the cursor
Note: Find more commands and options in How to Cut, Copy, and Paste in Vim/Vi.
Marking Text (Visual Mode)
Apart from command mode and insert mode, Vim also includes visual mode. This mode is mainly used for marking text.
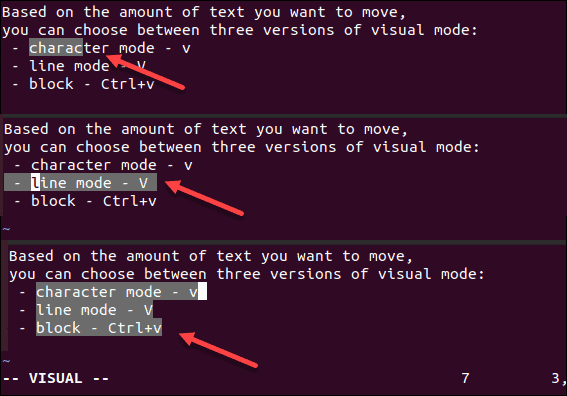
Based on the chunk of text you want to select, you can choose between three versions of visual mode: character mode, line mode, and block mode.
v– select text using character modeV– select lines using line modeCtrl+v– select text using block mode
Once you have enabled one of the modes, use the navigation keys to select the desired text.
o– move from one end of the selected text to the otheraw– select a wordab– select a block with ()aB– select a block with {}at– select a block with <>ib– select inner block with ()iB– select inner block with {}it– select inner block with <>
Visual Commands
Once you have selected the desired text in visual mode, you can use one of the visual commands to manipulate it. Some of them include:
y– yank (copy) the marked textd– delete (cut) the marked textp– paste the text after the cursoru– change the market text to lowercaseU– change the market text to uppercase
Search in File
*– jump to the next instance of the current word#– jump to previous instance of the current word/pattern– search forward for the specified pattern?pattern– search backward for the specified patternn– repeat the search in the same directionN– repeat the search in the opposite direction
Note: Searching in Vim/Vi is a task you will certainly perform often. Get to know all the search options in How To Search To Find A Word In Vim Or Vi Text Editor. To keep track of all the changes Vim shows how to use find and replace function.
Saving and Exiting File
:w– save the file:wq/:x/ZZ– save and close the file:q– quit:q!/ZQ– quit without saving changes:w new_file_name– save the file under a new name and continue editing the original:sav– save the file under a new name and continue editing the new copy:w !sudo tee %– write out the file using sudo and tee command
Note: Learn more about how to exit using Vim commands or shortcut keys with How To Exit (Quit) Linux Vim/Vi Editor.
Working with Multiple Files
:e file_name– open a file in a new buffer:bn– move to the next buffer:bp– go back to previous buffer:bd– close buffer:b#– move to the specified buffer (by number):b file_name– move to a buffer (by name):ls– list all open buffers

:sp file_name– open a file in a new buffer and split viewport horizontally:vs file_name– open a file in a new buffer and split viewport vertically:vert ba– edit all files as vertical viewports:tab ba– edit all buffers as tabsgt– move to next tabgT– move to previous tab

Ctrl+ws– split viewportCtrl+wv– split viewport verticallyCtrl+ww– switch viewportsCtrl+wq– quit a viewport- Ctrl+wx – exchange current viewport with next one
Ctrl+=– make all viewports equal in height and width
Marks and Jumps
m[a-z]– mark text using character mode (fromatoz)M[a-z]– mark lines using line mode (fromatoz)`a- jump to position markeda`y`a– yank text to position marked >a>`.– jump to last change in file`0– jump to position where Vim was last exited``– jump to last jump:marks– list all marks:jumps– list all jumps:changes– list all changesCtrl+i– move to next instance in jump listCtrl+o– move to previous instance in jump listg,– move to next instance in change listg;– move to previous instance in change list
Macros
qa– record macroaq– stop recording macro@a– run macroa@@– run last macro again
Enabling Vim Color Schemes
:colorscheme [colorscheme_name]– change to specified scheme:colorscheme [space]+Ctrl+d– list available Vim color scheme
The list of Vim color schemes shows you the ones that come by default with the text editor, as in the image below:

You can also configure the color settings manually or download user-made schemes. Find out how to do so in How to Change and Use Vim Color Schemes.
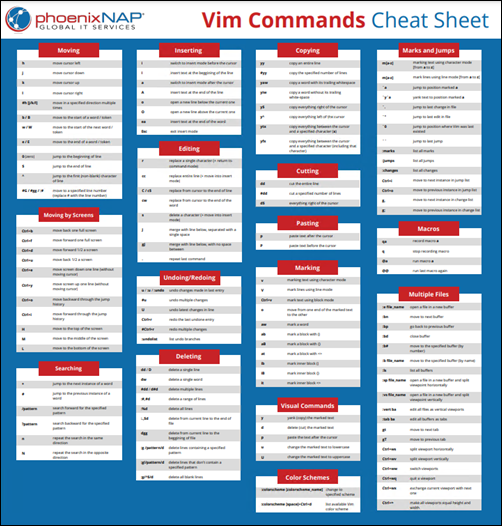
Vim Commands Cheat Sheet
This article includes a one-page Vim commands reference sheet. Save the cheat sheet in PDF format by clicking the Download Cheat Sheet button below.
Conclusion
Knowing basic Vim commands is useful as most Linux distributions have it installed by default. Once you get use to using Vim commands, mastering Vim should be simple.
Until then, keep a Vim cheat sheet at hand.
