Introduction
Python is a versatile programming language used for a wide range of applications, including web development, AI, scripting, data science, and much more. It is simple, versatile, and has a large development community.
Python is a cross-platform language and it is available on a majority of the popular operating systems, including Rocky Linux - an enterprise-grade OS designed for stability and ease of use.
In this tutorial, you will learn to install Python on Rocky Linux.

Prerequisites
- Rocky Linux installed and configured.
- A user account with root privileges.
Prepare the System
Prepare the system for the Python installation by updating the system package repository. Updating the package repository ensures that the latest available version of the program is installed.
Note: The key feature of Rocky Linux is stability, so the latest version available in the repository may not be the latest released version, but the most stable one. Each stable version is supported for several years.
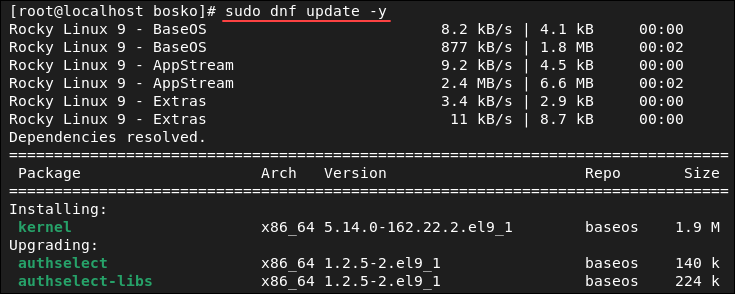
The default package manager for Rocky Linux is dnf, which is the one we will use in this tutorial. Run the following command to update the package repository and upgrade any available packages:
dnf update -y
Specifying the -y flag automatically answers yes to any prompts during the update. If you want to review the prompts, omit the flag.
Install Python
After the update finishes, install Python on Rocky Linux by running the following command:
dnf install python3 -yThe command installs Python and resolves all the required dependencies. After the installation completes, check if the installation was successful by running:
python -V
The output shows which Python version is installed.
Set Default Python Version
In case you have multiple Python versions installed, you can set the default one on your system. Check which Python versions are available on your system by running:
ls -ls /usr/bin/python* & ls -ls /usr/local/bin/python*
The output shows all the available Python versions. To change the default version, use the alternatives command:
alternatives --config pythonNote: Make sure that the different versions of Python are added to the alternatives command for it to work. Use the following syntax to add them:
alternatives --install [link] [name] [path] [priority]For example:
alternatives --install /usr/bin/python python /usr/bin/python3.9.14 1The command adds the specified binary as an alternative and sets the priority to 1.
In the interactive prompt, enter the number that defines the Python version you want to set as default and press Enter to confirm. The current default version is marked with a +.
After setting the default version, check if the settings are applied by running:
python -VSet Up a Virtual Environment
A virtual environment in Python is an isolated environment allowing users to install and manage Python packages with their own dependencies, separate from the system's global Python installation.
Python supports multiple environments on a single machine. Having multiple virtual environments is useful when working on multiple projects with different requirements, or when you want to test features without affecting your global Python environment.
Follow the steps below to set up a virtual programming environment:
1. Install Prerequisites
Before setting up a virtual programming environment for Python, make sure to install Rocky Linux Development Tools. The tools are a prerequisite that allow you to build and compile software from the source code.
Run the following command to install Rocky Linux Development Tools:
dnf groupinstall development -yWait for the installation to complete.
2. Choose Location
Choose which directory will contain the Python virtual environment. Either select an existing one, or create a new directory using the mkdir command:
mkdir [directory name]For this tutorial, we have created a new directory called python-test:
mkdir python-test3. Create Environment
Once you change the current directory to the one where you want to hold the virtual environment, use Python's built-in venv module to create the new virtual environment. The syntax is:
python -m venv [env_name]Replace [env_name] with a unique name for the environment. For example:

The command creates a new directory with the specified name and places a standalone Python installation and the pip package manager in the directory.
Use the ls command to check the files were created in the new directory:

4. Activate Environment
Before using the virtual environment, you must activate it. The syntax for activating the environment is:
source [env_name]/bin/activateFor example:

The command invokes the activation script in the bin directory and activates the virtual environment. We did not specify the [env_name] since we are already in the environment's directory.
Upon activation, the prompt changes to the name of your environment, which means it is now active. All Python packages are now installed in the virtual environment's local directory and don't affect your system's global Python environment.
Test Installation
To test the Python installation, we will create a simple script that returns an average value from a list of numbers. Follow the steps below:
Note: If you want to make a different program, follow our guide and create a calculator using Python.
1. A prerequisite for our program is the numpy package. Install the numpy package with pip, the Python package manager:
pip install numpy
2. Create a new Python file in the directory using a text editor. For example, we will create a file called average.py using the nano text editor:
nano average.py3. Paste the following code in the file:
import numpy as np
def calculate_average(numbers):
    average = np.mean(numbers)
    return average
if __name__ == '__main__':
    numbers = [1, 3, 5, 7, 9]
    average = calculate_average(numbers)
    print(f"The average number of {numbers} is {average:.2f}")
The code takes a list of numbers as an argument, numpy calculates the average, and returns the result. There is also a test case that uses the calculate_average function to calculate the average of the list and prints the result.
4. Save and close the file.
5. Run the Python program:
python average.py
6. When you finish working on the project, deactivate the virtual environment using the following command:
deactivate
Conclusion
This tutorial explained how to install Python on Rocky Linux and how to set up a virtual environment to test the installation. Python is a highly versatile programming language, and when combined with Rocky Linux, they offer a stable and powerful coding solution.
In our other Python tutorials, learn about string slicing, see how to append a string in Python, or learn to substring a string in Python.