Introduction
Dynamic pod scaling is a Kubernetes feature that makes it easy to control resource utilization and ensure that an adequate number of pods are running. Kubernetes supports three types of autoscaling: horizontal, vertical, and cluster scaling.
This article will explain horizontal pod autoscaling (HPA) and provide steps to configure it in your cluster.
Prerequisites
- Kubernetes cluster with kubectl installed.
- Docker Hub account.
What Is Horizontal Pod Autoscaling?
Horizontal pod autoscaling allows Kubernetes to deal with increased or decreased loads by scaling the number of pod replicas related to a specific deployment or stateful set. While vertical scaling means assigning more resources to the running pods, horizontal scaling creates or removes pods within the same resource allocation.
How Does Horizontal Pod Autoscaling Work?
The Kubernetes object that enables horizontal pod autoscaling is called HorizontalPodAutoscaler (HPA). The HPA is a controller and a Kubernetes REST API top-level resource.
The HPA is an intermittent control loop - i.e., it periodically checks the resource utilization against the user-set requirements and scales the workload resource accordingly. The default interval for HPA checks is 30 seconds. Use the --horizontal-pod-autoscaler-sync-period controller manager flag to change the interval value.
The autoscaling/v1 API version of the HPA only supports the average CPU utilization metric. The autoscaling/v2 API version allows scaling according to memory usage, defining custom metrics, and using multiple metrics in a single HPA object.
How to Configure Horizontal Pod Autoscaling?
As an illustration of the horizontal pod autoscaling capabilities, this article will show you how to:
- Create a test deployment.
- Create an HPA via the command line or use the declarative approach.
- Apply custom metrics.
- Apply multiple metrics.
Create a Deployment
The following section shows how to create a Docker image for a small PHP app that performs a resource-intensive calculation.
1. Create the app directory:
mkdir test-app2. Create a Dockerfile in a text editor:
nano Dockerfile3. Put the following contents into the file:
FROM php:5-apache
COPY index.php /var/www/html/index.php
RUN chmod a+rx index.php
4. Create the index.php file:
nano index.php5. Add the mathematical operation to the file to create a CPU load:
<?php
  $x = 0.0001;
  for ($i = 0; $i <= 1000000; $i++) {
    $x += sqrt($x);
  }
  echo "OK!";
?>
6. Build the Docker image:
docker build -t test-app:v1 .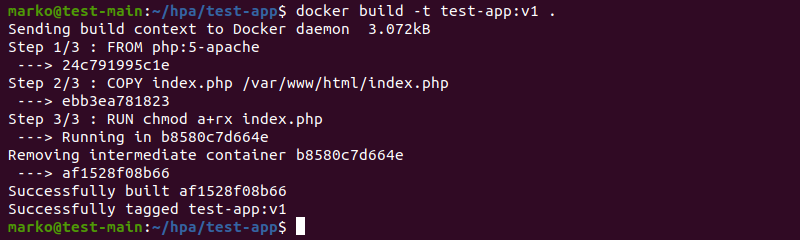
7. Tag the image. Use your Docker Hub account username:
docker image tag test-app:v1 [your-docker-hub-username]/test-app:v18. Push the image to Docker Hub by typing:
docker image push [your-docker-hub-username]/test-app:v1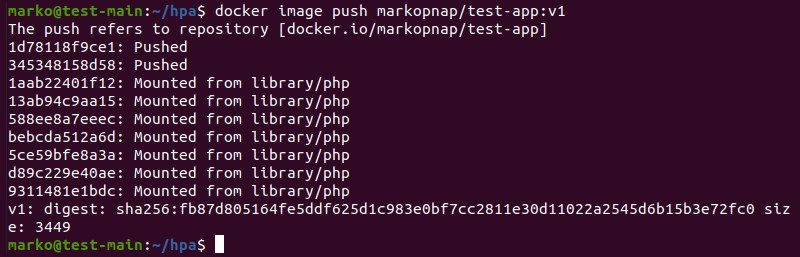
9. Create a deployment YAML in a text editor:
nano hpa-test.yaml10. The YAML defines the deployment and the service that exposes it. The spec.template.spec.containers section specifies that the deployment uses the Docker image created in the previous steps. Furthermore, the resources sub-section contains resource limits and requests.
apiVersion: apps/v1
kind: Deployment
metadata:
  name: hpa-test
spec:
  selector:
    matchLabels:
      run: hpa-test
  replicas: 1
  template:
    metadata:
      labels:
        run: hpa-test
    spec:
      containers:
      - name: hpa-test
        image: markopnap/test-app:v1
        ports:
        - containerPort: 80
        resources:
          limits:
            cpu: 500m
          requests:
            cpu: 200m
---
apiVersion: v1
kind: Service
metadata:
  name: hpa-test
  labels:
    run: hpa-test
spec:
  ports:
  - port: 80
  selector:
    run: hpa-test
11. Create the deployment by using the kubectl apply command:
kubectl apply -f hpa-test.yaml
The output confirms the successful creation of the objects.

12. Confirm that the objects are ready and running.
kubectl get all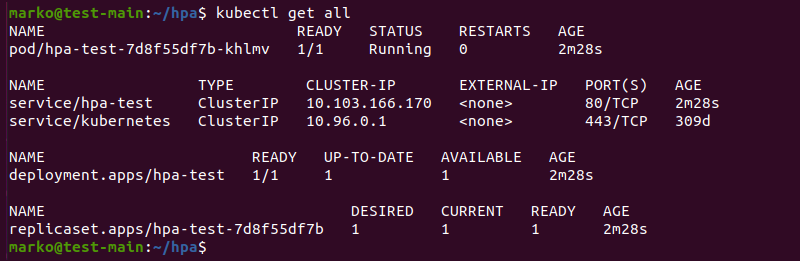
Note: Our BMC solution lets you provision and decommission servers quickly and automatically. BMC also supports on-demand resource scaling and pay-per-use billing models.
Create HPA
With the deployment up and running, proceed to create a HorizontalPodAutoscaler object. The sections below illustrate the two methods for creating HPAs.
Create HPA via kubectl Command
Create an HPA using the kubectl autoscale command.
kubectl autoscale deployment hpa-test --cpu-percent=50 --min=1 --max=10The --cpu-percent flag sets the CPU utilization percentage limit that triggers the autoscaler. The --min and --max flags specify the minimal and maximal number of pod replicas, i.e., the range within which the HPA is allowed to scale.

Create HPA via YAML Manifest
Alternatively, create the HPA declaratively by defining it in a YAML file.
1. Create the hpa.yaml file:
nano hpa.yaml2. The YAML contains spec.minReplicas, spec.maxReplicas, and targetCPUUtilizationPercentage fields that correspond to the --min, --max, and --cpu-percent flags in the command-line method for creating HPAs.
apiVersion: autoscaling/v1
kind: HorizontalPodAutoscaler
metadata:
  name: hpa-test
spec:
  scaleTargetRef:
    apiVersion: apps/v1
    kind: Deployment
    name: hpa-test
  minReplicas: 1
  maxReplicas: 10
  targetCPUUtilizationPercentage: 50
3. Create the HPA with kubectl apply:
kubectl apply -f hpa.yamlIncrease the Load
Before increasing the load to see the HPA in action, use kubectl get to check the status of the controller.
kubectl get hpaThe TARGETS column in the output shows that no load is generated. Consequently, the number of created pod replicas is still one.

Now increase the CPU load using the load generator. Execute the following command in a new terminal tab/window:
kubectl -n default run -i --tty load-generator --rm --image=busybox --restart=Never -- /bin/sh -c "while sleep 0.01; do wget -q -O- http://hpa-test; done"The command uses the busybox image to generate load and repeatedly query the hpa-test deployment. The deployment performs mathematical operations and engages the CPU.
In the first terminal tab/window, type the following command to watch the status of the HPA:
kubectl get hpa -wAfter a short time, the TARGETS column shows that the CPU load exceeds the limit specified upon the HPA creation. Consequently, the HPA increases the number of replicas to match the current load.

Stop Generating Load
To stop generating the CPU load, switch to the load generator terminal tab/window and press CTRL+C.
Type the following command to confirm that the number of replicas is back to one.
kubectl get hpa
Autoscaling Based on Custom Metrics
The autoscaling/v2 API version allows you to create custom metrics to trigger the HPA. To switch to autoscaling/v2, convert the deployment YAML into the new format with the following command:
kubectl get hpa hpa-test -o yaml > /tmp/hpa-v2.yamlOpen the new file and inspect its contents. The main change compared to autoscaling/v1 is the introduction of the spec.metrics section in which you can describe the metrics and create custom ones.
apiVersion: autoscaling/v2
kind: HorizontalPodAutoscaler
metadata:
  name: hpa-test
spec:
  scaleTargetRef:
    apiVersion: apps/v1
    kind: Deployment
    name: hpa-test
  minReplicas: 1
  maxReplicas: 10
  metrics:
  - type: Resource
    resource:
      name: cpu
      target:
        type: Utilization
        averageUtilization: 50
For example, to create a memory-related HPA condition, type the following in the spec.metrics section:
  metrics:
  - type: Resource
    resource:
      name: memory
      target:
        type: AverageValue
        averageValue: 50Mi
Kubernetes enables several custom metrics to be used for the HPA, including:
- Load balancer traffic.
- Outbound connections.
- Queue depth.
- Latency of a function or dependency.
- Request latency, etc.
Autoscaling Based on Multiple Metrics
The spec.metrics field in autoscaling/v2 allows setting up multiple metrics to be monitored by a single HPA. To specify more than one metric in a YAML, list them one after another. For example, the following section defines both CPU and memory metrics:
  metrics:
  - type: Resource
    resource:
      name: cpu
      target:
        type: Utilization
        averageUtilization: 30
  - type: Resource
    resource:
      name: memory
      target:
        type: AverageValue
        averageValue: 50Mi
HPA Best Practices
Consider the points below if you decide to use horizontal pod autoscaling:
- Ensure that the metrics-server is running on your cluster, providing your HPA with per-pod metrics.
- It is recommended to apply the HPA to the workload resources, not on the replication controllers themselves.
- Create HPAs using YAML files. The command-line method makes it more difficult to version-control.
- If you employ custom metrics, ensure that you use the correct target type for pods and objects.
- Define pod resource requests to help the HPA optimize the scaling process and keep metrics calculations accurate.
- Using microservice architecture is a great way to ensure that your deployment takes full advantage of horizontal autoscaling.
- Adding native support for parallel pods allows the HPA to create and terminate pods in parallel, speeding up the process.
HPA Limitations
Although the HPA is very useful in configuring horizontal scaling for your project, it still has certain limitations:
- You cannot use the HPA to scale DaemonSets.
- If vertical pod scaling is set up on the system, the HPA may conflict.
- If pod memory and CPU limits are not set properly, pods may terminate unexpectedly.
- You can use the HPA only on apps that can run on multiple pods.
- The HPA is limited by cluster capacity and may eventually require setting up cluster scaling.
- The HPA does not take network and storage capacity into account, so using it may cause outages.
Conclusion
The article introduced you to the concept of horizontal pod autoscaling and the HorizontalPodAutoscaler controller in Kubernetes. After reading the guide, you are better acquainted with the benefits and limitations of the HPA and the ways to configure it on your deployment.
