Introduction
MySQL allows administrators to export and import databases using built-in and third-party tools. Exporting a database creates a dump file that can later be imported to any MySQL deployment, making it easy to back up and migrate between different systems.
This tutorial will walk you through how to export a MySQL database and import it from a dump file.
Prerequisites
- MySQL installed (see our tutorials for Ubuntu and Windows).
- MySQL root user access.
- Command-line access.
- (optional) cPanel access (for the phpMyAdmin method).
- (optional) MySQL Workbench installed.
How to Export MySQL Database
MySQL provides multiple ways to export database content, including the CLI, web UI, and GUI methods. The following sections provide tutorials for exporting MySQL databases using mysqldump, phpMyAdmin, and MySQL Workbench.
Exporting MySQL Database With mysqldump
Note: The commands below can all be run with a root database user account. If you already have another user account with sufficient privileges, you can use it instead. You may also add a new MySQL user account.
MySQL includes the mysqldump command that creates a dump file with all the data related to the specified database. Once generated, the file can be shared or used as a backup.
Follow the steps below to export a MySQL database to a dump file:
1. Enter the following command in a terminal window, replacing [database] with the database name and [dump-file] with a custom name for the SQL file:
mysqldump –u root –p [database] > [dump-file].sqlIf successful, the command provides no output. The dump file is saved to the current working directory.
To run the command in Windows, provide the full path to the mysqldump.exe. For example:
C:\tools\mysql\current\bin\mysqldump -u root -p [database] > [dump-file].sqlNote: To avoid typing the full path, learn to set environment variables in Windows and add mysqldump to the Path variable.
2. Confirm the export in Linux by entering:
head –n 5 [dump-file].sql
In Windows, use the Get-Content command:
Get-Content -TotalCount 5 dump-file.sqlThe system prints the first five lines of the specified dump file. Check the Database field to confirm the correct database has been exported.

Note: The dump file is saved to the current working directory from which you run it.
Exporting MySQL Database Using phpMyAdmin
Server and site management platforms, such as cPanel, often include phpMyAdmin, a webUI program for managing web servers. If you have access to cPanel and want to export a database from a web server, follow the steps below to perform this action with phpMyAdmin:
1. Log into cPanel.
2. In the Databases section, select phpMyAdmin.
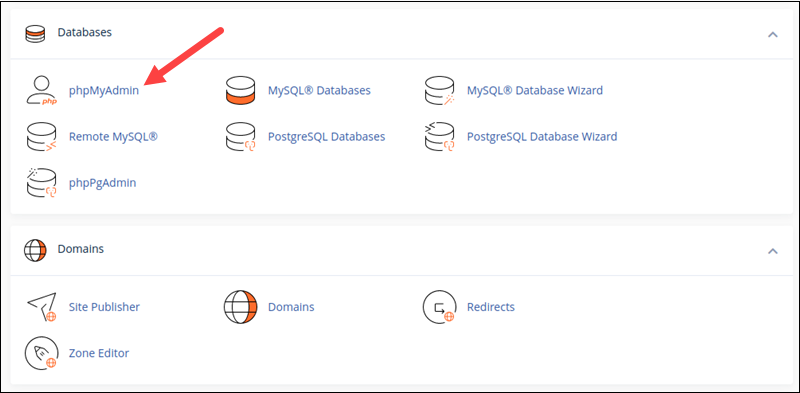
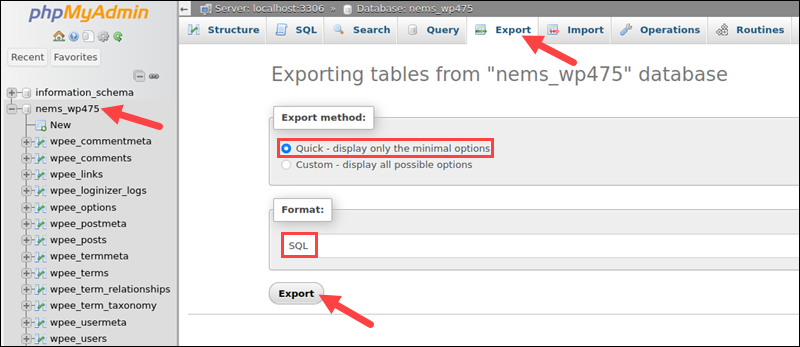
3. Select the database to export in the menu on the left side of the main phpMyAdmin window. Wait for the database to load.
4. Select the Export tab from the tab bar at the top of the window.
5. Set the export method to Quick.
6. Ensure the export format is SQL.
7. Select Export to download the dump file to the local system.
Exporting a MySQL Database via MySQL Workbench
MySQL Workbench is a GUI tool for MySQL database management, available for Linux, Windows, and macOS. Proceed with the following steps to export a dump file using MySQL Workbench:
1. Launch MySQL Workbench and connect to the MySQL database.
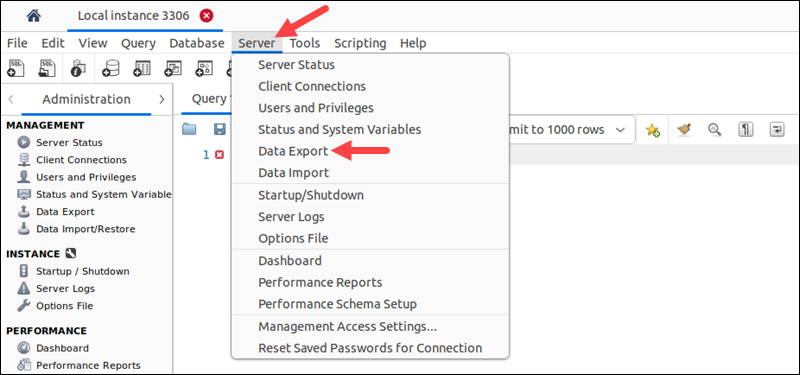
2. Select the Server item in the menu bar.
3. Choose Data Export from the menu.
4. Select the databases to export in the Expo Schema section.
5. Choose the Export to Self-Contained File option in the Export Options section.
6. Click the Start Export button to start the process.
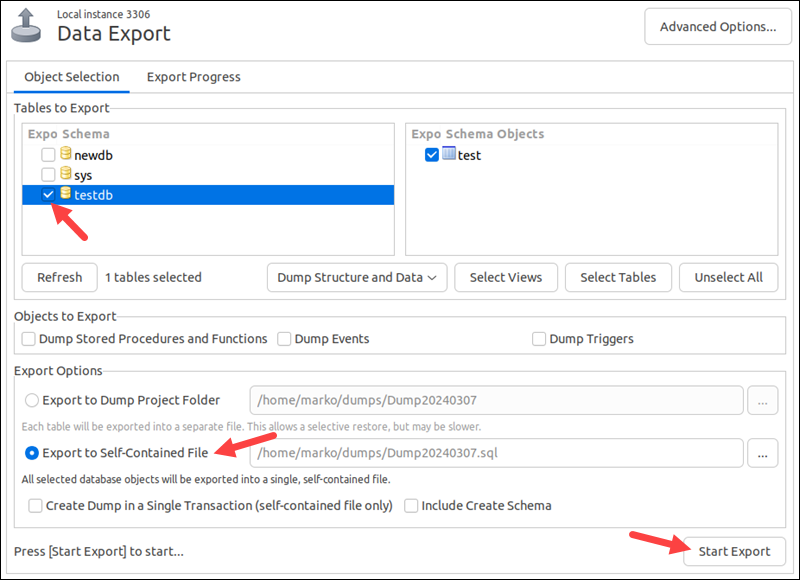
Workbench generates the file and places it in the directory listed next to the selected export option. By default, the file is in the /home/[user]/dumps directory.
How to Import MySQL Database
All the environments listed in the section on exporting MySQL databases can also be used to import databases to the local MySQL deployment. Refer to the relevant section below to learn how to import dump files using MySQL CLI, phpMyAdmin, and MySQL Workbench.
Importing MySQL Database Using mysqldump
Importing a database requires the local MySQL installation to have at least one database set up. If you are starting from scratch, set up a blank database by following the steps below:
1. Launch the MySQL shell:
mysql –u root –p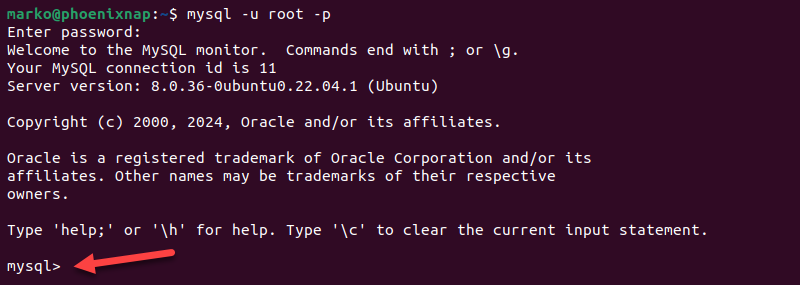
On Windows, use the following command to launch MySQL:
[path-to-mysql-binary]\mysql –u root –p2. Enter the root password when prompted. The mysql command prompt appears.
3. Create a new database by entering the command below. Replace [database] with a database name.
CREATE DATABASE [database];
The system returns the Query OK message.
4. Exit the MySQL shell by pressing Ctrl-D or typing exit.
With a database set up, proceed with the following steps to import the dump file:
1. Type the command below, replacing [database] with the name of the database you want to use and [dump-file] with the file containing a database backup:
mysql –u root –p [database] < [dump-file].sqlOn Windows, type the full path to the mysql.exe program. For example:
C:\tools\mysql\current\bin\mysql –u root –p [database] < [dump-file].sqlNote: When executing the command above, ensure that the dump file is in the current working directory. Alternatively, provide the full path to the file.
A successful import does not produce an output.
2. To check the database, log back into the MySQL shell and load the database by entering:
USE [database];Replace [database] with the database that received the imported data.

3. Display the contents of the database by typing:
SHOW TABLES;Check if the tables from the imported database are present in the system.

Importing MySQL Database With phpMyAdmin
Follow the steps below to import a dump file into the new database using the phpMyAdmin web interface:
1. Log into cPanel.
2. In the Databases section, select phpMyAdmin.
3. In the left column, select the database to import to.
4. Click the Import tab in the tab bar.
5. In the File to Import section, select Browse and provide the location of the dump file.
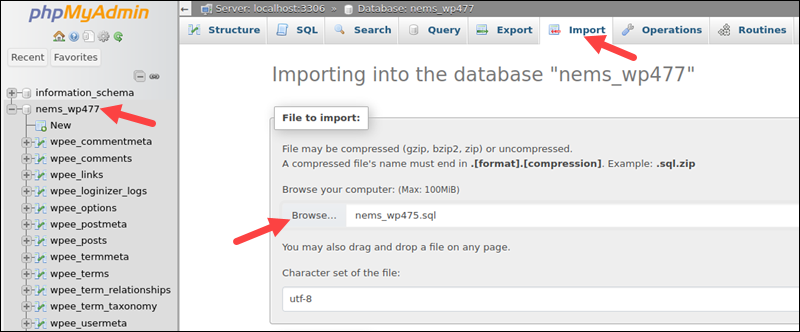
6. Set the import format to SQL.
7. Select Import.

phpMyAdmin reads the file and imports its contents.
Importing MySQL Database via MySQL Workbench
MySQL Workbench features flexible import options, allowing for selective imports, various formats, encodings, etc. The following procedure shows how to import an SQL file into a MySQL database using MySQL Workbench.
1. Select the Server item from the menu bar.
2. Choose Data Import from the menu that appears.
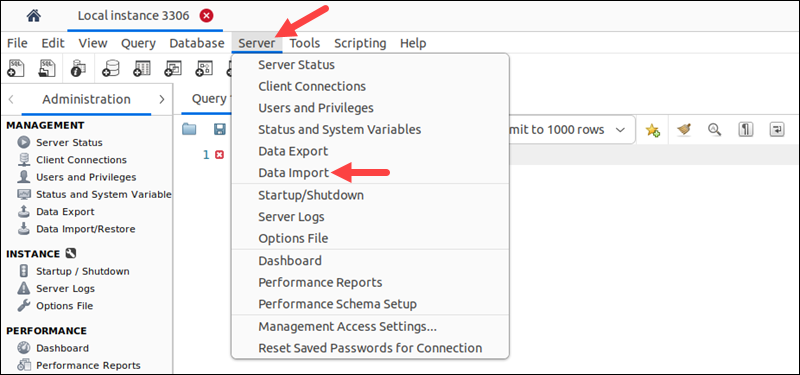
The Data Import window opens.
3. Select Import from Self-Contained File in the Import Options section. Provide the path to the dump file.
4. Choose an existing database for the Default Target Schema. To create a new database, select the New button.
5. Select Start Import.
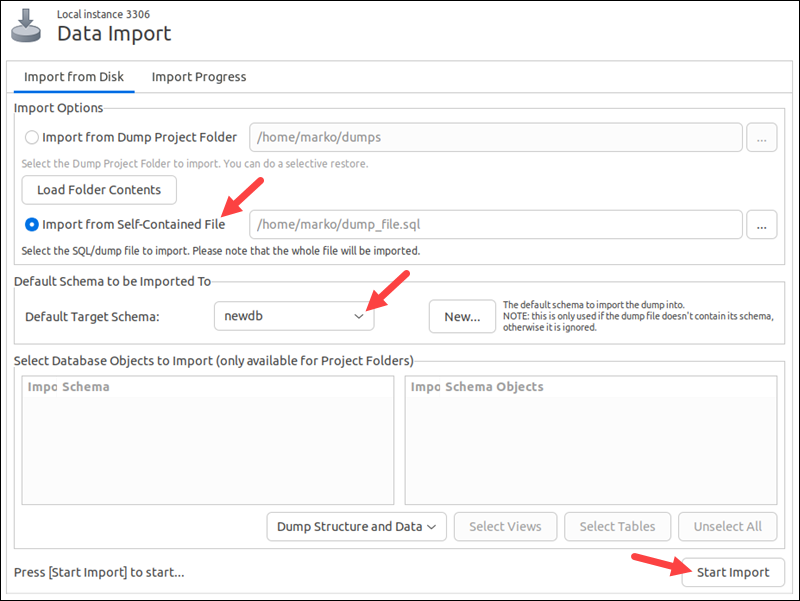
MySQL imports the contents of the dump file to the default target schema.
Conclusion
After reading this guide, you should know how to export and import a MySQL database. The methods included using the command line, server management web UI, and a graphical utility.
Next, check out our article on how to easily export from MySQL database table to CSV and how to import CSV into MySQL table.
