Introduction
Effective MySQL database management relies on a robust backup and restore strategy. This process is crucial for safeguarding data integrity and minimizing downtime.
By routinely backing up and efficiently restoring databases, businesses can mitigate the risks of data loss. This process ensures uninterrupted operations and swift recovery in the face of unforeseen events.
In this tutorial, we present two easy ways to back up and restore a MySQL Database.

Prerequisites
- A Linux operating system.
- MySQL installed (install MySQL on Ubuntu, CentOS 7, CentOS 8).
- An existing database.
How to Back Up MySQL Database?
You can back up a MySQL database using command-line tools, graphical user interfaces, and third-party tools. The most common methods are explained below.
Method 1: Back up MySQL Database Using mysqldump
mysqldump is the native MySQL backup solution. It allows the user to create a backup with a single command. The syntax is:
sudo mysqldump -u username -p dbname > backup.sql- Replace
usernamewith your MySQL username. dbnameis the database name you want to back up.- Replace
backup.sqlwith the desired name for the backup file.
For example:

When prompted, enter your password and press Enter to confirm. Wait for the process to complete.
Method 2: Back up MySQL Database Using phpMyAdmin
phpMyAdmin uses the Export function to create backups. Follow the steps below:
1. Open phpMyAdmin. In the directory tree on the left, click the database you want to back up.
Doing so opens the directory structure in the right-hand window. You will also notice that all the assets under the main database are highlighted in the directory tree.
2. Click the Export tab.
3. Select Quick in the Export Method section to save a copy of the whole database. Choose Custom to select individual tables or other special options. Leave the Format field set to SQL unless you have a good reason to change it.
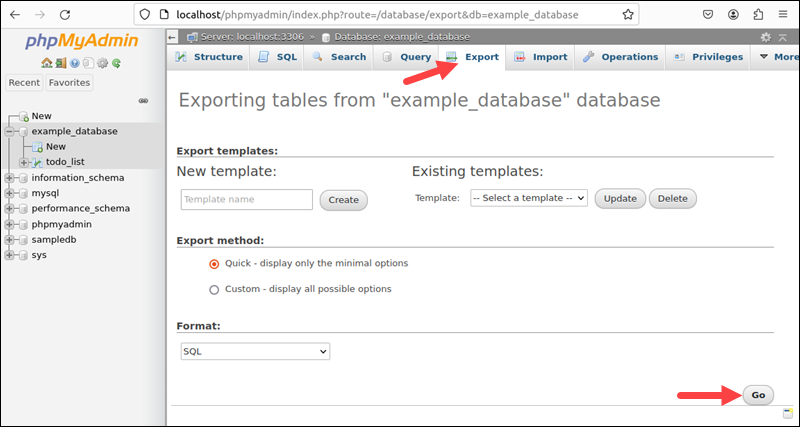
4. Click Go to start the process.
If you selected Quick, the web browser downloads a copy of the database into your specified downloads folder. You can copy it to a safe location.
Method 3: Back up MySQL Database Using Workbench
MySQL Workbench is a GUI that includes features for managing and performing backups of MySQL databases. Follow the steps below to back up a MySQL database using MySQL Workbench:
1. Launch MySQL Workbench and connect to your MySQL server.
2. In the MySQL Workbench home screen, select the Data Export option in the Management section in the sidebar.
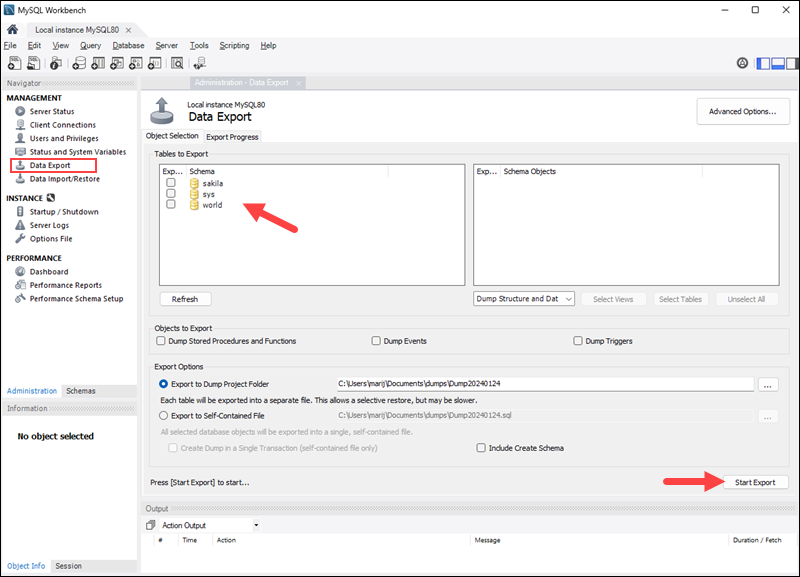
3. Select the database you want to back up from the list of available databases in the Data Export wizard.
4. Choose where you want to store the backup. Select a project folder or a self-contained file.
5. Configure backup options such as the backup method (complete or partial backup), compression, and other settings.
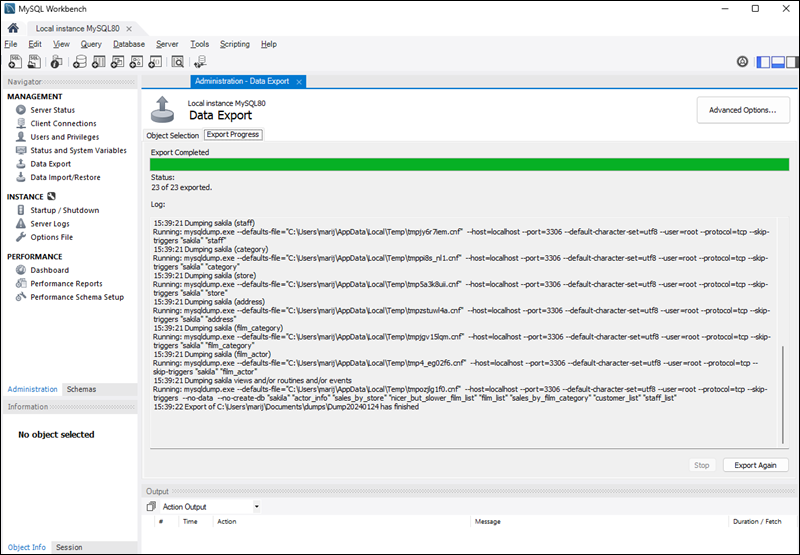
6. Review the configured settings and click the Start Export button to start the backup process.
The Backup Wizard displays the backup progress and a confirmation when it is completed.
Method 4: Back up MySQL Database Using a File System Snapshot
Backing up a MySQL database using a file system snapshot involves creating a snapshot of the underlying file system that stores the MySQL data files. This method allows you to create a point-in-time copy of the entire database without interrupting the MySQL service.
Follow the steps below to back up a MySQL database using a file system snapshot:
1. Identify your MySQL data directory location. The data directory is where MySQL stores its databases, tables, and other data files. The default location varies depending on your operating system. On Linux, the data directory is typically /var/lib/mysql/, while on Windows, it is C:\Program Files\MySQL\MySQL Server X.X\data\.
2. Before taking the snapshot, it's essential to pause or lock MySQL writes to ensure data consistency. In the MySQL prompt, use the following SQL command:
FLUSH TABLES WITH READ LOCK;
The command flushes all tables and prevents further write operations.
3. Create a snapshot using the tools provided by your file system or storage solution. The commands depend on your file system. For example, if you are using LVM (Logical Volume Manager) on Linux, use the command below:
lvcreate --snapshot --name mysqldata_snapshot --size 1G /dev/mapper/mysqlvg-mysqldataThe command creates a snapshot of the MySQL data volume.
4. After taking the snapshot, unlock MySQL writes by running:
UNLOCK TABLES;5. After creating the snapshot, you can back it up to another location or storage system, such as a different server, disk, or cloud storage service.
Method 5: Back up MySQL Database Using the Binary Log
MySQL binary logging allows users to log changes to their MySQL database. It provides a way to perform various tasks, including point-in-time recovery, replication, and backup. Follow the steps below to use binary logs for backup:
1. Make sure that binary logging is enabled in your MySQL configuration file (my.cnf or my.ini).
- In Linux, the file path is usually /etc/mysql/my.conf
- In Windows, the path is C:\ProgramData\MySQL\MySQL Server XX\my.ini.
2. Open the file using a text editor and look for the log_bin line. If it is not present or commented out, add it or uncomment it:
log_bin = /path/to/mysql-binReplace /path/to/mysql-bin with the desired path for your binary log files.
3. Verify the binary log-related configuration options using the following SQL command to check the current binary log status:
SHOW VARIABLES LIKE 'log_bin%';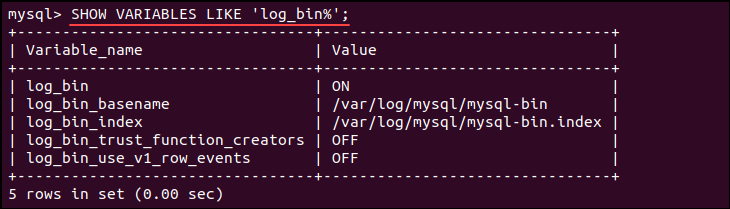
4. Before you start binary logging, create a full database backup. You can use tools like mysqldump or other backup methods to create a baseline backup.
5. Start binary logging by running the following SQL command in the MySQL shell:
SET GLOBAL log_bin = ON;5. Manually copy the binary log files to another location as a backup. Alternatively, use tools like mysqlbinlog to extract the SQL statements from the binary logs and save them to a file. The syntax is:
mysqlbinlog mysql-bin.xxxxxx > backup.sqlReplace mysql-bin.xxxxxx with the binary log file name.
Note: Binary logs consume disk space, so make sure to manage log rotation and retention policies. Keep in mind that binary logging is just one component of a comprehensive backup strategy. Full backups, incremental backups, and other methods should be considered for a robust backup plan.
How to Restore MySQL Database
There are several ways to restore a MySQL database, and the method you choose depends on factors such as the backup format, the database size, and the specific requirements of your setup.
The sections below show different ways of restoring a MySQL database.
Method 1: Restore All Databases in MySQL
The mysqldump utility allows you to restore a single database or all databases on the server in bulk. To restore all databases in MySQL, use the mysql command-line tool with an SQL dump file that contains the structure and data for all databases.
Follow the steps below:
1. Note the location of your SQL dump file containing the structure and data for all databases.
2. Use the mysql command to restore the dump file. The syntax is:
mysql -u username -p < backup.sql- Replace
usernamewith your MySQL username. - Replace
backup.sqlwith the path to your SQL dump file.
For example:

The command reads the SQL commands from the dump file and executes them to recreate all the databases.
After running the above command, MySQL prompts you for the password. Provide it and press Enter to confirm. It may take a long time to restore the databases if the SQL dump file is large. Also, ensure you have sufficient privileges to create databases and tables.
Method 2: Restore MySQL Database Using phpMyAdmin
phpMyAdmin is a popular web-based administration tool for MySQL. It is a convenient option for smaller databases. However, other methods like command-line tools or MySQL clients are more suitable for larger databases or when you need more control over the restoration process.
Follow the steps below to restore a MySQL database using phpMyAdmin.
1. Clear Old Database Information
It's important to clear old data before restoring a backup. If there is old data, it isn't overwritten when you restore the backup, causing duplicate tables, errors, and conflicts.
1. Open phpMyAdmin, and from the navigation pane on the left, choose the database you want to restore.
2. Select the Check all box near the bottom and click the Drop button to clear the old data.
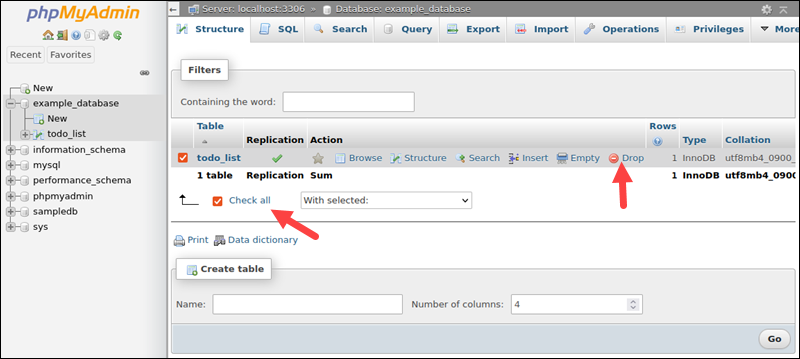
3. The tool prompts if you want to proceed. Click Yes.
The process removes the existing data, clearing the way for restoring the database.
2. Restore Database Information
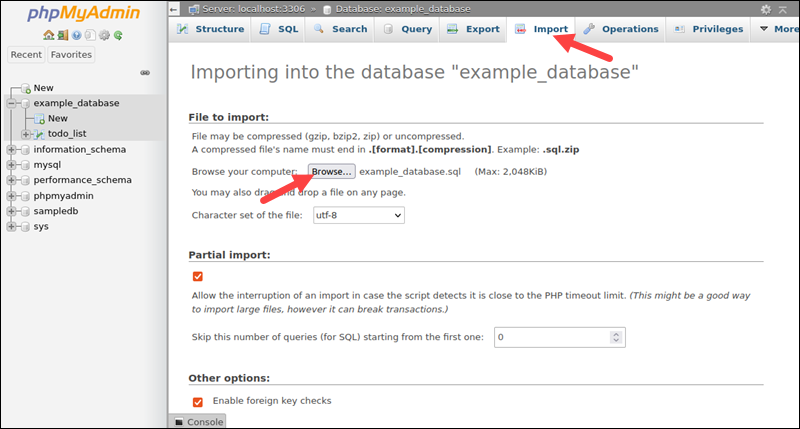
In phpMyAdmin, use the Import tool to restore a database.
1. In the top menu, click Import.
2. The first section is labeled File to import. A couple of lines down, there's a button labeled Browse.... Click the button and find the backup file.
3. Use the dialog box to find the export file you want to restore. Leave all the options set to default. If you created your backup with different options, you can select them here.
4. Click Go to start the process.
The program outputs the details and states whether the restore has been completed successfully.
Note: Depending on the server configuration, there are limitations on the file size you can upload through phpMyAdmin. If your SQL dump file is too large, consider using other methods like the command line or breaking the file into smaller parts. Additionally, if the restoration process takes a long time, it could be interrupted because the PHP web server has timeout limits.
Method 3: Restore a Specific Table in MySQL Database
To restore a specific table in MySQL, you can use the mysql command-line tool or a MySQL graphical user interface like MySQL Workbench. For this section, we will use the command line.
Assuming you have an SQL dump file that contains the specific table you want to restore, use the following syntax:
mysql -u username -p dbname < backup.sql- Replace
usernamewith your MySQL username. dbnameis your database name.- Replace
backup.sqlwith the path to your SQL dump file.
To restore a specific table from the dump file, use the --tables option along with the mysql command:
mysql -u username -p dbname --tables table_name < backup.sqlReplace table_name with the name of the specific table you want to restore.
Method 4: Restore MySQL Database Using Workbench
MySQL Workbench is a graphical tool that provides a user-friendly interface for managing MySQL databases. You can use it to restore a database from a backup file. Keep in mind that the exact steps and options may vary depending on the program version. If you encounter any issues, consult the documentation for your specific version.
Follow the steps below to restore a database using the MySQL Workbench:
1. Launch MySQL Workbench and connect to your MySQL server.
2. In the Navigator panel on the left, under Management, click the Data Import/Restore option.
3. In the Data Import window, choose the source of your backup data. Depending on your backup type, keep the selected Dump Project folder option or select the Import from Self-Contained File. Click the three dots (…) to find the SQL dump file or folder you want to restore.

The Import Options section allows you to configure various options such as target schema, specific objects to import, etc.
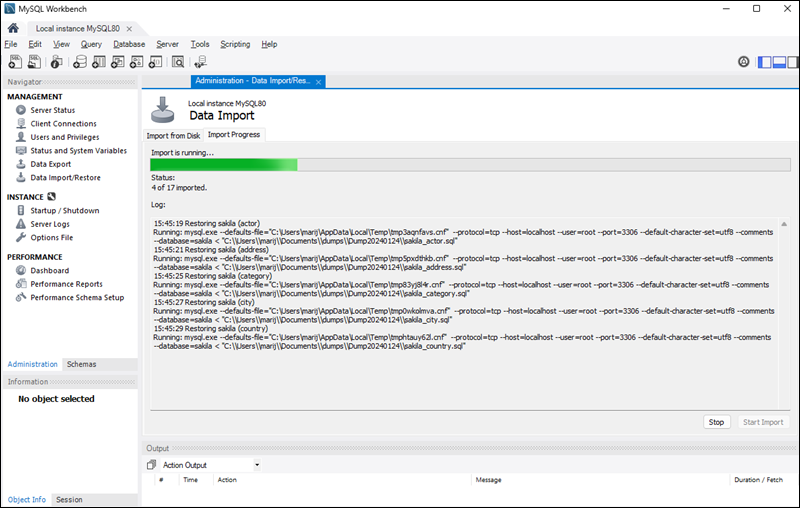
4. After configuring the import options, click the Start Import button to begin the restoration process.
MySQL Workbench displays the restore operation progress. You can monitor the status, and any errors or warnings will be shown in the log.
Method 5: Restore Database Using Binary Logs
Restoring a MySQL database using binary logs involves replaying the sequence of events recorded in the binary log files to bring the database to a specific point in time. It is typically used for point-in-time recovery or for restoring data after a specific event.
Use the mysqlbinlog utility to apply the binary logs and restore a database to the desired point in time. Follow the steps below:
Note: Before proceeding with the restoration, it's a good practice to create a backup of the existing database in case something goes wrong.
1. Open the terminal and use the following syntax to apply the binary logs and restore the database:
mysqlbinlog mysql-bin.xxxxxx | mysql -u username -p- Replace
mysql-bin.xxxxxxwith the path to the binary log file. - The
usernameis your MySQL username.
Enter your MySQL password and wait for the process to complete.
2. Restart the MySQL Server by running:
sudo service mysql restartThe restoration is now complete, and you can continue using the server.
Conclusion
The article showed you how to back up and restore a MySQL Database using different methods. If you want to learn more about how to perform regular MySQL backups, check out our article about setting up master-slave replication in MySQL.
To learn about different ways to analyze and repair a database, read our article on how to repair MySQL database.